1 Introduction
Part 22 of the “DASLIGHT / DVC4 HOW TO Course” is about learning how to create scenes.
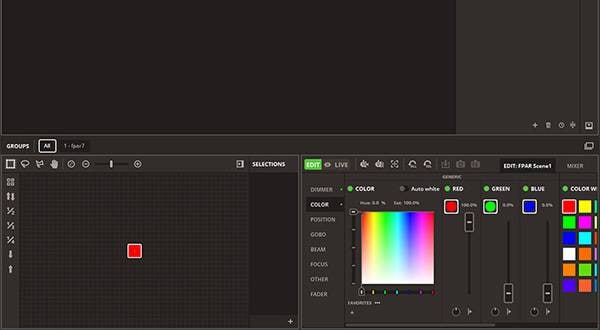
2 Create Scenes
Here in the “Edit” section, you can save a static scene where all the lights illuminate the center of the room in red, or you can also save a dynamic scene where the lights change color from red, green, and then to blue.
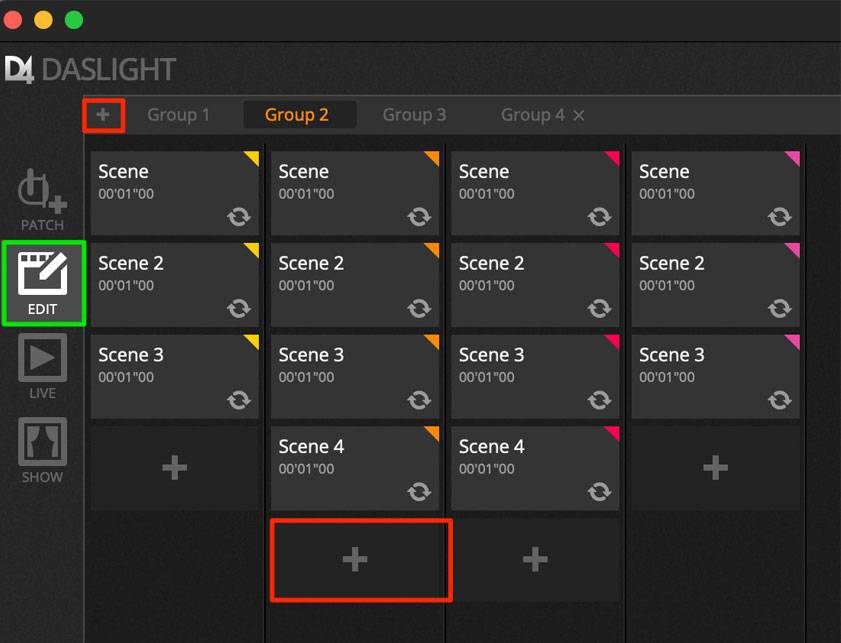
Scenes can be arranged into multiple groups. By default, you can simultaneously play one scene per group. Groups can be categorized and saved according to the effect types you want to use, for example, an LED par light group, a moving head group, and a strobe group.
Scenes are organized in a grid view with the groups arranged into columns. Click on the large “+” to add a scene to a group. To create a new group, click on the small “+” in the top left.
3 Steps
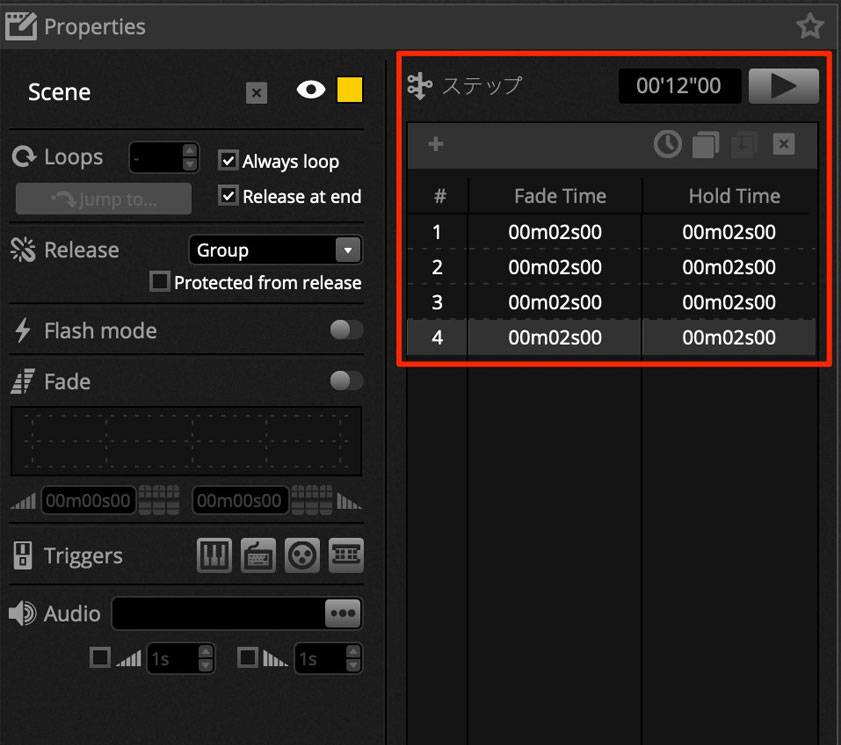
A scene can have one or more steps.
Each step is stored in a static state, and dynamic effects can be achieved by adding multiple steps with fade and hold times.
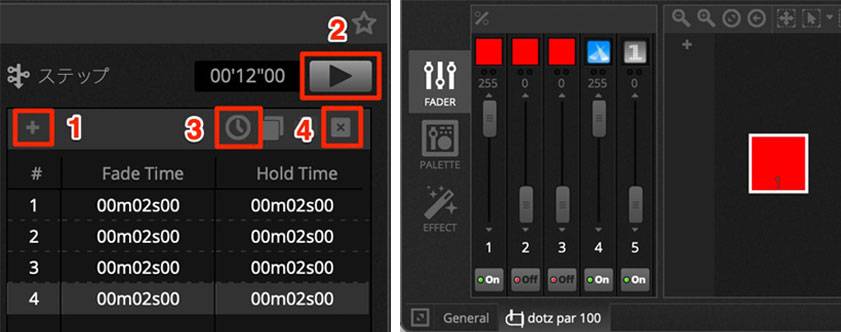
To create a new step, click on the “+” (*1).
If you change the DMX values of a fader or palette, the data will be immediately saved into the selected step. Fade and hold times can be changed by double-clicking on the step.
The example above is demonstrating a scene 4 steps each with a 2-second fade time and a 2-second hold time.
In this case, the set DMX values will be held for 2 seconds and then gradually move to the next values over the next 2 seconds. When the last step has been reached, the scene will loop back to the first step. To preview the scene, click the “Play” button (*2).
To edit multiple steps at once, select a step and then hold
Windows: “Ctrl” key
Mac: “command” key
While holding, select the steps you want to modify.
You can also hold the “Shift” key and select multiple steps to change within the range you selected.
To change the fade and hold times of the steps you selected, click the “Time Settings” button (*3).
Steps can also be rearranged by dragging and dropping them. To delete a step, press the Backspace/Delete key or click the “Remove Step” button (*4).
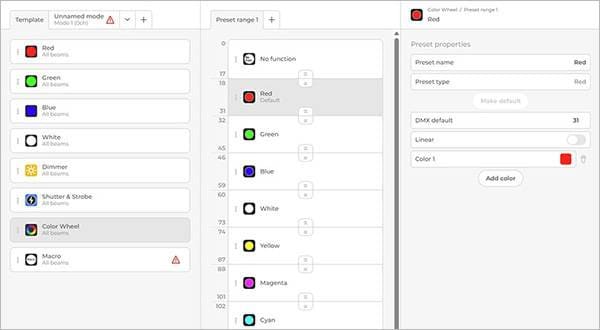
4 Scene Properties
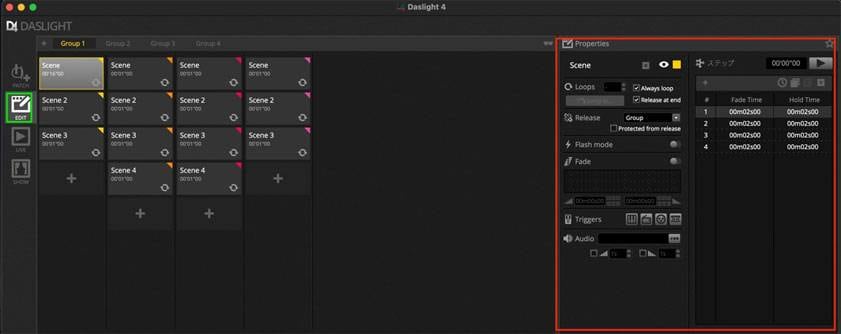
The properties of the selected scene will be displayed on the right of the Edit window.
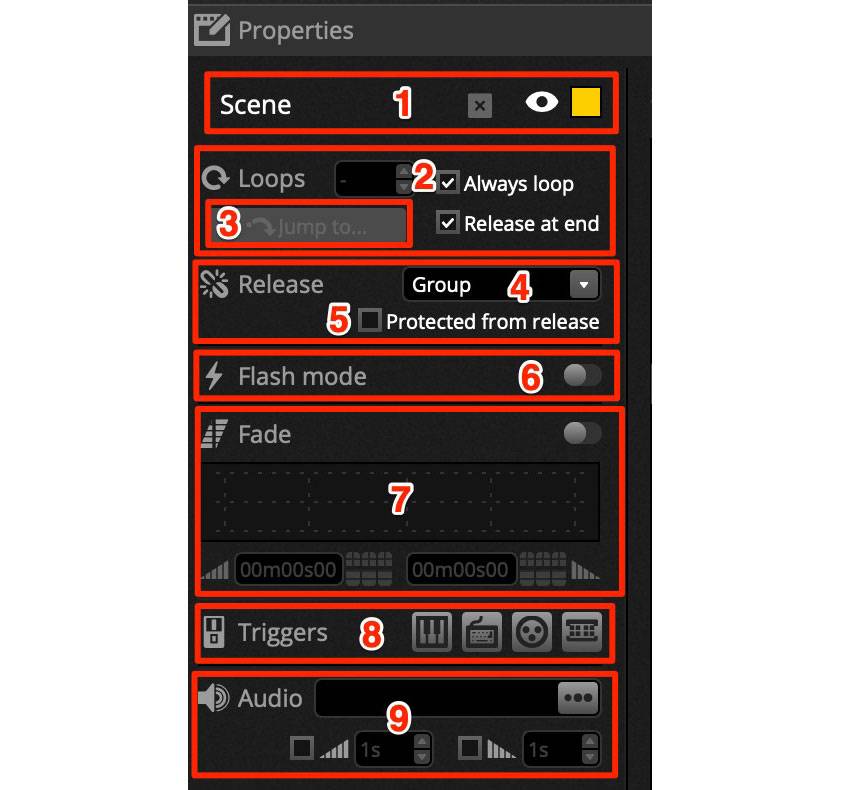
4.1 Scene: Register the name of the scene here. The three buttons on the right have the following functions.
- Clear the scene name.
- Show/Hide the scene on the LIVE tab.
- Change the color of the scene button.
4.2 Loops: Set how many times the scene will play.
- If Loops is set to 1, the scene will play only once.
- Always Loop: The scene will loop indefinitely until it is released.
- Release at end: Automatically release the scene once the loop is finished.
4.3 Jump to…: Set the next scene to be played.
- Another scene in the same show file.
- A scene in a different show file.
4.4 Release: Set the release condition for other scenes when the selected scene is played.
- OFF: No other scenes will be released.
- General: All scenes will be released.
- Group: All scenes in the same group will be released.
- All except group: All scenes will be released except those in the same group.
4.5 Protected from release: The scene will continuously play unless you stop it manually.
4.6 Flash mode: The scene will play as long as you click on it, and will stop playing when you release the mouse or keyboard key.
4.7 Fade: Set the fade-in and fade-out time of the scene.
*The fade graph setting is for live control only.
4.8 Triggers: Set a MIDI/Keyboard/DMX/Port trigger.
4.9 Audio: Select an audio file to be played and the fade-out time when the scene is triggered.

*Click on the star button at the top right will save the current settings as the default when a new scene is created.
5 Summary
This time, I showed you some basic controls that included creating scenes. Now you can understand how to use the step functions to control the detailed timing.
If you are considering using DASLIGHT, download the Daslight 4 software for free to try out before you buy!!
DASLIGHT download
https://www.daslight.com/ja/download.htm
DASLIGHT / DVC4 GOLD DMX Software & Interface
DASLIGHT / DVC4 HOW TO講座
DASLIGHT / DVC4 HOW TO Course
Part 1 "Moving Head-How to Program Circle Effect"
Part 2 "How to use a MIDI controller"
Part 3 "Setting up a multi universe"
Part 4 "How to Use Scan Library Editor"
Part 5 "How to use 3D Visualizer"
Part 6 "How to play scenes simultaneously"
Part 7 "How to Use Scan Library Editor: Moving Head"
Part 8 "USB Interface DVC4 GOLD ZM"
Part 9 "USB Interface Extra / Dry / Contact"
Part 10 DVC4 FUN USB Interface"
Part 11 "DVC4 GOLD USB Interface"
Part 12 "Daslight 4 Basic – Patch"
Part 13 "Daslight 4 Basic – Fader"
Part 14 "Daslight 4 Basic - Fixture Windows"
Part 15 "DASLIGHT / DVC4 FUN upgrade method"
Part 16 How to deal with the "XHL-NAP error"
Part 17 "About compatibility with macOS Big Sur"
Part 18 "How to use Scan Library Editor-New Creation-Part 1-“
Part 19 "Daslight 4 Basics-Arranging Lighting Fixtures-"
Part 20 "How to use Stand Alone"
DASLIGHT / DVC4 HOW TO Course Part 21 How to Update Firmware"


 防滴パーライト特集
 ステージ照明の調光器
 EK Pro ステージ照明
 プロ仕様 ステージ照明 ELATION
 小さなパーティでも役立つカッコイイ照明機材
 照明入門講座