1. Introduction
Hello, everyone! This is Tezuka from Sales.
This is the 20th installment of the “A How-to Course on the DASLIGHT / DVCR No. 20”. This time, I will introduce how to use the stand-alone system.
2. What is the Stand-alone System?
Did you know that the DVC4 series DMX interface has a live mode as well as a stand-alone mode that allows you to play shows without a PC?
The DMX interface has a built-in memory for stand-alone mode, which allows you to copy your show to the device itself so that you can run your show even when it is not connected to a PC.
In the event of a software or connection failure, the DMX interface can be put into stand-alone mode and act as a backup to prevent blackouts by running default scenes.
※ Power must be supplied to the DMX interface via USB.
3. How to use Stand-alone
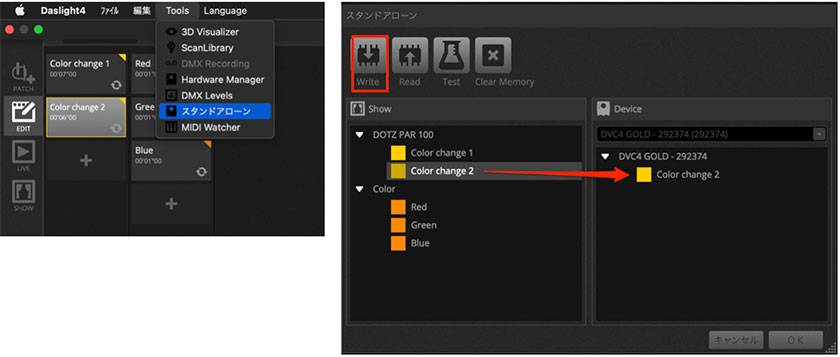
Access the “Stand-alone” window from the “Tools” menu, and you will see a list of all scenes on the left side of the screen. Drag and drop the desired scene to “Device” and write it to memory.
Button Functions
- Read: Reads the show from the DMX interface and loads it into Daslight4. If memory space is low, only minimal information will be stored.
- Test: Allows you to test the show in stand-alone mode.
- Clear Memory: Deletes all written scenes from memory.
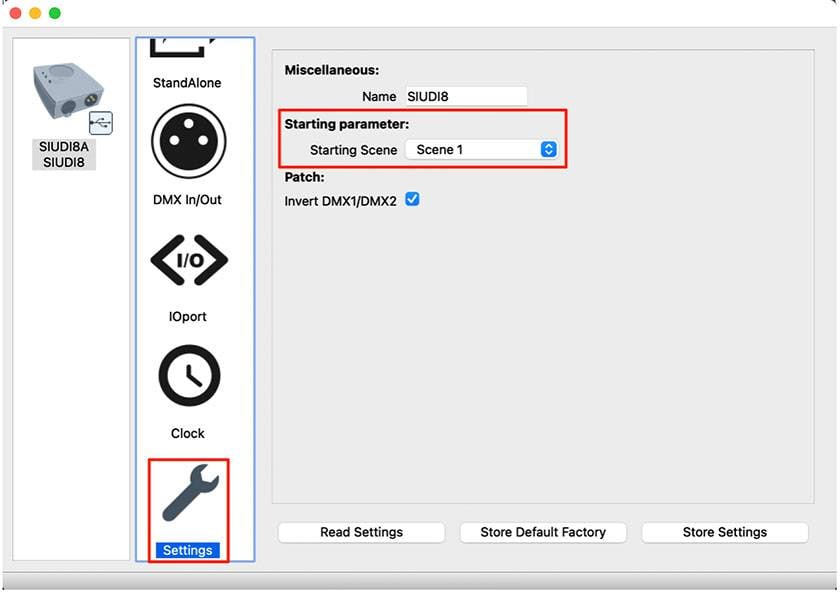
Next, access the Hardware Manager.
Go to “Settings” and select “Default Stand-Alone Scene”.
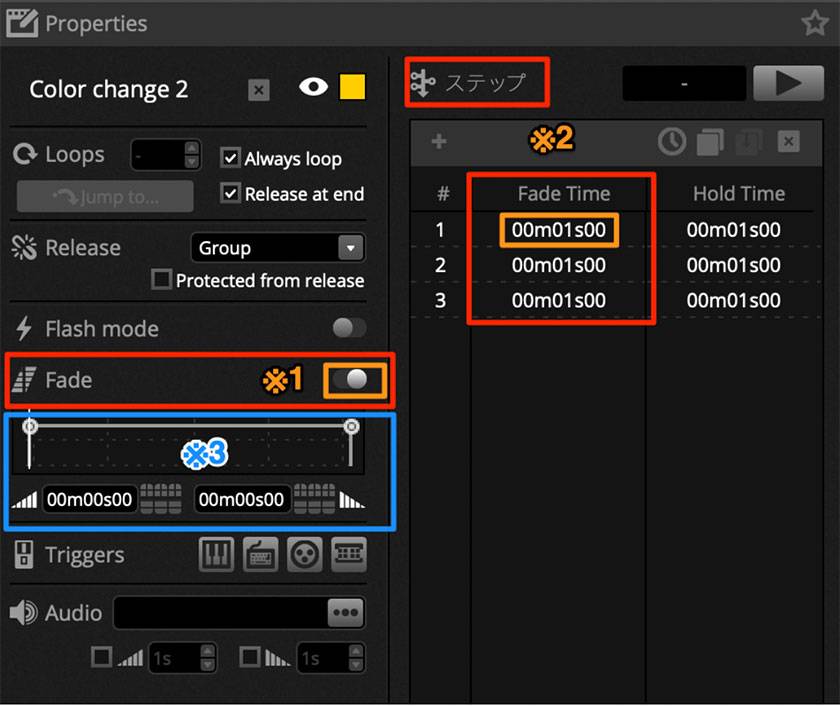
When using Fade in stand-alone mode, some settings must be made in order for it to work correctly.
- Enable “Fade ”*1.
- Set the fade time in the “Step” column*2.
In stand-alone mode, only the data recorded for each scene step will be saved.
It is tempting to use the fade graph*3 to set the fade time, but this function is for live control only.
If the fade does not work correctly in Stand-alone mode, recheck the fade time settings!
4. Summary
In this article, I introduced the use of Stand-alone. Besides being used for backup purposes, this function is also useful when you want to execute simple lighting effects without connecting to a PC.
If you are considering introducing DASLIGHT in the future, you can download Daslight4 software free of charge and check its operability beforehand, so please try it out as much as possible!
https://www.daslight.com/ja/download.htm
I look forward to seeing you again in the next issue!
DASLIGHT / DVC4 GOLD Standard DMX Lighting Software & USB Interface
DASLIGHT / DVC4 HOW TO Lecture
Part 1: Moving Heads - How to Program Circle Effects
Part 2: How to Use a MIDI Controller
Part 3: Multi-Universe Settings
Part 4: Using the Scan Library Editor
Part 5: Using the 3D Visualizer
Part 6: How to Playback Scenes Simultaneously
Part 7: How to Use the Scan Library Editor, Moving Head Edition
Part 8: USB Interface DVC4 GOLD ZM Edition
Part 9 USB Interface Extra Edition - Dry Contact
Part 10 USB Interface DVC4 FUN Edition
Part 11 USB Interface DVC4 GOLD Edition
Part 12 Daslight4 Basic Edition - Patch
Part 13 Daslight4 Basic Edition - Faders
Part 14 Daslight4 Basic - Light Window
Part 15 DASLIGHT / DVC4 FUN Upgrade Method
Part 16: How to Deal with XHL-NAP Errors
Part 17 Compatibility of macOS Big Sur
Part 18: How to use the Scan Library Editor - Create New Editor - Part 1
Part 19 Daslight 4 Basics -Lamp Placement