Cheena: I was having a conversation Mr. Parazio, and we ended up talking about instrument making. We’ll be presenting this with a three-person collaboration.
Parazio: I made my comeback as a bassist at the age of 30! I’m working hard every day and I’m determined to keep it up this time! However, the reality is that I’m currently enjoying collecting and repairing gear. I’m studying daily with the hope of someday creating my own original equipment. In short, I’m an amateur. Nice to meet you.
Twitter https://twitter.com/k_parazio
→ Read Parazio’s articles here
Eru: After starting work, I wanted a new hobby, so I began playing bass in 2018. I’ve been continuing to study steadily on my own. I’m the bassist for the three-member band Route 1. That said, at present, we’re just a cover band for practice, so creating original songs is our goal for the time being. Recently, I’ve also started playing guitar and drums.
Twitter https://twitter.com/L_bass0213
→ Read Eru’s articles here
Cheena: I joined the brass band club in junior high school, and after buying an electric bass in my third year, I became fascinated by the world of modification and DIY. I create and modify instruments and effects pedals using tools such as 3D printers and laser cutters.
Twitter twitter https://twitter.com/on_8va_bassa
→ Read Cheena’s articles here
Nemoto: A multi-string enthusiast who’s particular about thumb playing. I used to handle both bass and PA. After quitting music once and taking about a ten-year break, I started to play again. I’ve been involved in music for a long time, but since I don’t practice seriously, I’m not very good. Please be kind. Lately, I’ve been enjoying relic work.
Twitter https://twitter.com/amaze3551
→ Read Nemoto’s articles here
Parazio: Once again, I’ll be receiving guidance on how to make instruments at my own request. I’m a complete amateur when it comes to woodworking.
Nemoto: I was seriously into repair and woodworking in my teenage years. During the roughly ten-year break I took from music, most of my passion for it faded away. I’ll participate properly, but I have what people call “a skill learned long ago.”
Cheena: As always, when it comes to instrument making, I can already sense when things are about to spiral out of control. No matter how busy I get with my schoolwork, I’ll still make time for building, modifying, and writing.
Parazio: Once again, following up from last time, this topic was chosen at my request.
Cheena, please tell me everything!
By the way, I want to build an electric bass from scratch.
Cheena: Build one yourself, huh? The question is—where do you want to start?
For now, how do you want to go about making it? Here’s the order by difficulty (from hardest to easiest):
— Body —
- From rough lumber (starting with planing work, etc.)
- From pre-cut boards (such as those measured from aimoku, etc.)
- From partially processed material
→ Only the neck pocket processed
→ Only the body outline processed
→ Unpainted body - From a finished (painted) body
— Neck —
- From rough lumber
- From pre-cut wood
- From partially processed material
→ Fingerboard and neck without frets
→ Unshaped headstock
→ Fretted but unpainted neck - From a finished (painted) neck
— Parts —
- Hand-wound pickups
- Metal hardware fabrication
- Pickguard making
- Custom wiring
- Wiring kit
Of course, the required tools will vary depending on where you start.
Parazio: That’s exactly what I wanted to ask about. To be honest, I’d really like to start from rough lumber.
When I was repairing the Thunderbird I got from Nemoto, I realized how much fun this kind of work is, so I want to dive in deeper.
By the way, Cheena, what level would you recommend for a beginner?
I’m a total novice…
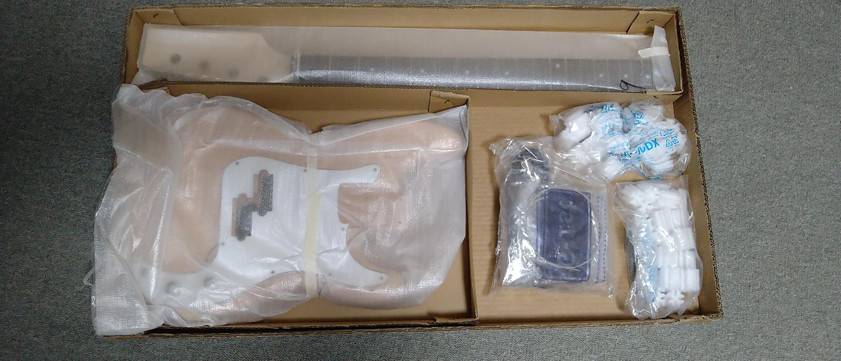
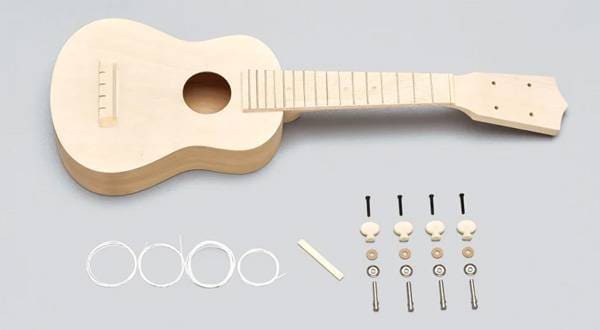
Cheena: For a first-time build, I’d recommend starting with an unfinished kit that costs at least around 20,000 yen per set. It includes all the essential parts that make up an instrument except for the finish, and by following the instructions properly, you’ll learn where precision and care are required, which is a very valuable experience. If you’re just assembling it, all you really need are a screwdriver and a soldering iron. Even if you want to make small shape adjustments, you won’t need power tools like a trimmer or jigsaw — just sandpaper and a hand file will do. That’s another big advantage.
And one more thing; not having to worry about forgetting to buy parts is crucial. Once your progress gets interrupted, your motivation drops instantly…
Parazio: Exactly! When making something, I want to first understand what parts really matter.
But when I searched around, I found that while there are assembly kits and neck/body sets for guitars, there are almost none for basses.
When I looked earlier, I saw that Fender sells necks separately.
If only there were something like the HOSCO assembly kits for basses…
Cheena: I’ll include some links at the end, but here are the ones I recommend.
If you don’t mind going beyond the beginner level, there’s also GuitarFetish, Warmoth, and Koloss Guitars...
Oh, and I don’t recommend kits from AliExpress or Amazon, since they usually need modifications starting from the parts level.
Parazio: So, it’s better to start by learning how to assemble first, right?
By the way, I remember an article where you assembled a guitar before, Cheena. How difficult was that one? Could a beginner handle it?
Cheena: Ah, that one.
■I tried importing a kit from overseas and building it
That’s about the right level, I think. Set-neck types or acoustic guitars can be a bit tricky since they require some extra tools, though.
By the way, Nemoto is also pretty knowledgeable about this kind of stuff.
Parazio: Really? Nemoto, you’ve done a lot too then!
Would it be okay to just gather parts separately and build from that?
I don’t think I’d end up using the included electronics or pickguard anyway...
By the way, I don’t dislike doing that kind of hands-on work.
Nemoto: Gathering parts is totally fine.
Brian May’s Red Special even reused sewing machine parts, and there’s a nickname for when you pair a Precision Bass body with a Jazz Bass neck — the “Franken (PJ Franken)” — since that kind of thing was actually popular in certain circles back in the ’70s and ’80s.
However, be careful — if the parts are from different eras, the necks might not fit together.
That’s because Fender neck joints come in two types: square heel and round heel.
For example, if you try to combine a ’51 OPB body with a ’64 JB neck, you’ll need to do some modification.
It’s just a matter of shaving it down, so it’s not impossible — it just means you can’t simply bolt it on.
So, I’d say go ahead and mix and match freely! It could be fun to combine something like a Baguley aluminum neck or a Moses carbon neck.
I once tried making varnish myself, the kind used for violins, but I don’t recommend it.
I wanted a honey-gold finish, but it ended up way too yellow and just looked a bit gaudy.
Cheena might be tempted to try it, but honestly, unless you’re planning to make a lot of instruments, it’s better to just buy it.
Parazio: Homemade varnish!? You mean the kind made from organic materials? That’s amazing — being able to make that yourself!
And of course, part compatibility really does matter, right?
I wasn’t expecting to be able to build everything without any modification, so I’ll go into it assuming some work will be required.
Cheena, if you’ve got any stories about your own DIY failures, please tell me!
Cheena: Oh, I’ve had plenty of failures…
- I shaved a fretless fingerboard too much and ended up exposing the side inlays.
- When I tried coloring directly on the actual instrument, the lacquer wouldn’t stick afterward.
- Then, when I used regular wood glue instead of Titebond, it later gummed up the trimmer blade so badly I had to throw the blade away.
Well, those kinds of mistakes are still recoverable, but when I made parts with a 3D printer and they either flew off or cracked because the material wasn’t strong enough — yeah, there’s no excuse for that one…
Parazio: You’re really doing all kinds of fun stuff!
When it comes to 3D printing, I guess choosing the right resin material is important, right?
Anyway, getting back to the main topic — if you start from the raw wood, what does the process look like? And, how many tools would you actually need for that?
Cheena: Assuming you’ve got properly dried wood of sufficient size —
For the body, the process goes like this:
create a template → thickness adjustment of the wood → rough cutting → routing and shaping based on the template.
Eyeballing it without a template is risky.
For the neck, installing the truss rod → gluing the fingerboard → cutting the shape → carving the headstock and forming the grip shape.
Then you add inlays, shape the fingerboard radius, and install the frets.
(Some people follow a different order — there are different “schools” of thought — and sometimes you can just use a pre-shaped fingerboard.)
As for essential tools, for electrical work you’ll need:
an electric planer, trimmer (router), jigsaw, and either a hand drill or drill press.
Sanders aren’t absolutely required, but they make all kinds of shaping work so much easier.
For hand tools, having a round plane and rasps is helpful.
You’ll also need things like a fret saw and crowning file.
Parazio: So basically, you need a full set of woodworking tools.
Once I start collecting tools, I feel like I’ll end up getting obsessed with those too.
I guess it would also be good to have chisels and small planes, right?
Also, I’ve been thinking — taking measurements seems like it would be the hardest part.
I want to start by learning how to understand the dimensions properly.
Nemoto: Yeah, having measuring tools is definitely a must.
You’ll need a precision caliper, for sure.
It’s also good to have a scale ruler and a 1-meter aluminum straightedge.
And, if you plan on doing any finish other than oil, you’ll want to buff out the surface at the end, so even a simple buffing attachment for an electric drill will do — make sure you have one ready.
Parazio: So measurement tools are a basic requirement, then.
I mean, any kind of manufacturing setup has measuring tools, right?
So the first things I need are a workbench and measurement tools.
But man, the more we talk about this, the more I feel that building a custom instrument really is the dream of a true craftsman!
I’m getting excited — it feels like this plan is actually starting to take shape.
(Breaking news: my family just told me I’m absolutely not allowed to use machinery indoors. I sense impending despair… )
Cheena: Yeah, you really can’t do machining indoors — don’t even try.
You’ll end up with tons of wood shavings and dust, and the fine particles can get inside your electronics and ruin them.
And, it’s no laughing matter if a dust explosion happens.
What you can do in a living space is oil finishing, but only with a low-odor type, and then just the final assembly work like wiring, screwing, and drilling.
Parazio: The last time I spread out a blue tarp to do some woodworking, I was told I was “ruining prime real estate” and got scolded for it.
So yeah, they yelled at me again this time.
Living in an apartment complex really makes DIY tough, doesn’t it?
Cheena: If you can, use a workshop space at a home improvement store or a FAB-type shared makerspace.
Also, painting can easily cause complaints about odors, so in that kind of environment it’s best to give up on spray paint or oil-based stains.
Parazio: Ah, that’s a good idea!
If you go into the city, some home centers actually have DIY spaces available.
For painting, I’m planning to use a water-based stain anyway.
Looks like the smartest move for me is to buy semi-finished parts and work from there.
For anyone living in an apartment — take it easy, and don’t push it to the point of starting a neighborhood dispute, haha.
Cheena: Exactly. Also, this goes without saying, but pay close attention to temperature and humidity while you’re working.
If the neck pocket dimensions or drying times for your finish become unstable, it can cause a lot of trouble later.
Parazio: That’s one of the biggest differences from metalworking, isn’t it?
They say wood is alive — it really reacts to the weather and humidity.
By the way, assuming I’m working with semi-finished parts, the general process something like:
test assembly → painting → wiring and final assembly?
Cheena: That’s mostly correct. There’s often debate about whether to drill pilot holes for wood screws before or after painting, but since you’re using a stain, doing it after painting is fine. For more brittle finishes like urethane, it’s better to drill the pilot holes beforehand using a small bit.
Parazio: Got it — so for urethane-based coatings, you need to drill the holes in advance.
I see. Since I’ll be using a stain, are there any special precautions I should know about?
Cheena: First of all, make sure you test how the wood absorbs the color and decide on your application method ahead of time.
Also, if you’re planning to add a topcoat or apply conductive paint later, you should think about how those layers will interact.
And if you’re going to mix colors for custom tones, be sure to record your mixing ratios — you’ll need them for consistency.
Parazio: Yeah, masking and that kind of thing are really important.
I’ll definitely need to measure the color ratios properly with a scale.
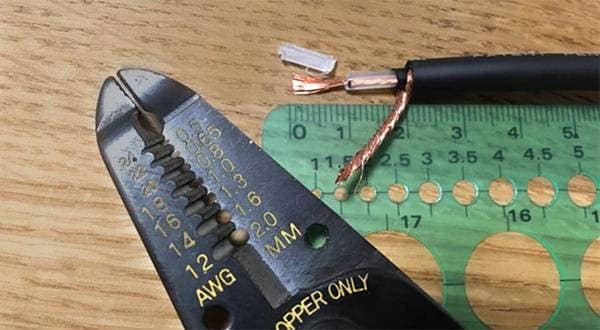
By the way — moving away from woodworking for a moment — have you ever made a pickup yourself?
Those are made by winding copper wire around a magnet, right?
Nemoto: The pole pieces don’t actually need to be magnets themselves — as long as they’re ferromagnetic, they’ll work fine.
If you just want to prototype one, you can buy copper wire at a home improvement store, stick some screws upright into a base with a magnet underneath, and then wind the wire around the screws. That’ll do the job.
You can pick the screws from something like this list:
By the way, the copper wire you buy at hardware stores often has an enamel coating to prevent rust, so you should sand the ends with sandpaper to expose the metal.
Cheena: It’s tough work though… there’s a chance the wire could snap at any stage of the process.
Nemoto: Yeah, after all that effort, you might end up with something that's the quality of an eager beginner…
Parazio: Wow, so it’s really that difficult…
Cheena: Well, try making one once — you’ll quickly realize just how cheap Chinese pickups really are.
Once you get yourself a winder that can count the number of turns, though, there’s no going back.
Parazio: So, it really comes down to having the right equipment. It’s amazing how deep the world of components goes, way beyond what you’d expect.
Actually, I’ve made a pickguard and a truss rod cover for my Thunderbird before.
Those were easy, but mass-producing them would be impossible for me.
Cheena: Yeah, mass-producing pickguards is no joke either… Most people use a trimmer to bevel the edges, but I just can’t get used to it.
If you can make CAD data, I recommend borrowing a laser cutter instead. You can’t use chlorine-based plastics with it, but the results are super clean.
Parazio: By the way, I actually made mine out of wood. All the materials, including the paint, were from the 100-yen shop.
Cheena: That’s great that you can actually get a decent range of plastic, MDF, and SPF materials from 100-yen stores these days. When you say paint that won’t get you yelled at by the people around you, I assume you mean water-based acrylic paint or maybe milk paint?
Parazio: Yeah, I used water-based acrylic. But honestly, I was a little concerned about how soft the coating turned out, so next time I’m going to switch to a water-based stain instead.
Personally, I like a matte finish, so staining sounds ideal to me.
Cheena: Just to be clear — a stain, as the name suggests, only dyes the wood, it doesn’t form a coating layer. I wonder what caused your coating to feel soft though…
Parazio: So the final step would be to apply water-based urethane varnish, right?
If possible, I’d like to keep everything water-based.
Even cars use water-based paint nowadays, so I figured water-based coatings have gotten pretty advanced.
That’s something I’ll need to research more.
Cheena: It should probably be fine. When it comes to layering paints, there’s always a bit of luck involved — and color mixing is all about personal preference anyway. As long as you get a decently solid coating that can withstand some wear and tear, it’s totally fine for an instrument.
Wishbass’s oil finish? I don’t really get that one, honestly.
Parazio: Talking about all this really makes me realize how cheap instruments are sold for.
When you think about the people who actually make them, it makes you appreciate the instruments you already have — you can’t treat them carelessly.
But yeah, if you try to make one yourself, by the time you factor in space, tools, and consumables, it adds up fast.
Even a bass sold for 100,000 yen starts to seem like a bargain.
Nemoto: Yeah, handmade goods come with a huge markup, but a lot of people don’t really get that.
If you’re making 100 instruments a month versus 10 a month, of course there’s going to be a difference in profit margins — that’s just common sense.
Cheena: Let’s be grateful even for the 3,000-yen junk and modify it radically… even a 10,000-yen Playtech.
Parazio: Right? No matter how good the equipment you have, handmade stuff ultimately comes down to human hands, so it’s quite costly. (I think you’d understand if you considered your own salary.)
Even a 10,000-yen Playtech reflects an incredible effort by the company.
You’d have to wonder just how well it’s selling—otherwise, they couldn’t make it at that price.
Speaking of Playtech, I remember seeing an article where you, Cheena, had installed a piezo.
If you pick up sound with a piezo even on an electric bass, does it feel like an acoustic?
Cheena: Ah, you mean this one?
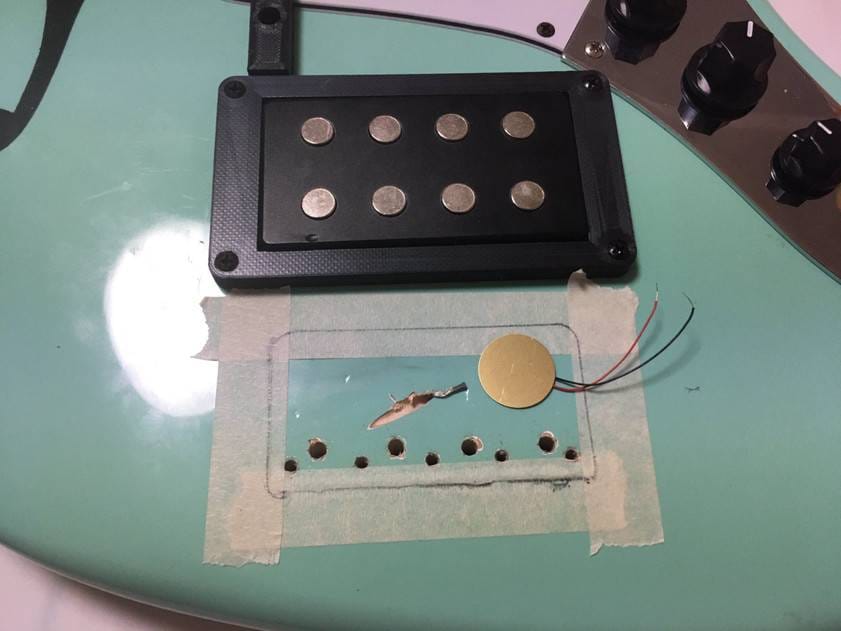
■Playing with Playtech – Installing a Piezo Pickup for a Coin
Looking back, the modification was pretty rough and the photos are messy, so sorry about that. In this case, I put insulating tape on the metal bridge plate, scraped the finish a bit, and sandwiched the piezo element in place.
The sound that came out wasn’t really “acoustic-like.” If anything, it just picked up the vibrations of the strings directly, so you hear the string movement amplified — a surprisingly bright tone.
It’s not low-end, woody, upright bass-like at all, but the sustain is fairly close. With a little adjustment and a high-cut circuit, it can be used effectively, though.
Parazio: That’s it! I think that’s really a great idea. Even if I can’t go all the way to building one from scratch, with modifications, someone like me living in an apartment complex could still enjoy it. Also, as was mentioned earlier, maybe a kit is the better way to go. Plus, if you have experience building one yourself, you can make more detailed requests when ordering one, lol. Thank you again, Cheena-san and Nemoto-san.
The “sound & person” column is made up of contributions from you.
For details about contributing, click here.


![Diving into the Abyss of Weight Reduction in Instruments [Nemoto x Cheena Collaboration Article]](/contents/uploads/thumbs/5/2021/9/20210930_5_14340_1.jpg)
 DIY ギターメンテナンス
 ギターケーブルの作り方
 超オススメのフレーズ道場 ギター
 配線カスタマイズ 第1回
 ギターのお手入れ
 ギター名人ラボ