We’ve already covered Part 1 and Part 2 for those who want to learn more about the MACKIE DLZ CREATOR, and in this third part, we are taking a closer look at “NDI”.
To begin with, in my case, it started with the question: What is NDI?
So, I asked the AI Gemini to explain it in about 400 characters, and it gave a very easy-to-understand explanation.
NDI (Network Device Interface) is a standard developed by NewTek that allows high-quality, low-latency video data to be transmitted over a network (IP).
Traditionally, connecting cameras to PCs or switchers required dedicated HDMI or SDI cables, but with NDI, video, audio, and control signals can all be sent and received over a single standard LAN cable.
■ Main Features
Cable Simplification: Existing in-house LAN or Wi-Fi environments can be used, eliminating the need for complex wiring.
Interoperability: Devices connected to the same network automatically recognize each other, making setup easy.
Low Latency: Provides real-time performance with no sense of delay, even for live streaming and live events.
Currently, it is widely used by professionals and individuals alike for YouTube streaming, esports, remote conferencing systems, and more. It can be said that it’s a modern standard technology for “handling video as data”.
That about sums it up. (lol)
And, the connection diagram in the manual that originally sparked my interest in streaming using NDI looks like this.
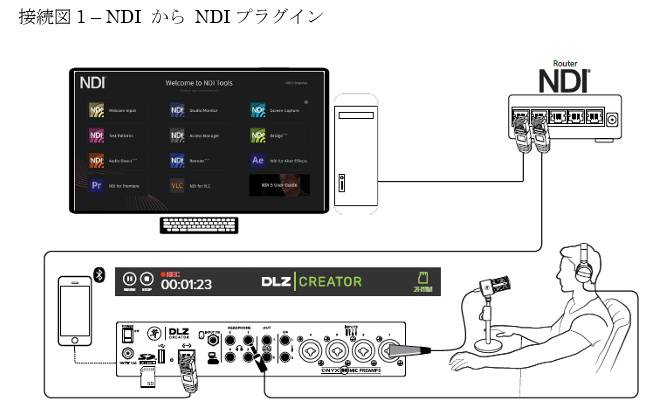
LAN instead of USB!? A router!?
At this point, a question suddenly came to mind.
When streaming, what are the differences (advantages) between NDI connections and USB connections?
When I asked Gemini, I got an incredibly spot-on answer lol.
If you’re streaming with the MACKIE DLZ Creator, that’s a great choice of equipment!
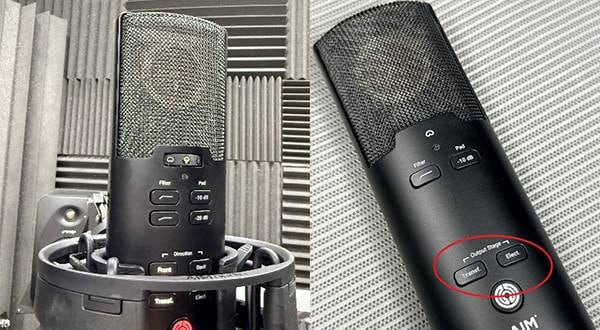
The DLZ Creator is a groundbreaking product that became the world’s first audio mixer to officially support NDI through a firmware update.
Here’s the conclusion first:
“If you’re streaming alone right next to your PC, use USB.”
“If you want to place it away from your PC, or share audio across multiple PCs, use NDI.”
Here is a summary of the specific differences.
A Comparison of USB Connection and NDI Connection
| Feature | Connection (USB-C) | NDI Connection (Ethernet) |
|---|---|---|
| Main purpose | Simple streaming/recording with a single PC | Long-distance transmission and sharing between multiple PCs |
| Connection distance | Short (typically limited to 3–5 m) | Extremely long (depending on the LAN cable, up to 100 m or more) |
| Setup | Plug-and-play, simple (standard method) | Network configuration required (some technical knowledge required) |
| Stability | Depends on PC load and connector contact quality | Extremely stable (resistant to noise and momentary dropouts) |
| Expandability | Only the connected single PC | Retrievable by all PCs on the same network |
Conclusive Advantages of NDI Connections
1. No Physical Distance Limitations
USB cables suffer signal degradation and unstable connections as they get longer. With NDI, a single LAN cable allows you to send clear audio without degradation even between distant locations, such as the mixer in a soundproof room and a streaming PC in the living room.
2. Easy “One-to-Many” Streaming
USB is a one-to-one connection, but NDI sends audio over the network, making it possible to simultaneously play BGM on the main streaming PC while monitoring or recording that audio on a secondary PC.
3. Smarter Cable Management
If your cameras and other devices already support NDI, you can simply aggregate LAN cables into a hub, allowing the PC to receive all video and audio through a single LAN cable.
Which should you use?
- ■ USB connection is suitable for:
- ・Those who place the DLZ Creator right next to their PC.
- ・Those who want to start streaming immediately with OBS or similar software, without dealing with complicated settings.
- ■ NDI connection is suitable for:
- ・Those who want to place the PC and mixer in separate locations.
- ・Those who want to use the same audio across two PCs (for example, one for gaming and one for streaming).
- ・Those who want to minimize the risk of audio drop-outs and noise during streaming as much as possible.
Even with my fairly shallow, just-scratching-the-surface level of knowledge, I found myself thinking, “Ah, I see.” (lol)
So, let’s try it right away!!
But before getting started, a number of preparatory steps are required.
- Installing the NDI tools
- Installing OBS
- Installing the Mackie USB Driver (for Windows PCs)
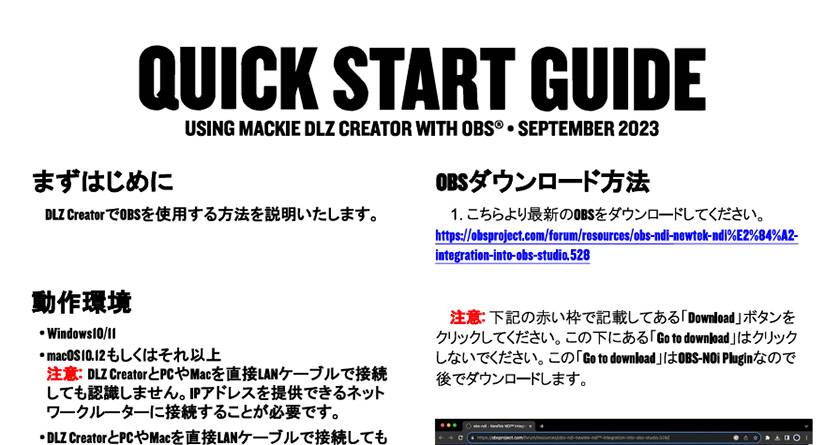
Explaining each one in detail would take quite a long time, so for more information, please refer to the Quick Start Guide (PDF) below.
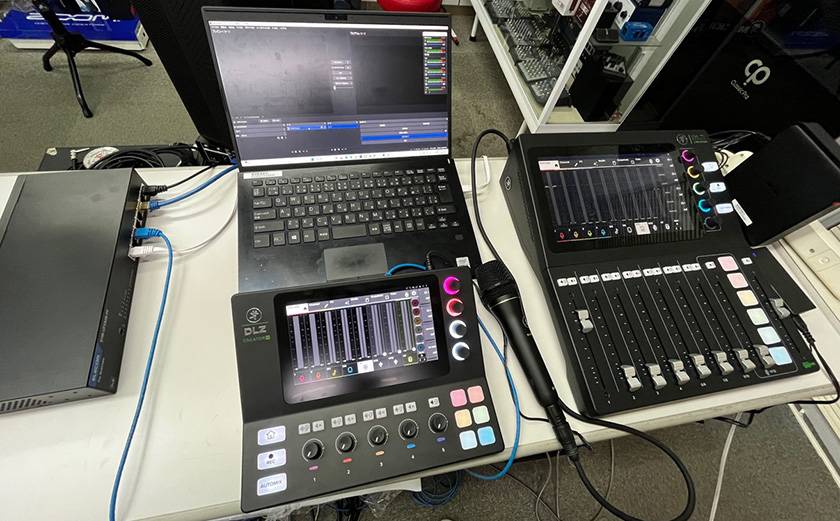
Items prepared
- DLZ CREATOR
- DLZ CREATOR XS
- Dynamic microphone
- Windows PC
- Wi-Fi router
- LAN hub (a super cheap one I bought secondhand on Mercari for testing)
- LAN cables (low-priced ones purchased at an electronics store)
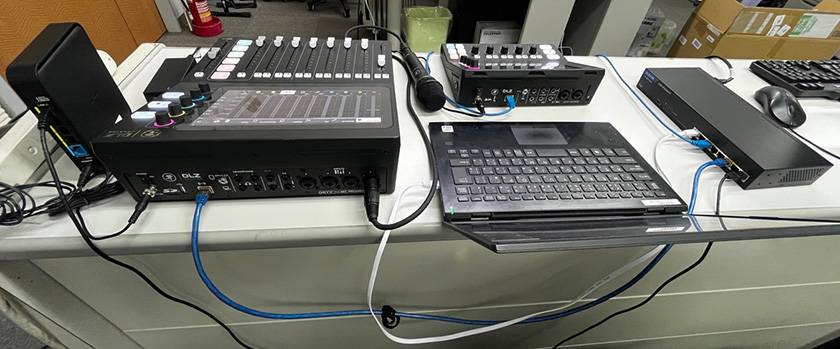
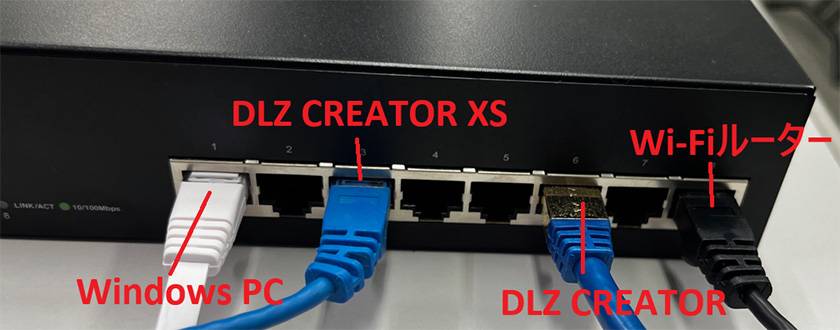
Connection
| Wi-Fi router | → LAN hub |
| LAN hub | → Windows PC |
| → DLZ CREATOR | |
| → DLZ CREATOR XS |
Procedure
If you prepare everything as described in the Quick Start Guide, there are no particularly difficult additional settings required.
- Make the connections,
- turn on the power to the devices,
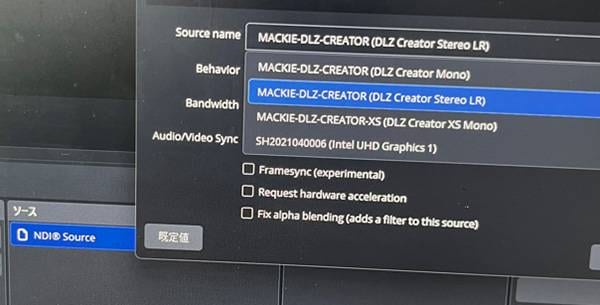
- launch OBS,
- and simply select “DLZ CREATOR” as the source under “NDI Source”.
Then, it should go like this.
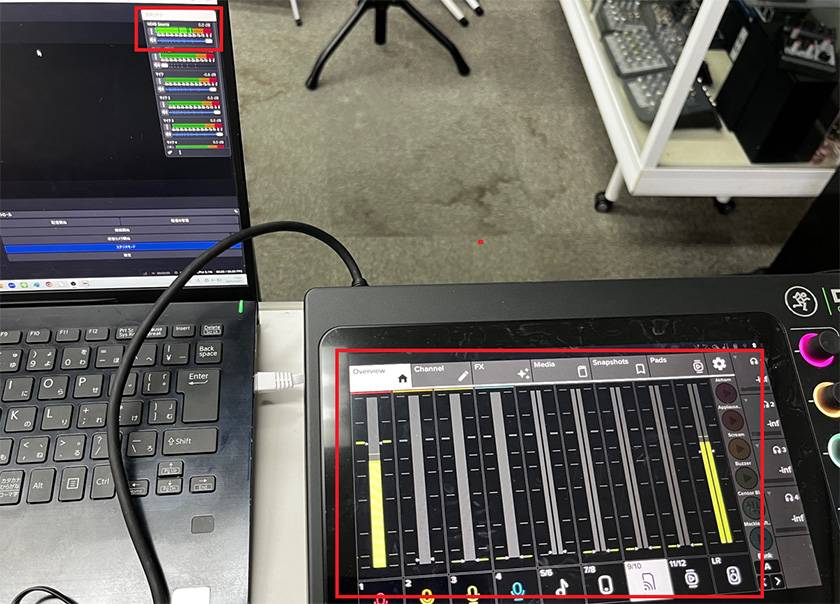
When speaking into the microphone connected to ch1 of the DLZ CREATOR, the meters in OBS responded, allowing me to confirm that the connection had been completed correctly.
It worked more smoothly than I expected!!
Next, I tested interconnecting multiple DLZ Creator mixers.
Yes—that’s why the DLZ CREATOR XS was included in the initial connection explanation.
In the manual, the illustration looks like this.
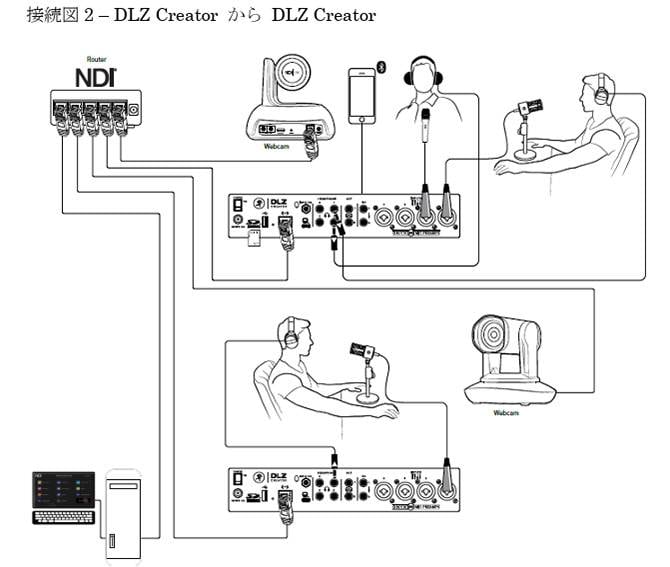
Although there was no camera,
DLZ CREATOR as the main unit
DLZ CREATOR XS as the sub unit
Microphone connected to ch1 of the DLZ CREATOR XS
I tried to
“output the sound of the microphone connected to the DLZ CREATOR XS from the DLZ CREATOR.”
The procedure is as follows.
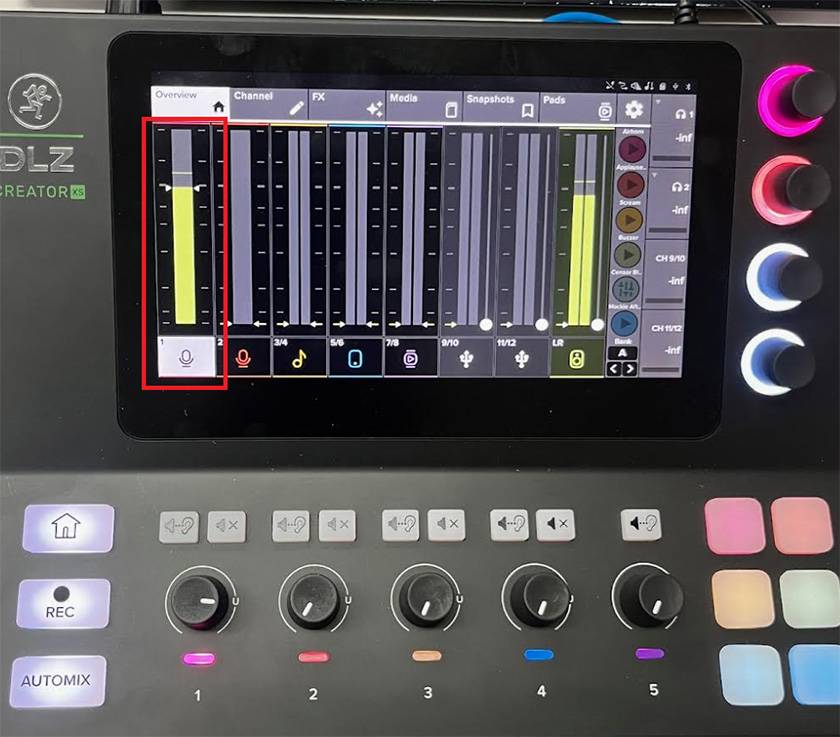
1. Connect a microphone to ch1 of the DLZ CREATOR XS, adjust the gain as needed, and raise the ch1 fader. The far-right LR fader does not affect the NDI output level.
2. Touch the NDI Audio Source on the DLZ CREATOR (not on the XS).
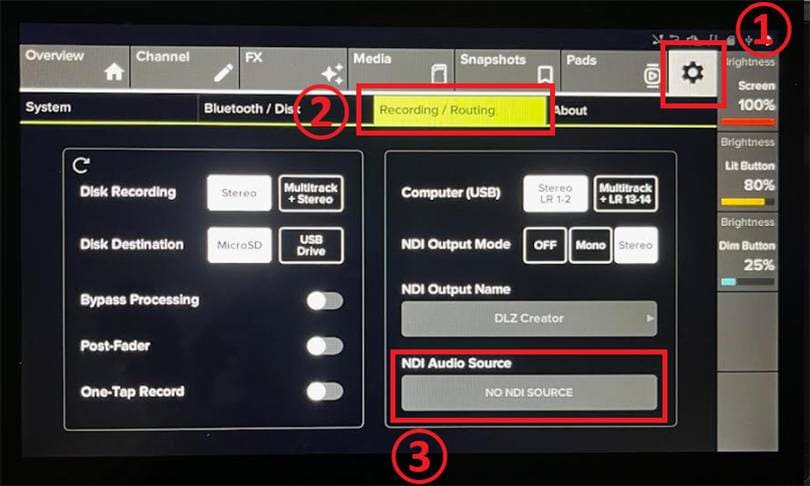
3. Select DLZ CREATOR XS Stereo LR and confirm.

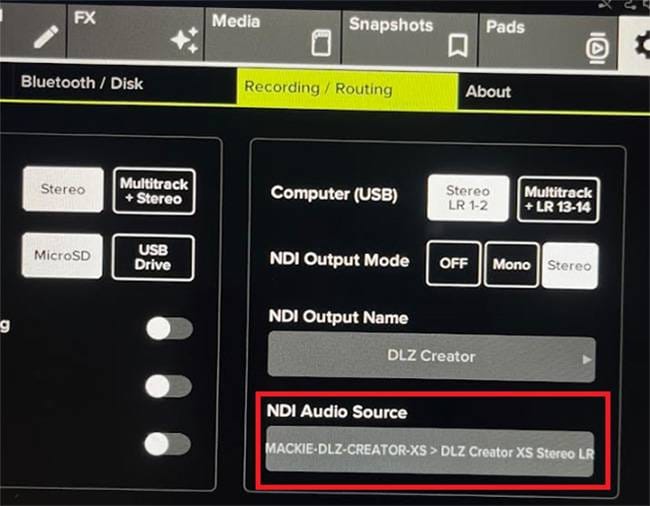
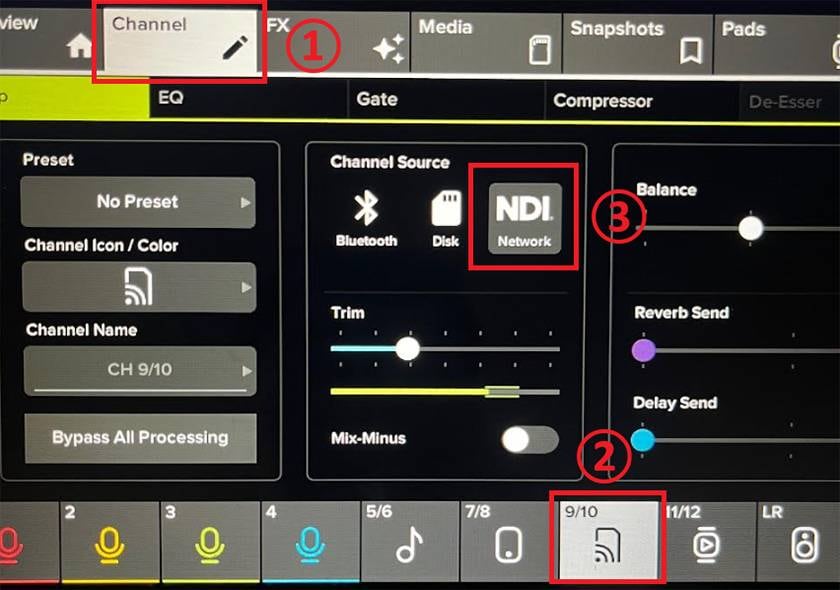
4. Set the Channel Source of ch9/10 on the DLZ CREATOR to NDI. By doing this, the sound from the DLZ CREATOR XS can be output from the DLZ CREATOR.
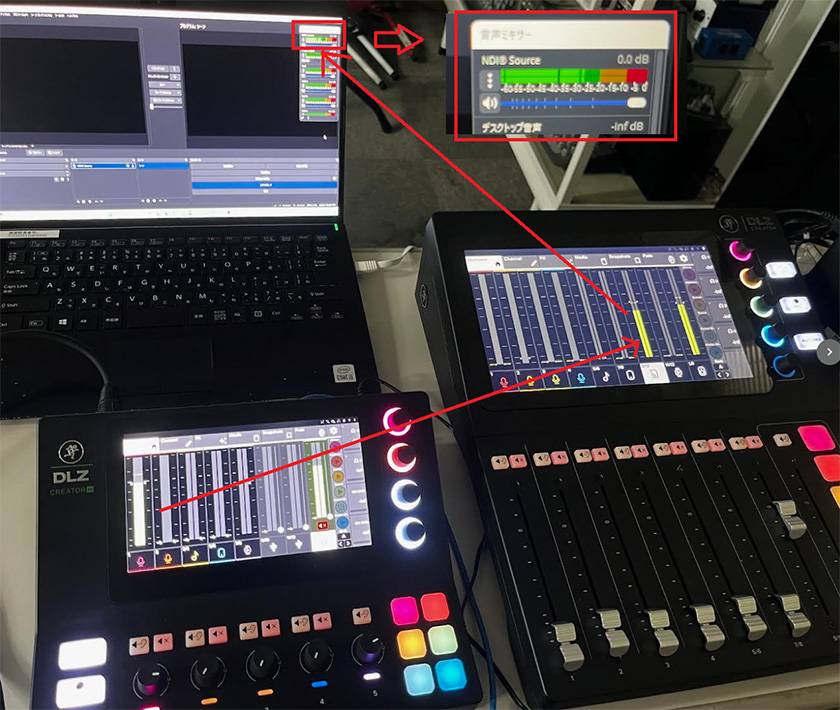
5. When speaking into the microphone, the level meter of the NDI Source in OBS moves as shown. This confirms that the signal was flowing as “microphone → DLZ CREATOR XS → DLZ CREATOR → Windows PC.”
What did you think?
I think this is something common with digital mixers, but the excitement you feel the moment sound finally comes out when trying a new connection method is amazing. This time as well, I made various mistakes along the way, but somehow managed to get there.
Generally,
“Mixer for streaming” = “mixer with a built-in USB audio interface”
is probably a common impression, but
the DLZ CREATOR and DLZ CREATOR XS not only have a USB audio interface, they are also
groundbreaking mixers that officially support NDI for the first time in the world as audio mixers!!
Thank you very much for sticking with this long article to the very end.
Be sure to check out the MACKIE / DLZ CREATOR series that’s packed with carefully thought-out features.


![Mackie Streaming-Focused Digital Mixer DLZ CREATOR - A Closer Look at Its Recommended Features!!: The Three Modes [Easy/Enhanced/Pro], AUTO GAIN, AUTO MIX](/contents/uploads/thumbs/2/2025/12/20251204_2_33788_1.jpg)
![[If You’re Unsure, Choose This!] Mackie ShowBox Thorough Review!](/contents/uploads/thumbs/2/2025/11/20251128_2_33696_1.jpg)

 MACKIE GOシリーズ特集
 MACKIE ブランドページ
 ミキサーケース セレクター
 Mackie PAスピーカー比較表
 Mackie ミキサー比較