The AVID Mbox Studio audio interface is finally for sale.
It features a wide variety of functions with a high-grade sound quality, and I will review its actual usability by preparing a unit!

First, let's take a look at what kind of audio interface Mbox Studio is and write down its features while focusing on its functions.
・Four microphone preamplifiers
・Up to 21in / 22out *including digital inputs and outputs
・VariableZ" variable impedance for guitar and other instrument inputs for optimum sound adjustment
・Onboard DSP effects (EQ, reverb, delay)
・Presets can be assigned to buttons and called up with a single button
・Bluetooth input for connection to smartphones and other devices
・Bluetooth output for connection of wireless headphones, etc.
・MIDI input/output
・Built-in tuner function
・Loopback function
・Built-in talkback microphone
・Reamp output
・Dual-channel FX loop for pedal effects
・Over 130 plug-ins bundled
・MBOX Control app for advanced configuration control
Even a quick rundown shows that it is packed with so many features!
I am very interested in the Bluetooth functionality on each of the inputs and outputs, but I am amazed at how many features there are for guitarists.
Mbox Studioだけの機能もあり、たくさんボタンがあり、見た目も含めてワクワク感に溢れた製品です!
今回はこの中から特筆すべき機能をピックアップして実際の使い勝手をチェックしていきましょう。
その前に、まずはその外観や一番大事な音質について確認します。
Some of the functions are exclusive to the Mbox Studio. There are lots of buttons and the product is exciting to look at, including its appearance!
Let's pick out some of these features worth mentioning and check out how easy they are to use in practice.
Before that, I will first check its appearance and most importantly, its sound quality.
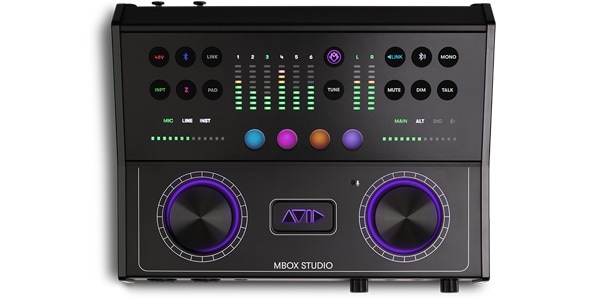
Appearance
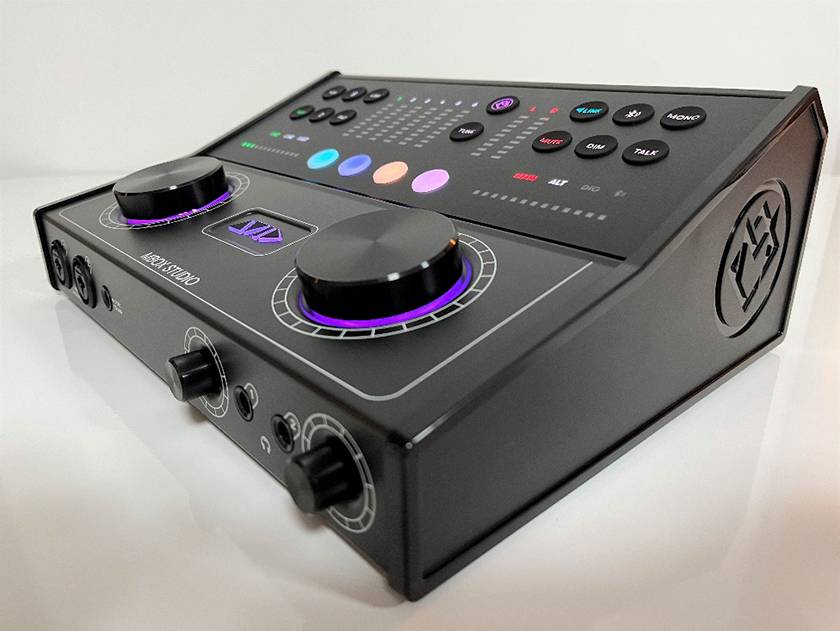
The workstation sits solidly in the center of the room.
It looks like a cockpit, which is something that men long for, and for some reason it makes me feel pumped!
As for the button layout, the left side is for inputs and the right side is for outputs, so you can operate it without getting lost, even though there are many buttons.
The terminals that tend to be plugged and unplugged frequently are located on the front side, while those that are usually connected are located on the back side, which is a logical design.

Sound Quality
First, check the sound quality of the main output.
As expected of AVID, the sound is extremely high-resolution and accurate. The low frequency range also has a solid, low center of gravity, enabling monitoring with a sense of stability. I compared it to a higher-priced interface and found it to be a great dupe!
The two headphone outputs sound as clear and undistorted as the main outputs.
The microphone preamplifier captures the sound of the source material as it is without any unnecessary coloration, and it’s the same as that found in Pro Tools Carbon and Venue S6L!
Even if you subtract the various functional aspects, it seems to be a reliable, high-grade audio interface.
Next, I will explain the functions one by one while actually using them.
Bluetooth Input/Output
Bluetooth functionality is provided on the input and output sides.
Therefore, on the input side, you can connect a smartphone or other device to play music from studio monitors or headphones, or record the sound from your smartphone.
On the output side, you can connect fully wireless earphones such as AirPods or Bluetooth headphones to check the mix.
■ Input side
1. Press and hold the Bluetooth button on the left side of the unit to start pairing.

2. On the phone side, the name "MBOX IN XXXX" is displayed, and pairing is easily completed by selecting it.
When I played my favorite song from the music app on my iPhone, it was output from the studio monitor without difficulty!
It is very convenient to be able to easily listen to your favorite songs from your smartphone on the studio monitors! It's so natural and comfortable to use that I wonder why I couldn't do it before. It will also play a role when you are mixing, such as playing a song for quick reference and comparing it with your own mix.
■ Output side
1. Press and hold the Bluetooth button on the right side of the main unit
2.When the button flashes, turn on the pairing mode on the Bluetooth earphone/headphone side. (The operation may vary depending on the device you have.)

3. Push the knob on the monitor to the Bluetooth icon, and the Bluetooth earphone/headphone will output!
This was also very easy to use! Checking the mix with the earphones you use in your daily life will lead to new discoveries and help you brush up your work.
When you press the monitor knob, you can choose whether to output from the monitor or the Bluetooth device, but you can also set the Mbox Control to output both at the same time.
However, since there is a slight time lag with Bluetooth devices, simultaneous output can be a bit uncomfortable depending on how you listen.
Since it is possible to output from Bluetooth speakers and other devices, this is ideal for applications such as checking the mix on another speaker.
Rear Amplifier Output
Personally, I had the perception that reamping is a time-consuming process that requires a certain amount of preparation, but Mbox Studio has a Hi-Z OUT TO AMP jack on the front of the unit, which lowers the psychological hurdle to starting the reamping process.

By connecting a single shield from the Hi-Z OUT TO AMP jack to an amp, you can immediately see what the amp will sound like when it is reamped, so you can quickly determine whether or not you should actually reamp the amp.
I was reminded once again how important it is to have light footwork when doing creative work.
DSP Effect
EQ, soft limiter, reverb, and delay can be applied on the Mbox Control software.
You can choose whether to apply the effects only to the monitor audio or to the DAW, and you can freely route the effects only to the headphone output.
The EQ is a parametric equalizer, which is intuitive and effective despite the small screen.

The reverb can be selected from Small, Medium, Large, and Hall/Church, so you can get the effect you need for your application with clear and comfortable reverb.
The delay is relatively short, up to 320 ms, but can be easily blended with the original sound by adding a low-pass filter and modulation.

The soft limiter is a very natural limiting without any compression and is ideal for sound sources with large dynamics!
Variable-Z
The impedance can be adjusted for both microphones and instrument inputs such as guitars.
When connecting a ribbon mic or mic pre, a higher impedance setting than a dynamic mic is considered appropriate, so you can feel rest assured that any mic or device can be used.
The instrument input can be selected from seven more finely tuned impedance selections. A mode for inserting a condenser is also available, bringing out the best characteristics of guitars and other instruments.

Indeed, changing the impedance value clearly changes the sound quality. Personally, I preferred the highest impedance because of its direct feel, but I felt that there are many cases where another choice would be more appropriate depending on the sound you are looking for, the type of guitar, and the amp simulator you are using at the same time.
Tuner function
The interface literally has a tuner function, which is more convenient than you might imagine!
The interface itself is capable of delicate tuning, but if it’s connected to a PC, pressing the tuner button will also start up the tuner on the computer.
It’s so natural and easy to use that I wonder why it was not included until now.
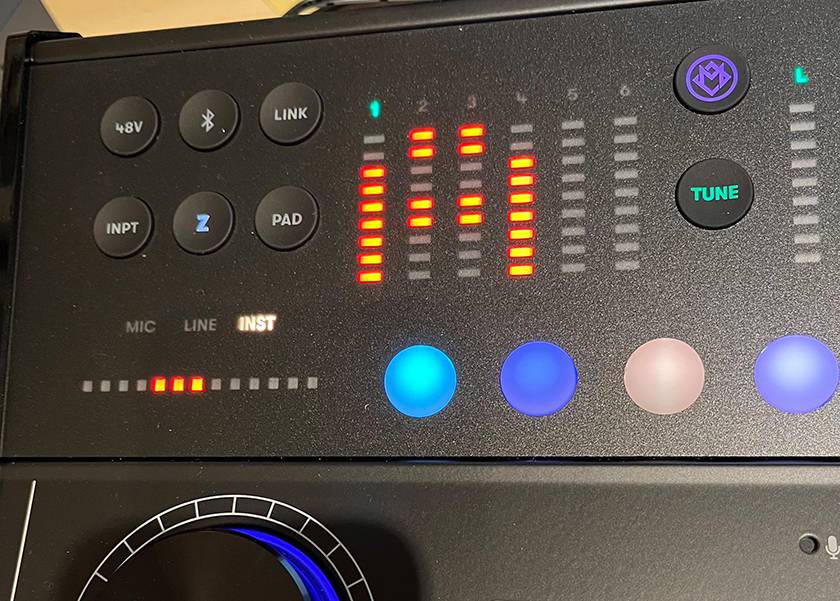

Tuning is done while watching the meter in the lower left corner, which turns green when the pitch is correct.
Dual Channel FX loop
The dual channel FX loop has send/return jacks for outboard and effects pedals, and can be used in mono or stereo.
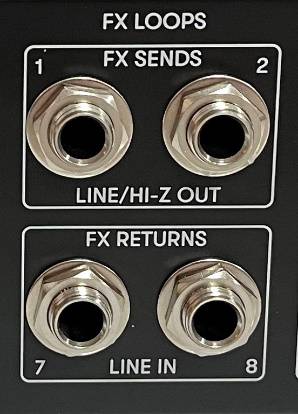
When connecting effects pedals, the loop can be set to high impedance, allowing them to reach their full potential!
Routing these FX loops tends to be a hassle, but I was able to set them up without hesitation from the Mbox Control on my first try.
Summary
There are still many points worth mentioning, but I would like to bring them up in the next issue, as there are some features that I personally would like to introduce after I have played around with them some more!
I feel that Mbox Studio is not just a collection of features, but that each feature has its own philosophy.
There is a sense of inevitability, as if we arrived at the current style as a result of pursuing the functions truly necessary for recording in the 2022 era.
For this reason, at first glance, I felt that there were too many buttons, but now my opinion has made a 180° change. I feel that there are no unnecessary functions at all and the system has been refined.
Mbox Studio is an audio interface that proposes a new way of music production.
I will further explore the depth of its nostalgia in the next issue!


![Top 5 Best-Selling Audio Interface Ranking! [2021]](/contents/uploads/thumbs/2/2021/10/20211001_2_14408_1.jpg)
![[2022 Latest Edition] Overview of Some New Audio Interfaces!](/contents/uploads/thumbs/2/2021/3/20210311_2_12472_1.jpg)
![[2023 Latest Edition] Overview of Some New Audio Interfaces!](/contents/uploads/thumbs/2/2021/1/20210108_2_12044_1.jpg)

![[For beginners!] Choose an audio interface one rank higher](/contents/uploads/thumbs/2/2020/7/20200702_2_10515_1.jpg)
 ライブ配信に必要な機材
 ライブ配信に必要な機材を徹底解説 オンラインライブの創り方
 DTMセール情報まとめ
 配信・ポッドキャスト特集!(ライブ/動画/ゲーム実況)
 DTMに必要な機材
 ニコニコ生放送やUstreamでDJプレイをネット配信する