It’s really hot again this summer.
If we don’t have any particular reason to go outside, we’d rather stay indoors as much as possible, wouldn’t we?
But in Japan, there is an event called a ‘festival’ where people enjoy turning that ‘heat’ into ‘excitement’!
So far, I have participated several times in outdoor events by providing equipment support.
Fortunately, I have never experienced a speaker shutting down because its protection circuit was triggered by high temperatures. However, on sunny days, I have often experienced the back of a speaker becoming so hot during the daytime that I found myself thinking, “Is this really okay?”
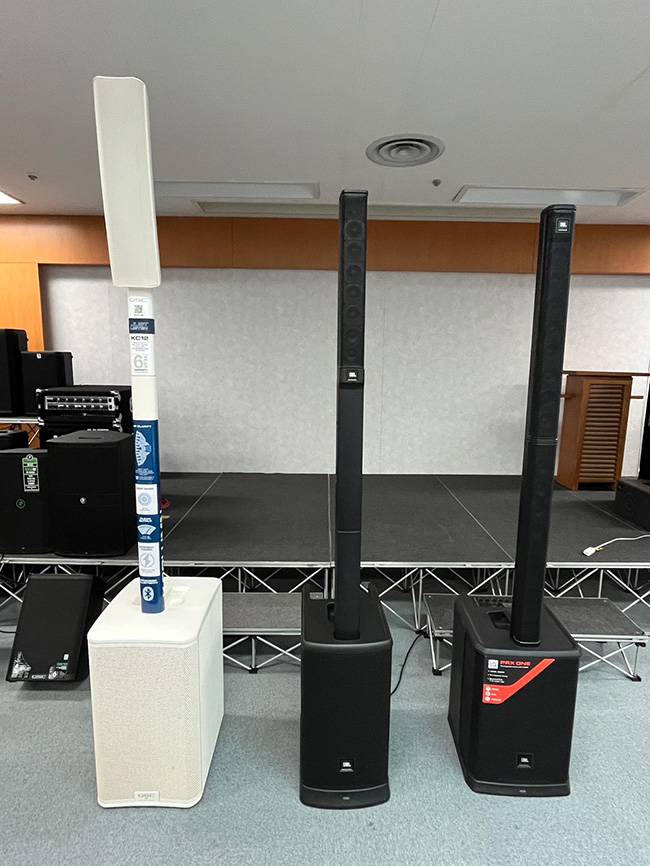
This year, I will be providing a total of six JBL and QSC column speakers as equipment support for the NEO Bon Odori event to be held in Onagawa, Miyagi Prefecture, on August 16. I really want to get through the event without any major trouble!! After thinking long and hard about what to do, I came up with the following idea:
“That’s it! I’ll make a sunshade.”
That was it.
The basic color of PA speakers is, above all, black.
If they are exposed to direct sunlight under the blazing sun, they will obviously become extremely hot in no time.
I even consulted the popular AI, and most of the answers were things like:
- Set them up in the shade in the first place
- Prepare a tent for the speakers
- Hang a tarp, etc.
But all of these options involved additional costs.
That’s when I came up with the idea of using a windshield sunshade for cars.
I thought, “This should work if I repurpose one of these!”
Since the power amplifier, DSP, and other electronic circuits are built into the subwoofer section, I first thought I should somehow protect this part from direct sunlight.
The key points were:
- Block direct sunlight at all costs
- Leave a gap between the shade and the main unit for ventilation
- Keep the cost to a minimum
So, let’s get started.
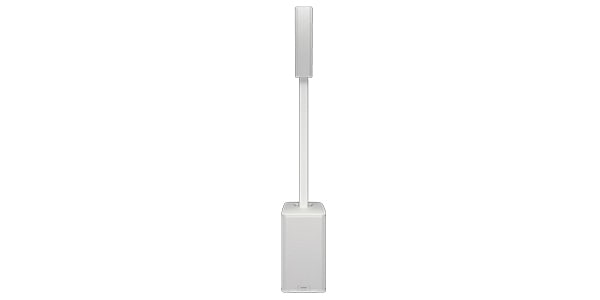
1. Here are the column speakers I prepared for this project.
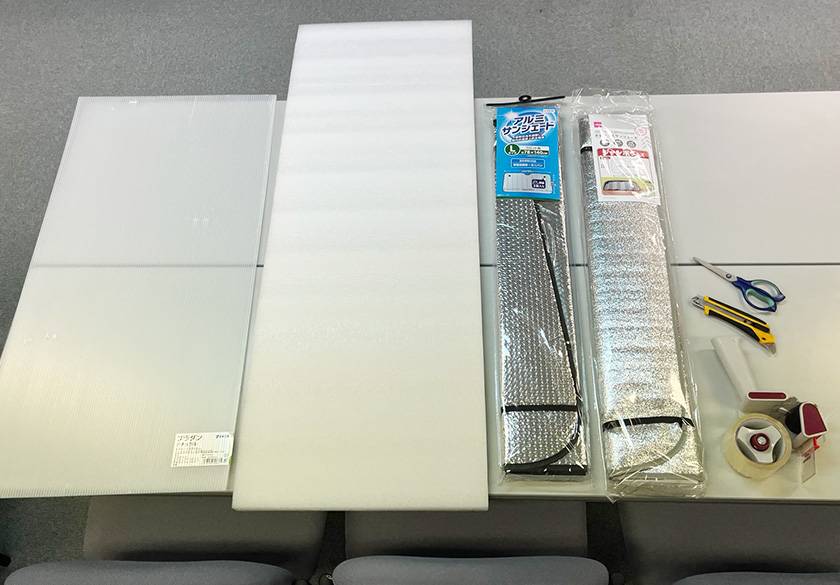
2. Things I prepared
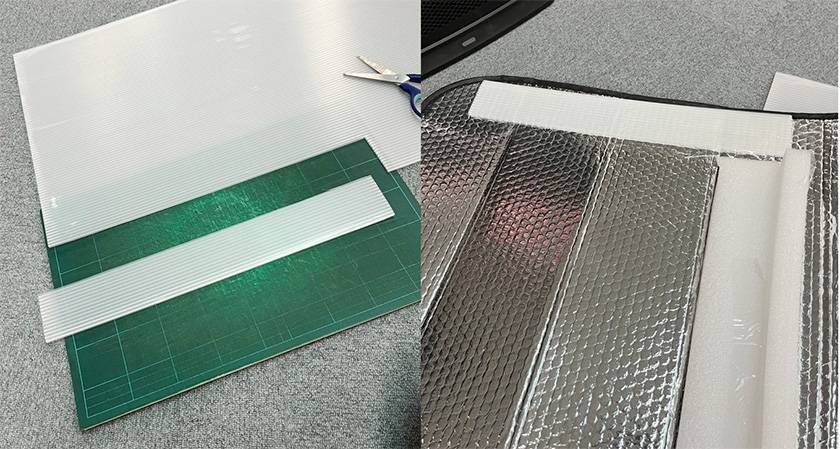
From left: plastic corrugated board, a styrofoam sheet (originally used as some kind of packing material), aluminum sunshade (DCM, 78 × 140 cm, 498 yen), aluminum sunshade (DAISO, 78 × 140 cm, 330 yen), scissors, a utility knife, and tape.
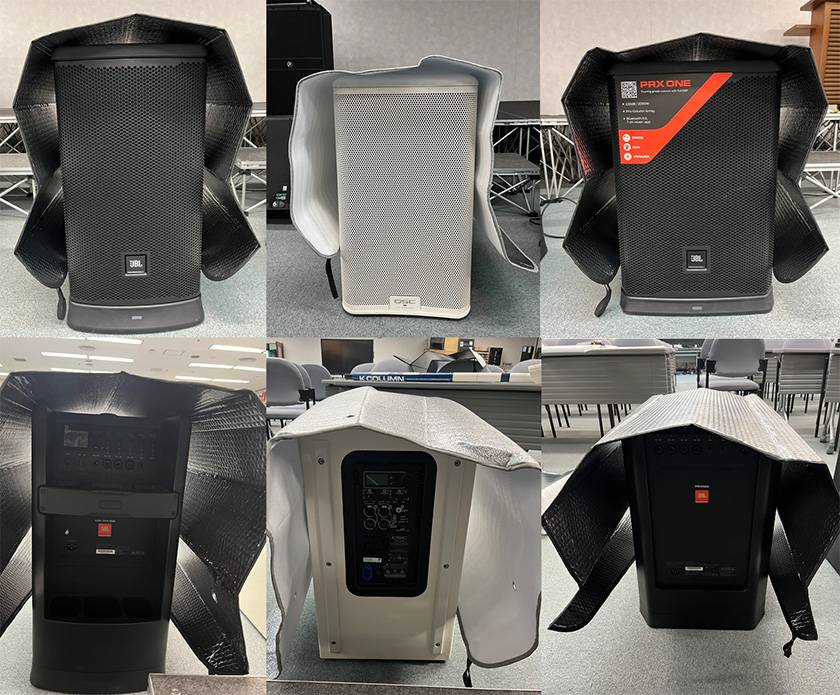
3. First, I just placed it on top without thinking too much.
In terms of length, I thought the KC12 might be just a little too short, but it was actually a good size. It was a little long in terms of depth as well, but since that means it provides more shade, I decided that was fine.
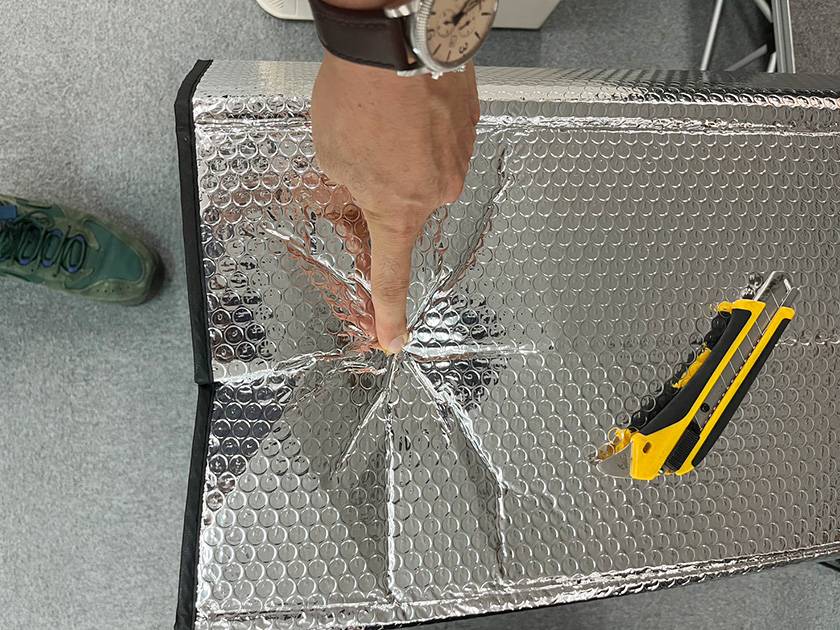
4. After finding the center, I pressed firmly with my finger at the center of the hole where the column pole would go and marked it.
At this point, I pressed firmly around the edge of the hole with my fingers to get a rough idea of the diagonal lines.
5. I made diagonal cuts with a utility knife.
What I learned at this point was that “the hole diameter < the column pole diameter,” so I made the cuts slightly longer than I initially thought I would need.
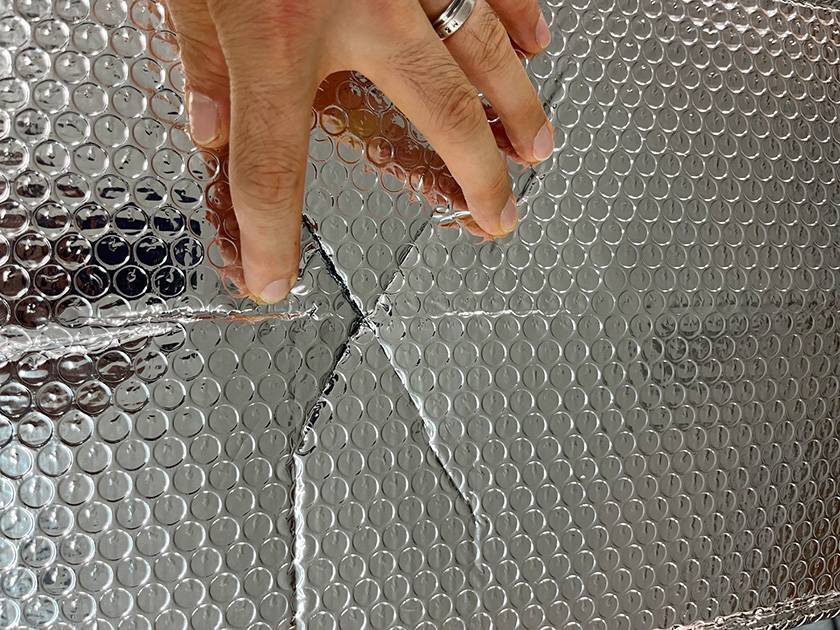
It’s a little hard to see, but I applied three layers of tape from both the front and back to slightly reinforce the cut area.
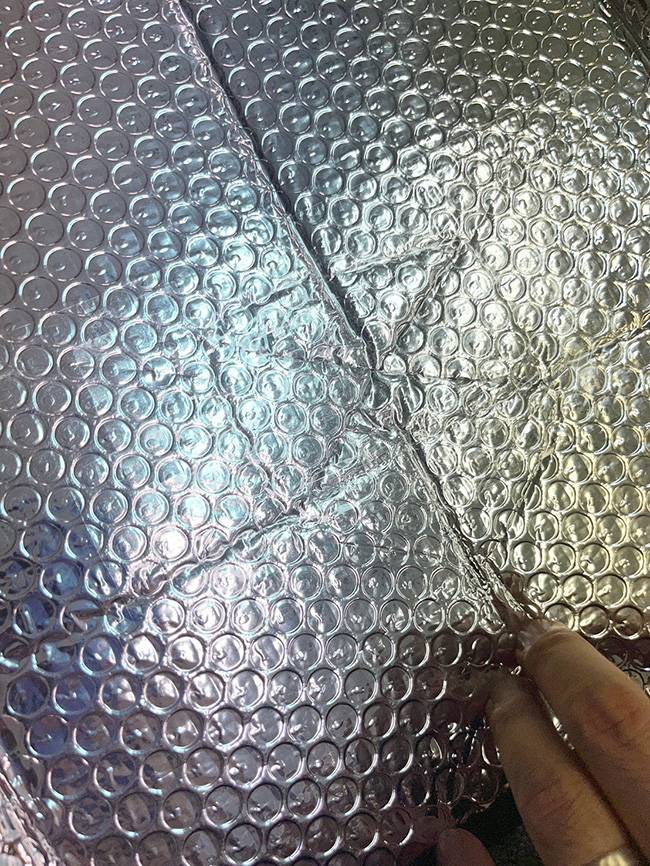
6. It went through more cleanly than I expected, like this.
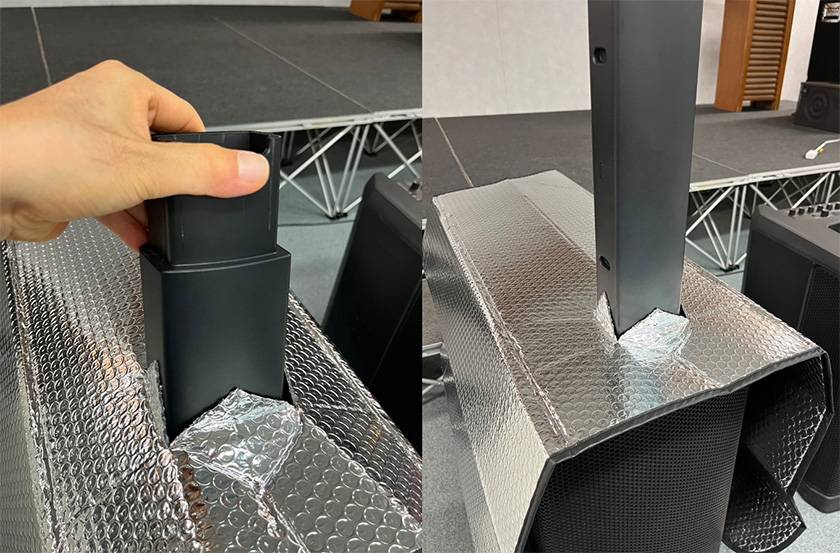
7. Next: “Create a gap between the aluminum sunshade and the main unit.”
I used the styrofoam sheet I had prepared. I cut it like this and secured it in an L shape with tape.
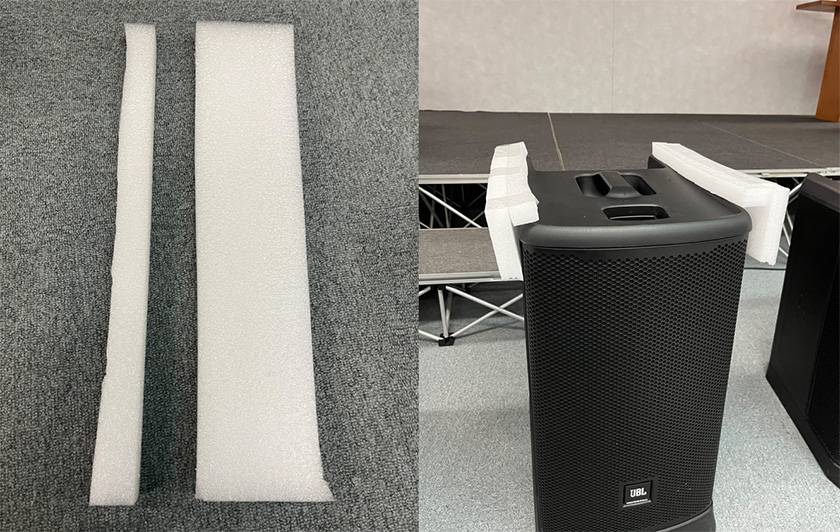
8. I marked the positions of the corners of the L-shaped parts with a pen and secured them to the aluminum sunshade with tape.
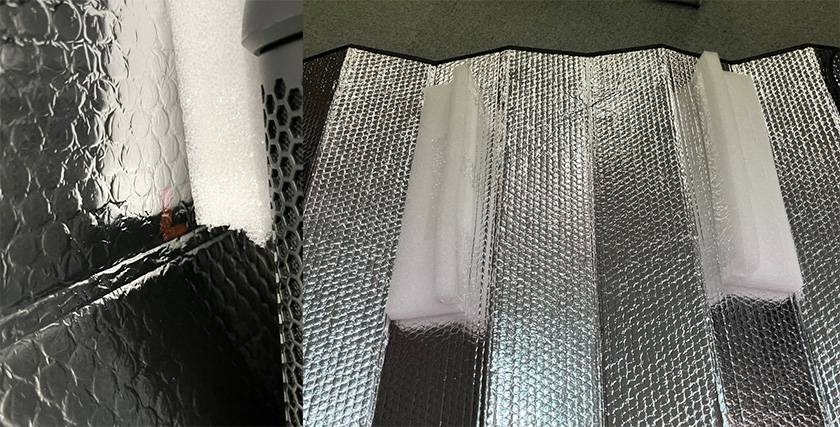
9. The parts hanging down on both sides of the front were wrinkled, so this is where I used the plastic corrugated board.
I cut it into long, narrow pieces and secured them to the inside of the sunshade with tape. I’m using a lot of tape.
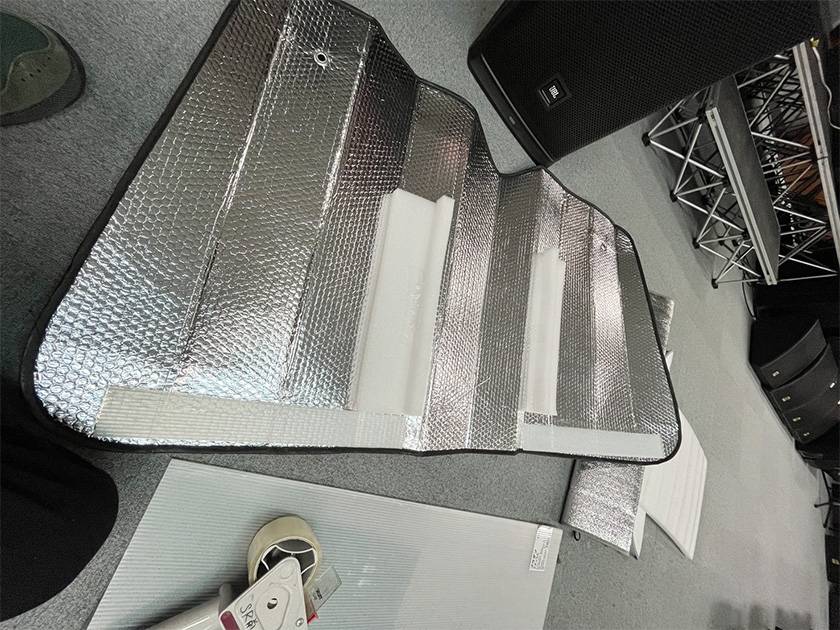
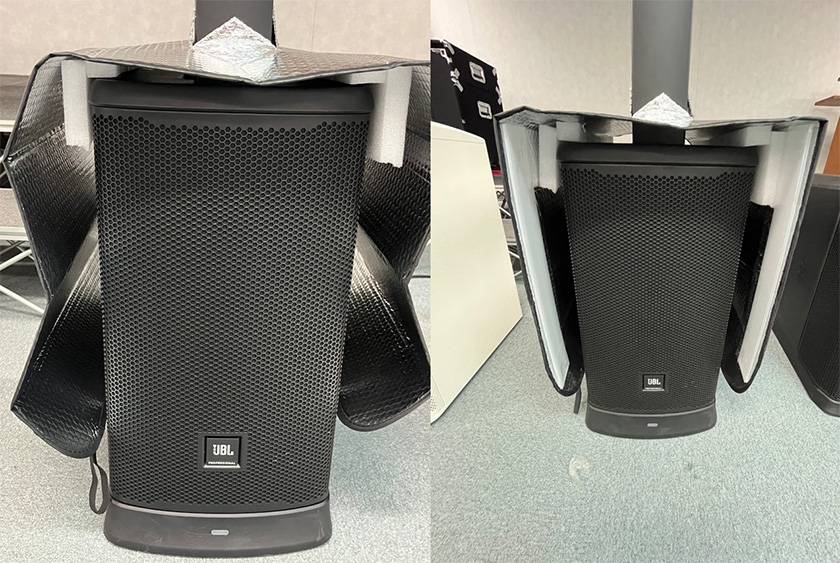
10. What do you think? The left is before adding the plastic corrugated board, and the right is after.
I’m sure there are plenty of things you might want to point out, but visually, it looks much cleaner now.
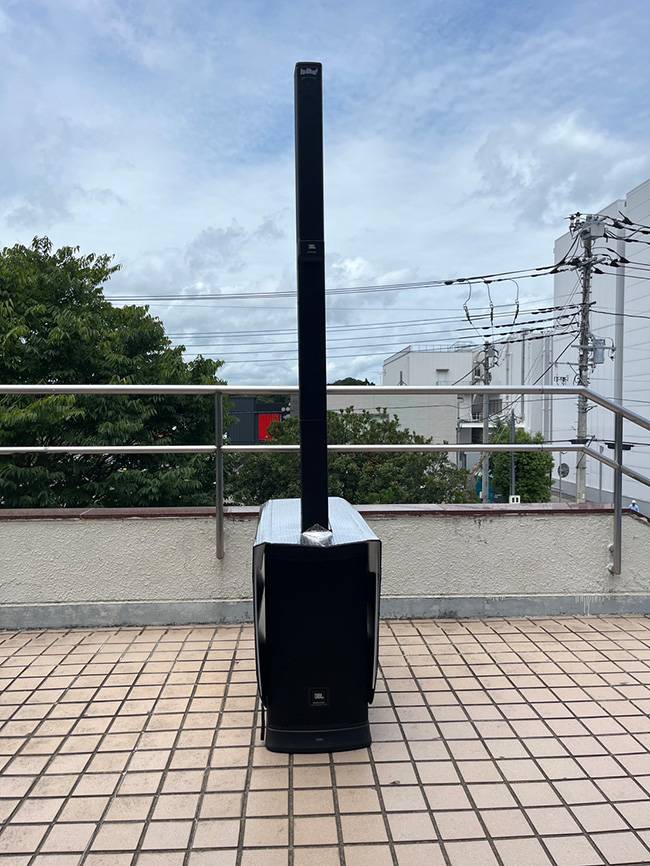
11. So, I took it outside to see how it looked.
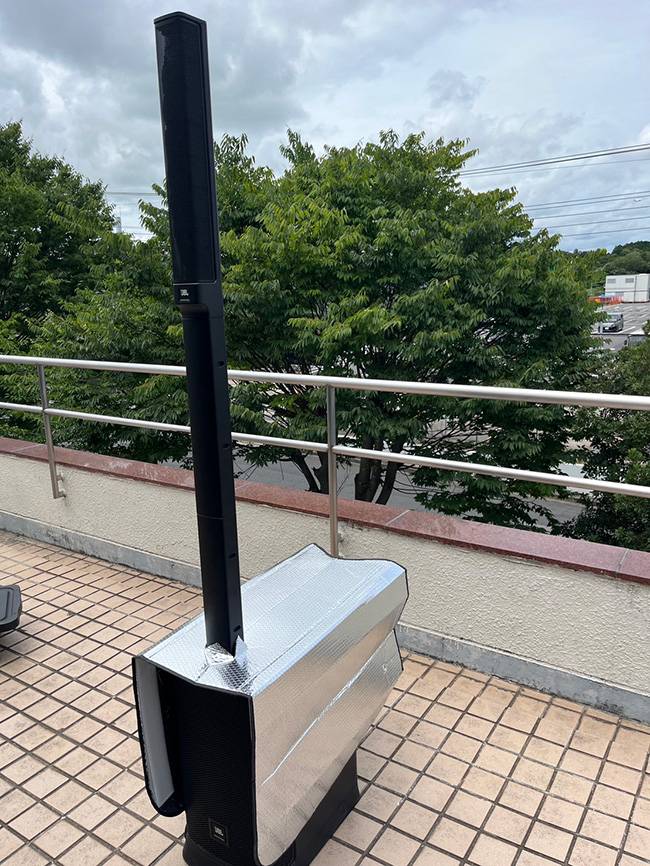
12. All three of the column speaker models I prepared this time have USB ports that can also be used for charging.
If I turn on a USB fan such as the CLASSIC PRO CPF10 or CPF20 like this, it should be possible to circulate air around the main unit while keeping it shaded, which should also help prevent heat from building up.
However, there was a catch here as well.
The QSC KC12 uses Type-C, so it cannot be used unless you have a USB fan that can receive power from Type-C. Therefore, for the fan for the KC12, I’m thinking of using a USB power adapter.
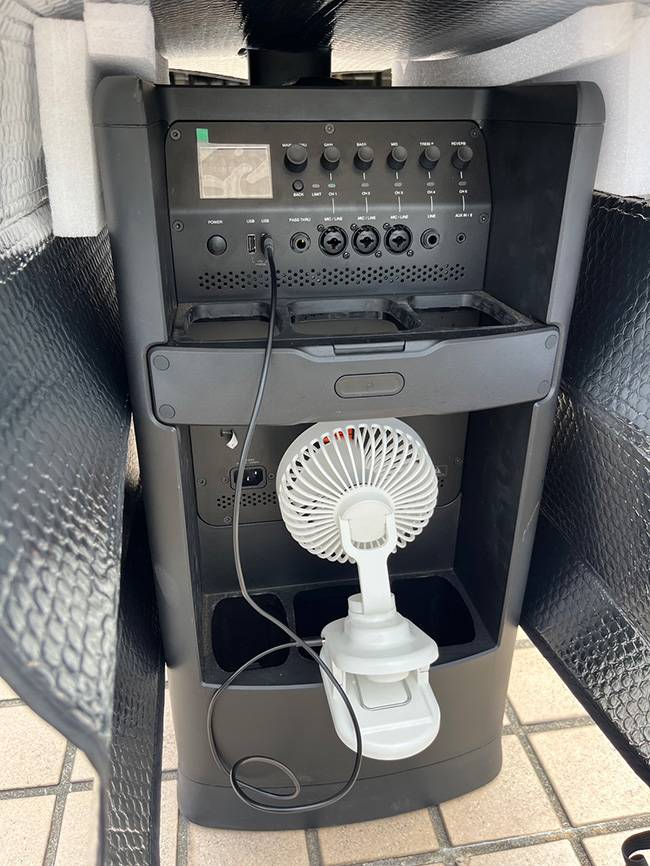
There’s also the sagging on the back side.
For this part, I’m thinking of either securing it all the way around with a packing strap or attaching it directly to the side of the subwoofer with masking tape!
I’ll skip over the details quite a bit, but I made versions for the PRX ONE (DAISO) and KC12 (DCM) using the same procedure.
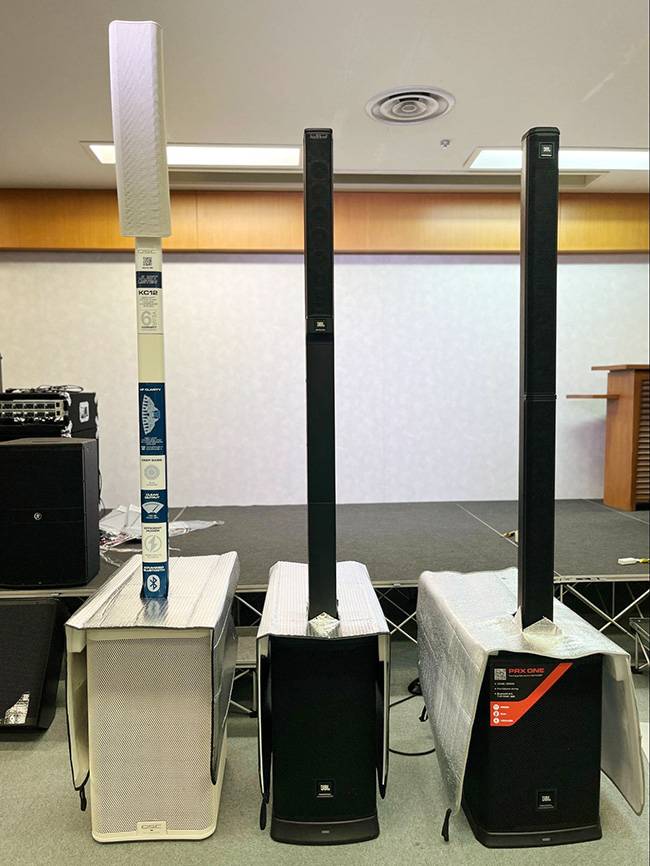
The DCM version has a silver reflective sheet on both sides, while the inside of the DAISO version is more like a styrofoam sheet, so it felt a little flimsier than the DCM version. However, once I added the L-shaped parts and the plastic corrugated board, it became nice and sleek in the same way, so I decided it was good enough.
On July 20, the temperature in Narita was 35°C (95°F).
Starting at 11 a.m., I set up the column speakers outdoors and actually tested the effectiveness of the sunshades!
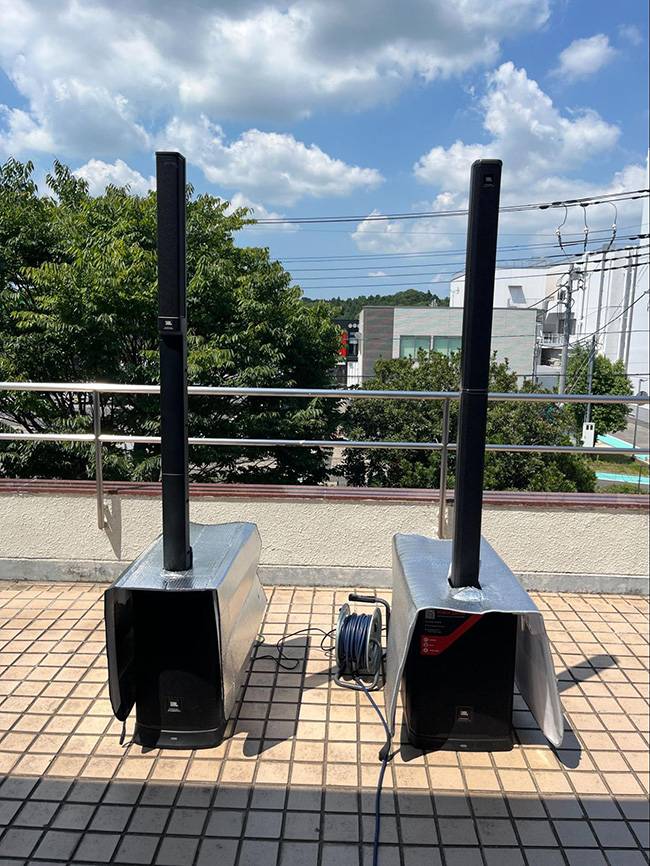
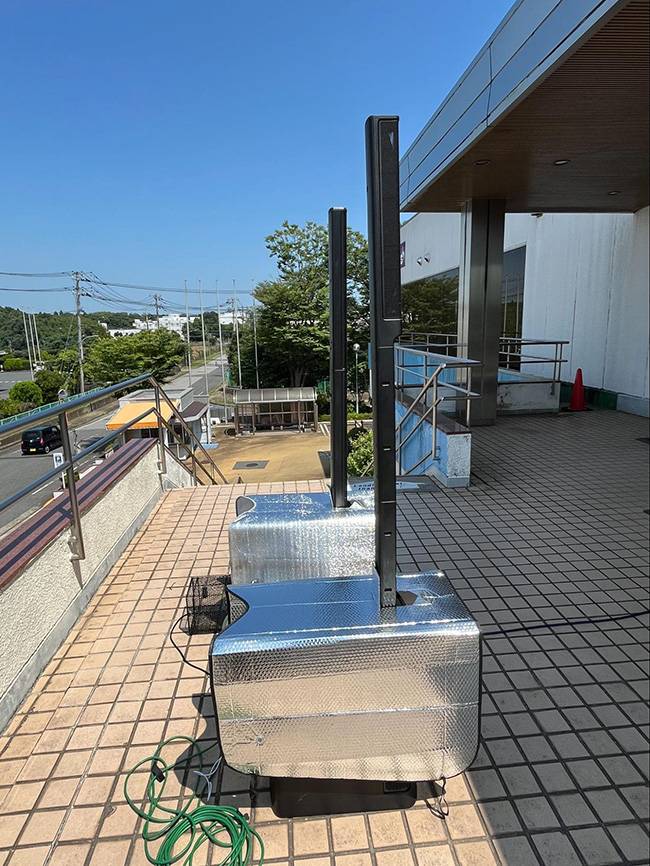
There was an area on the front speaker grille that was receiving direct sunlight, so I extended the cutout for the column pole slightly, allowing the entire shade to slide forward.
Since the way sunlight hits the speakers changes depending on the installation location and the position of the sun, it seems useful to make it possible to adjust the position like this.
■ EON ONE Mk2
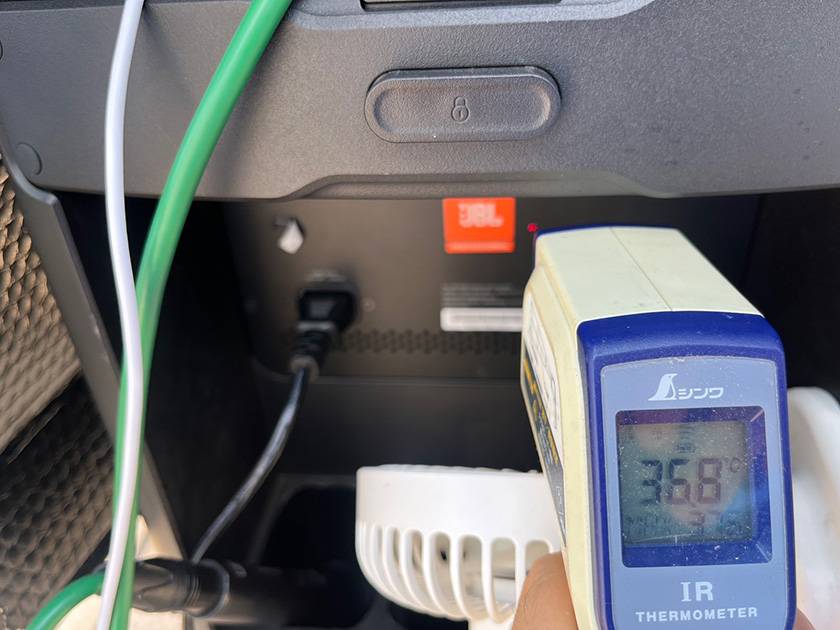
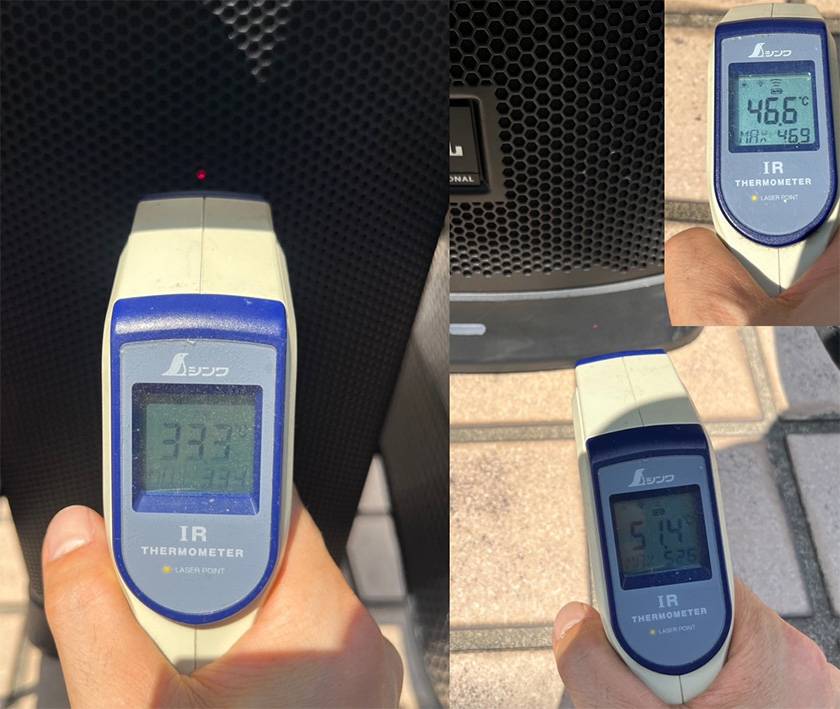
I measured the surface temperature of each part using an infrared thermometer with a laser pointer.
- Back: approx. 36.8°C (98.2°F)
- Front (shaded area): approx. 33.3°C (91.9°F)
- Front (exposed to direct sunlight and close to the ground): approx. 51.4°C (124.5°F)
- Ground: approx. 46.6°C (115.9°F)
Even on the front of the speaker, there was a temperature difference of approximately 18°C (32°F) between the shaded and sunny areas.
Once again, I really felt how much direct sunlight affects the temperature of the equipment.
■ PRX ONE
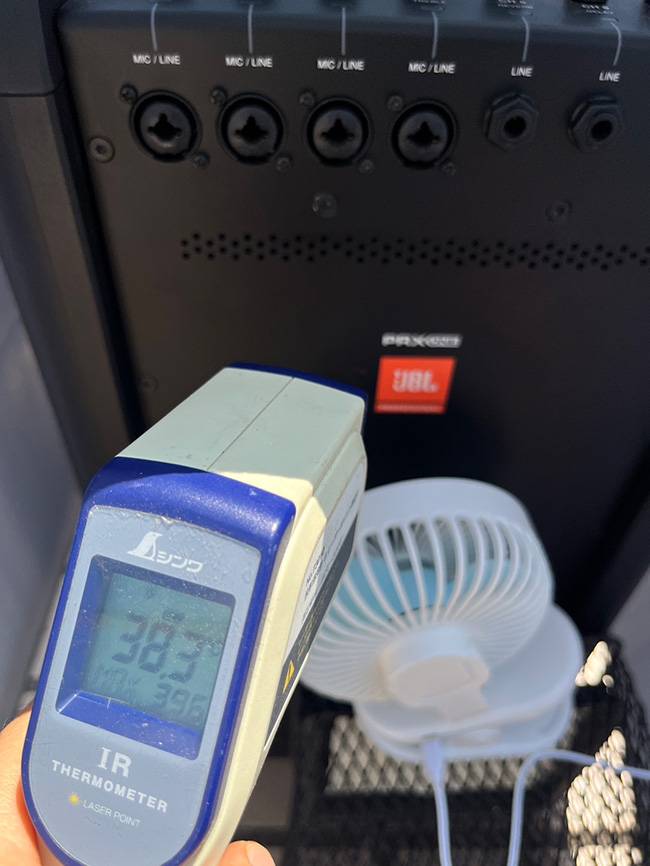
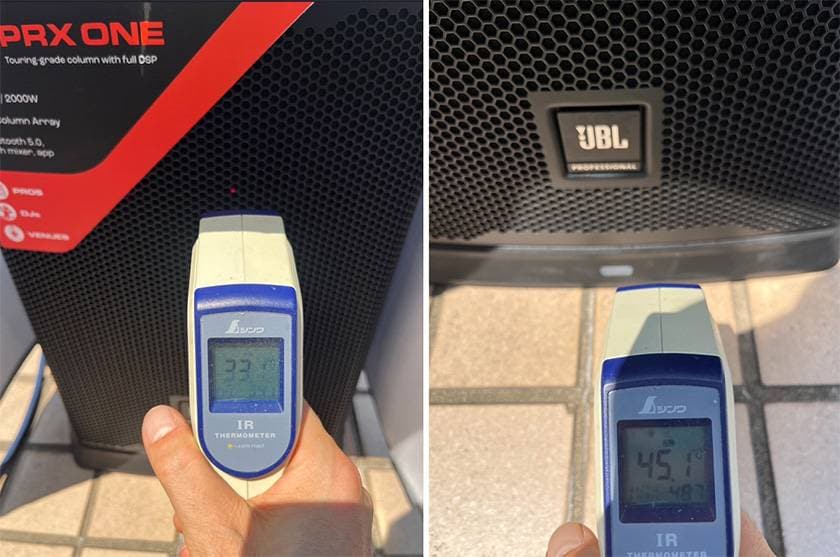
I also measured the temperatures in the shade and in direct sunlight here.
- Back: approx. 38.3°C (100.9°F)
- Front (shaded area): approx. 33.1°C (91.6°F)
- Front (exposed to direct sunlight and close to the ground): approx. 45.1°C (113.2°F)
Results of the daytime test
- Above all, it is important to avoid direct sunlight.
- It is even more effective if the structure allows you to adjust the position of the cutout so that the front speaker grille is also shaded.
- There was no significant temperature increase on the top or sides of the speaker itself, or in the gap between the sunshade and the main unit, for either the DCM or DAISO versions.
- Although the temperature of the back rose to some extent, I could clearly feel that the shade was effective in blocking direct sunlight.
- This test was conducted with no sound output and was not performed under the conditions of actual event use, such as prolonged operation at high volume, so it is not a strict comparison. However, I was able to confirm that blocking direct sunlight helps suppress temperature increases.
Impressions after making them
- It took about 30 minutes to make the two.
- Since the column pole is inserted through the cross-shaped hole, as long as the cross-shaped hole does not tear, the position will not shift, so it feels quite stable.
- Depending on the position of the sun, it may be necessary to move the shade forward or backward.
- If you want to cut the cost of the aluminum sunshade as much as possible, go with DAISO; if you want to consider the quality a little more, go with DCM.
- The DAISO material is more prone to having the cross-shaped hole expand.
- It was fun, like making something for a summer vacation school project.
How will these perform at the actual event? Please look forward to next month’s blog to find out!!
It looks like they should be more effective than doing nothing at all!!
If it works well, I’ll consider having CLASSIC PRO turn it into a product!




![[For Neighborhood Associations / Organizers!] Tips & How to Choose the Best Simple PA Systems for Summer Festivals & Bon Odori Events](/contents/uploads/thumbs/2/2026/7/20260723_2_35770_1.jpg)
![[Recommended for 2026] 5 Latest Battery-Powered PA Speakers!!](/contents/uploads/thumbs/2/2026/2/20260217_2_34484_1.jpg)
![[For Hanami, Entrance/Graduation Ceremonies, and More!] Convenient Battery-Powered Portable PA Systems for Outdoor Use](/contents/uploads/thumbs/2/2025/3/20250326_2_30968_1.jpg)
![[Must-See Speakers for Beginner PA Users] Highly recommended for live concerts and other various music events! JBL IRX108BT and IRX112BT PA Powered Speakers](/contents/uploads/thumbs/2/2023/9/20230927_2_24031_1.jpg)
 JBL EON ONE MK2 特集
 スピーカーの定番 Classic Proのおすすめモデル
 スピーカースタンドの選び方 K&M編
 神社でお祭りバンド
 JBL PRX ONE 特集
 学校向け機材特設ページ
 Discount Sale
 Outlet
 New Arrivals
 Podcast (streaming)
 Headphones / Earphones
 Microphones
 Wireless Equipment
 Speakers
 Power Amps
 Mixers
 Processors
 Portable PA Systems
 Recorders
 Karaoke
 Guitars
 Basses
 Ukuleles
 Drums & Percussion
 Pianos / Synthesizers
 Wind Instruments
 Stringed Instruments
 Japanese Instruments
 Harmonicas, Other
 Software
 DJ & VJ
 Stands
 Cables & Connectors
 Racks & Cases
 Lighting
 Stage & Truss
 Video Equipment
 PC PERIPHERALS
 Power Supplies
 Studio Furniture
 Household Items, Other
 Alcoholic Beverages