Hello,
At the end of last year, I bought a wok and have been diligently cooking at home ever since.
Owning a wok has made cooking a lot more enjoyable, and it’s motivating me to try making a variety of dishes. However, most of what I make tends to be Chinese cuisine, which naturally raises concerns about calorie intake.
That said, these dishes are not only delicious to eat but also incredibly fun to cook!
I’m currently considering incorporating regular exercise into my daily routine to balance things out.
Now, originally, this post was supposed to be about “Let’s Try Wiring!”
but there’s something we need to understand first before we get into actual wiring:
The Structure of Switches
This time, I’ll explain the structure of the two most common types of switches—the ‘3-way lever switch’, often used in models like Telecasters, and the spring-loaded ‘toggle switch’ found in Les Paul models.
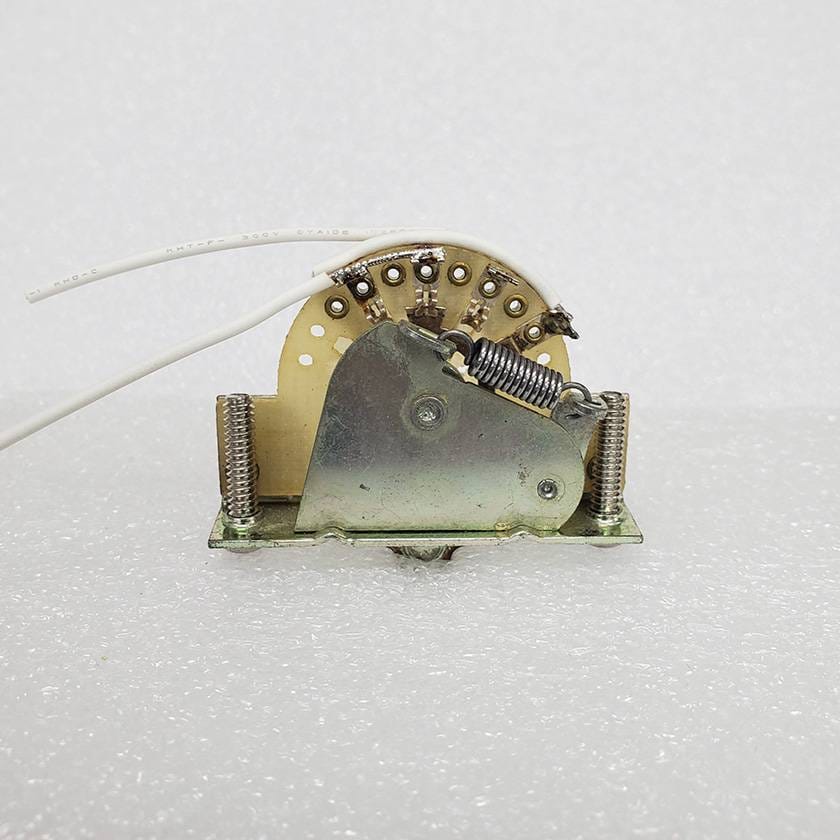
◯ 3-Way Lever Switch
Let’s start with the lever switch.
I’ll use the classic and easy-to-understand CRL 3-way switch as an example.

If you’re seeing this for the first time,
you might be thinking, “What is this? How does it work?”
Don’t worry.
It’s actually very simple.
Take a look at one side of the switch.

The far-right terminal is always in contact with a bent piece of metal.
The second terminal from the right is also in contact with this metal piece.
In other words, terminals 1 and 2 (counting from the right) are connected, while terminals 3 and 4 are separated.
Now, when you move the lever to the center position:

The bent metal shifts, connecting terminals 1 and 3, while terminals 2 and 4 are disconnected.
If you move the lever again, this time, terminals 1 and 4 are connected.

And terminals 2 and 3 are disconnected.
Do you see the pattern now?
The lever switch simply connects different terminals to the common terminal (the first terminal on the right) as you move the lever.
It’s pretty simple.
The terminal that is always connected to the bent metal is called the common terminal, and it functions as a circuit in connection with other terminals.
Since there are three terminals that can connect to the common terminal, this is referred to as a single-pole, triple-throw (SP3T) switch.
Now, let’s look at the other side.
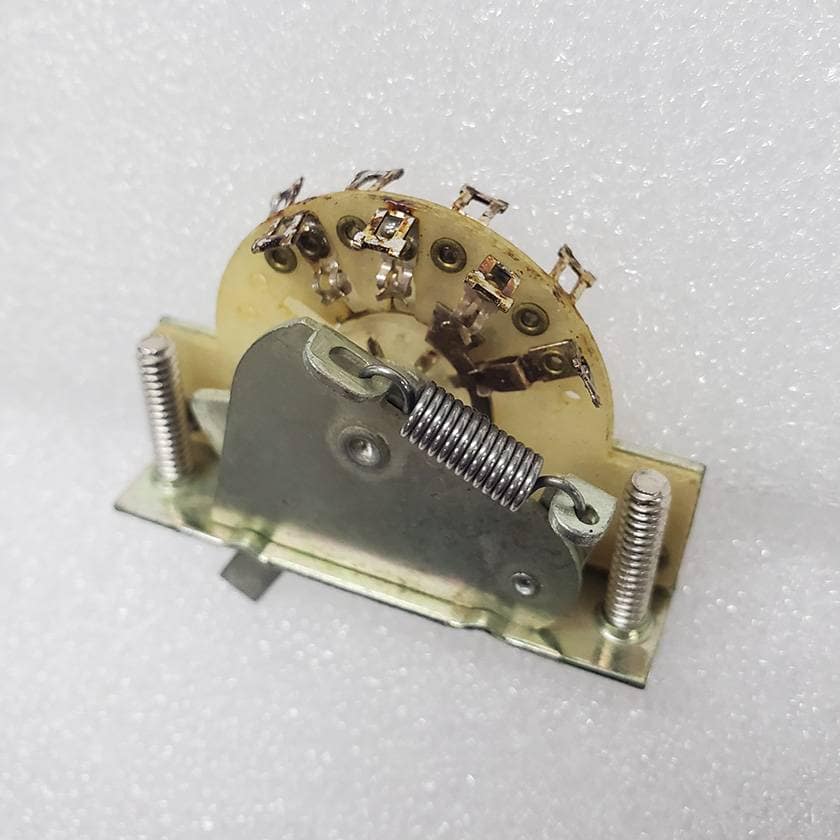
The spring may make it a bit hard to see, but the structure on this side is exactly the same as the other.
In other words, this side is also a single-pole, triple-throw (SP3T) circuit, which means the switch as a whole is a double-pole, triple-throw (DP3T) switch.
You might be thinking,
“So... what’s the big deal?”
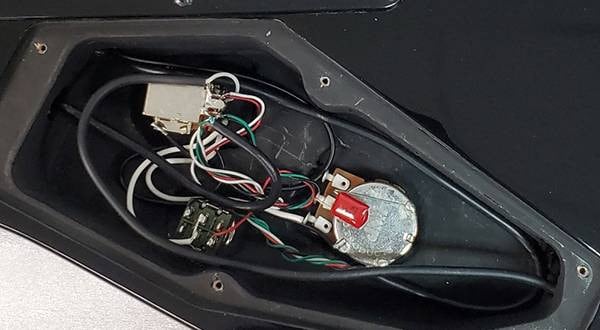
Let’s take a look at an example using Telecaster wiring.

The two common terminals are connected, and as shown in the yellow-circled sections of the photo, the terminals are joined and wired, with each pickup connected to these points.
When the switch is tilted to one side, the corresponding pickup is selected.
Since the common terminals are connected, both pickups are selected when the switch is in the middle position.

Wiring after understanding this structure and simply following a wiring diagram found online without knowing the details makes a world of difference.
By fully grasping the structure, you can troubleshoot and quickly repair issues, such as cases where no sound is produced.
This knowledge also helps when sourcing replacement parts, and you may even be able to substitute other types of switches with the same structure instead of using a lever switch.
Furthermore, instead of using a lever switch solely as a selector, you can create your own custom wiring that incorporates additional functions.
With this understanding, you can also tackle more complex configurations using special switches like double-pole, four-throw (DP4T) switches or super switches with four poles and five throws, enabling even greater wiring flexibility.
◯ Leaf-Spring Toggle Switch
Here, I’ll explain the toggle switch using a common example — a short-type domestic model.
First, take a look at the picture.

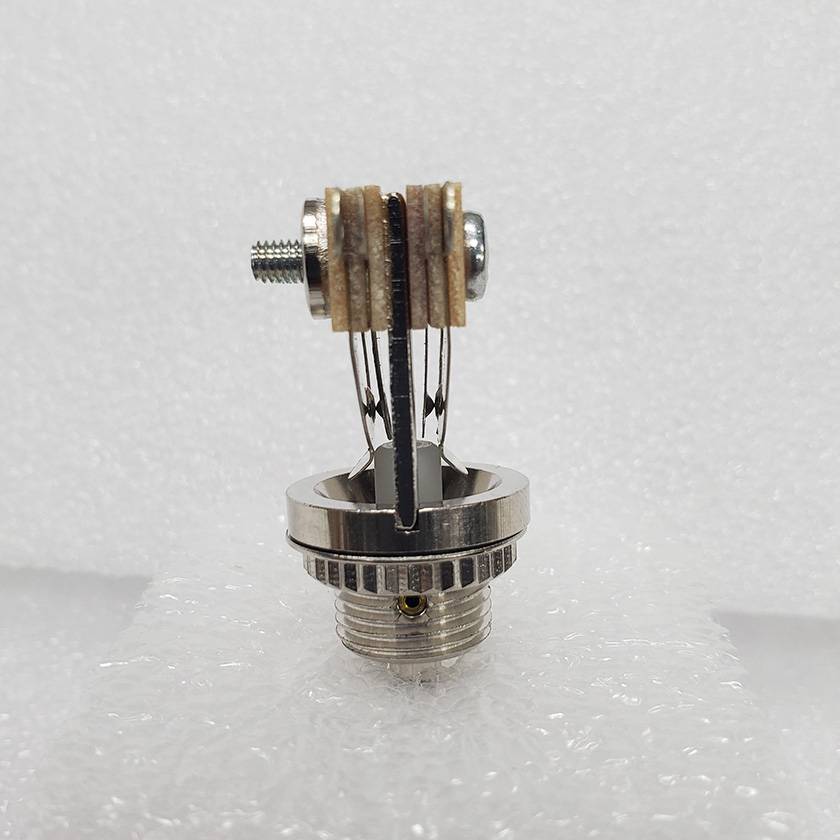
Compared to the lever switch, it somehow looks simpler, right?
But still a bit confusing?
Not to worry — this one is really straightforward.
First, let’s connect the two terminals in the middle, just as you would when wiring it for use as a guitar pickup selector.
By the way, these terminals are the common terminals of the switch.


In this state, if you look at the middle of the switch, you can see that the terminals extending from both ends are in contact with the common terminal.
Next, try flipping the lever.


You’ll notice that the terminal on the opposite side of the flipped direction is now disconnected from the common terminal.
That’s it!!
In other words, the pickup connected to the flipped side is selected, while in the center position both pickups are connected.
That’s all there is to it!!
And then there’s the thick terminal sticking out from the back.

This terminal serves as the ground for the switch, so you can connect it to the back of a pot or the ring of a jack without any problem.
It’s a very simple structure, isn’t it?
However, precisely because of its simple design, it’s more prone to issues compared to a lever switch. Let me explain one of those issues—contact failure.
To be specific, this happens when “only one pickup produces sound after switching.”
The reason this occurs is that the blade spring toggle switch merely makes or breaks contact between terminals. When the switch isn’t used frequently, the terminals can become tarnished, making it harder for electricity to pass through.

On the other hand, lever switches are less likely to encounter this issue because the metal parts rub against each other when the switch is toggled.
You can see the wear marks in the photo below.

That said, a toggle switch that has trouble conducting current can be easily restored.
Since the problem is caused by tarnish on the parts, all you need to do is remove it.
One method is to cut a small piece of waterproof sandpaper, around #2000 grit, and place it between the switch contacts.

Then, simply slide it lightly back and forth. By polishing all the contact points this way, most contact failures can be resolved.
However, if you’re hesitant to use sandpaper, you can also use cleaning fluid or polishing compound to clean the contact areas instead.
The key point is just to remove the tarnish from the contacts, so feel free to use whichever method you prefer.
How was it?
There’s still a lot more I’d like to share about switches, but for this post, I aimed to keep it simple and easy to understand by focusing on the basics. I hope to cover more in future updates.
While writing this blog, I realized that before getting into practical wiring, it might be better to explain potentiometers first...
So, it looks like the hands-on wiring part will be a bit further down the line.
That said, thank you for reading this post!
I’d be delighted if you would join me again for the next update.
See you next time on the Sound House Staff Blog.
Goodbye!


 ピックアップ交換大作戦!
 プレイテックのギターを最強に改造!!
 ピックアップの種類
 パーツの配線を知ろう
 ピックアップの種類(アコースティックギター)
 ピックアップの種類(エレキギター)