First Order of Business
The key to tuning a stringed instrument is to “not be in a hurry, but remain calm and collected”. Tuning is not just about moving the pegs to the right pitch; it is about balancing the instrument as a whole. Once you get the hang of it, it's not that difficult, but it can be confusing for first-timers. I hope this article will help you get the hang of it.
Please refer to Sound House's “TORA NO MAKI” for more information.
⇒ TORA NO MAKI website: Beginner's Guide to Stringed Instruments
A stringed instrument is in balance with the tension of the strings.
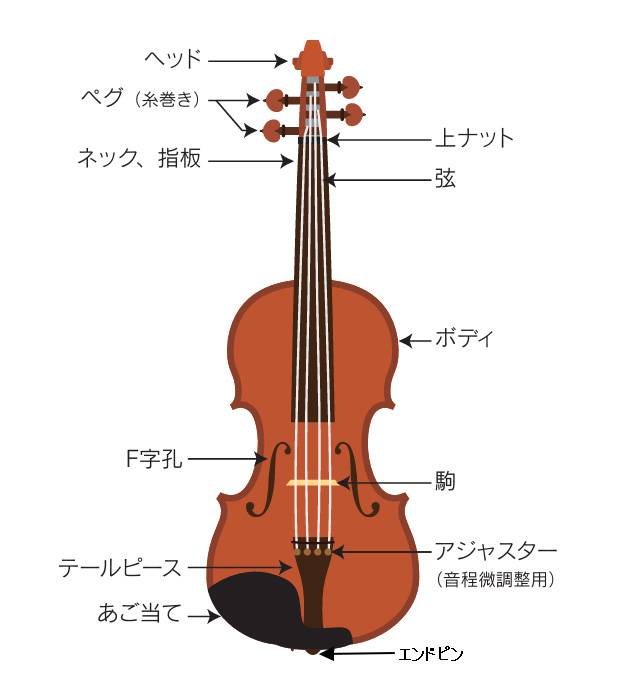
The parts that support the tension of the strings are the pegs, upper nut, piece, tailpiece, lower nut, and end pins. The entire instrument to which these parts are attached is in a state of balance with the tension.
Therefore, not only the pegs, but the condition of the instrument as a whole is affected by changes in temperature and humidity, which in turn affect the condition of the instrument. This is one of the causes of pitch deviation even though the instrument is not touched by hand, and I think this is true for all instruments.
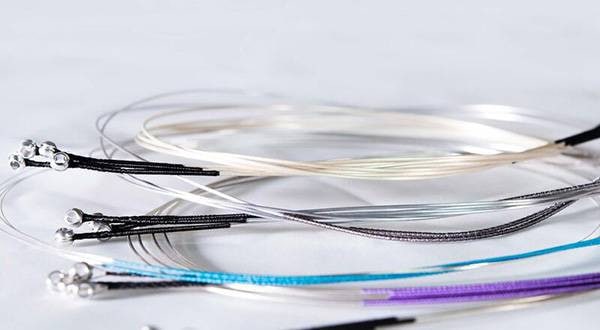
How the strings wrap around the pegs - Are they neatly wound?
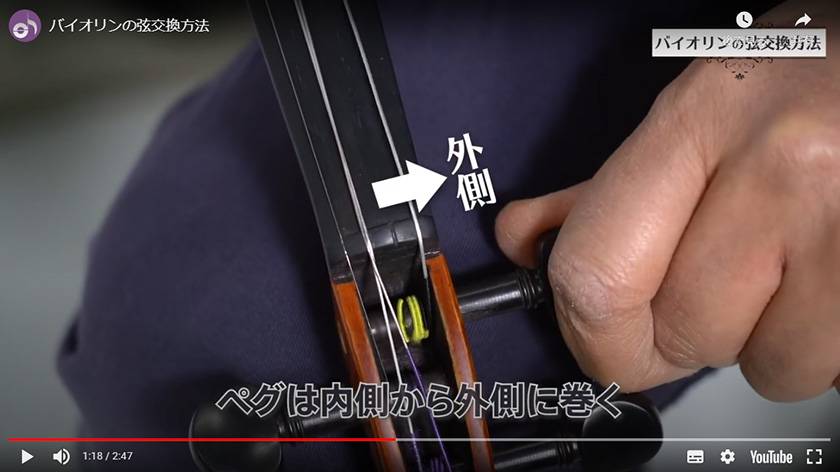
A string is wound around the peg by inserting the tip of the string through a small hole in the peg. The string should be wound as tightly as possible from the hole to the wall of the peg box, i.e., from the inside to the outside, to minimize deviation. This is one of the causes of out-of-tune strings.

The pitch is set by the pegs, but it is also fine-tuned by the fine tuners built into the tailpiece. Although most attention is focused on the action of moving the pegs, there are other things to keep in mind.
Important
① Checking the position and angle of the bridge

The angle of the bridge should be such that the back of the bridge is vertically aligned with the front board, which can be confirmed by looking at the instrument from the side and checking the angle with a ruler or the like.
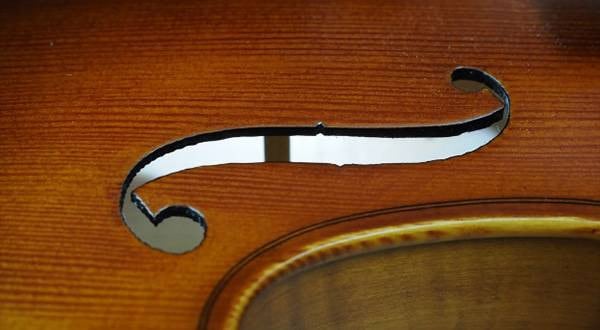
The position of the bridge should be balanced so that the center thickness of the bridge is aligned with the line connecting the inside indentation of the left and right F-holes. This is to be checked before starting to tune the strings.
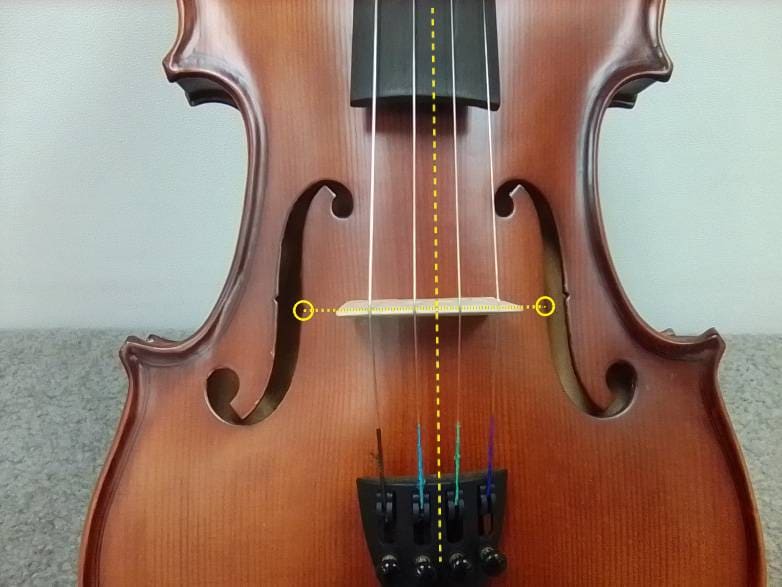
When you start tuning, the bridge usually tilts forward (toward the neck) due to the minute movement of the strings. Therefore, the bridge should be adjusted several times during tuning to maintain the correct angle (stance).
■ How to correct a piece
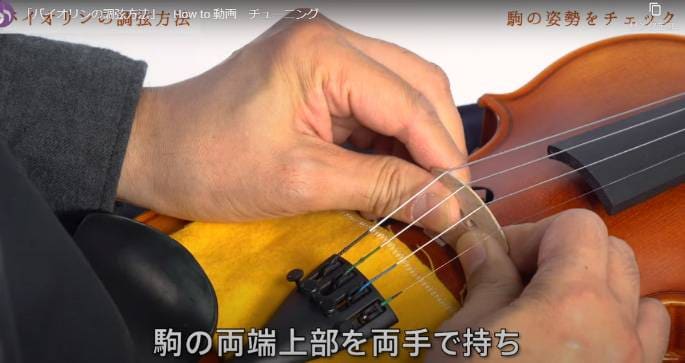
Place the instrument on your knees as shown in the photo to correct the angle of the pieces.
Hold the piece between the fingers of both hands and correct only the tilt of the piece without moving the legs.
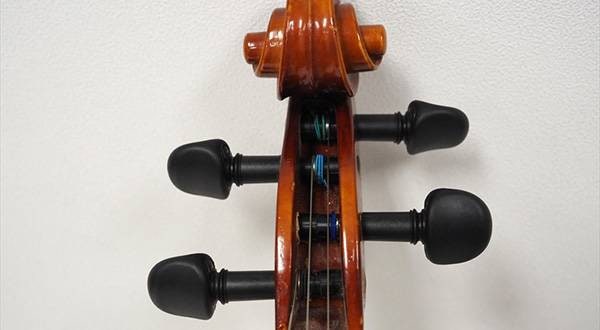
② Be careful not to turn the pegs too much!
When you hear the word “turn,” you may think you are turning the pegs in a circular motion, but the movement of the pegs is surprisingly subtle once a certain amount of tension has been applied.
Since these are not gear-type pegs, the pitch of the note will change drastically if you rotate them just a little. There are many cases in which a peg is cut by a sudden movement with the same sensation as a guitar peg. In the “Tips to Avoid Breaking Strings” video in the “TORA NO MAKI” section, there’s an explanation on how much rotation angle is required to raise the G string peg of a steel string of a violin from an octave lower pitch to the default pitch.
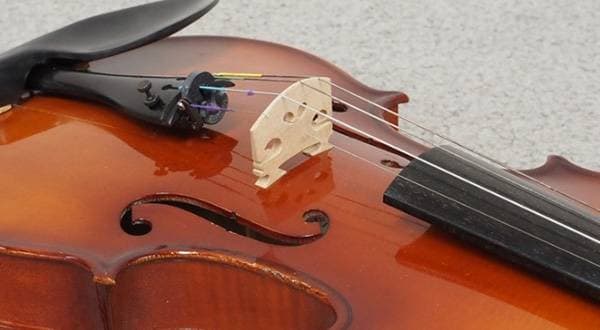
③ The fine tuners screws on the tailpiece should have a proper amount of room.
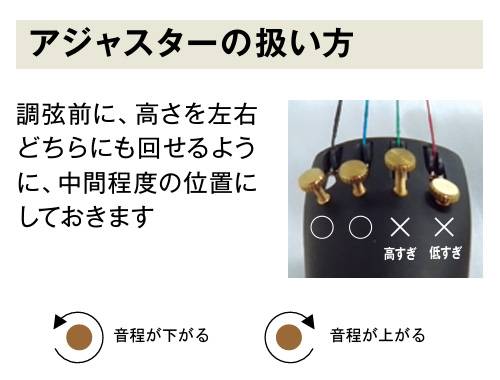
The fine tuners should be in a position that allows you to either raise or lower the pitch (the image is of a cello, but the basic structure is the same for violin and viola).
The fine tuners are easy to operate, so I tend to rely on it, but it’s not possible to raise the pitch from a too low position as shown in the image. In this case, give it an appropriate amount of leeway, and then match it again with the pegs. Adjust the fine tuners and repeat.
Start the actual tuning.
Most violins are tuned in the order of A, D, G, E, and violas are tuned from A, D, G, C. There seems to be no strict rule for this order, but it is customary. During the tuning process, check the angle of the bridge, then move on to the next string, and repeat the process.
Important
First listen and check the correct pitch.
If you misinterpret the pitch by an octave and try to set it an octave higher, the string will likely break. If you don't know whether the string is at a higher or lower pitch, you may be hesitant to move the peg. Listen and check for the correct pitch.
■ Violin
■ Viola
(The following is a quote from TORA NO MAKI)
Finally, turn the pegs and start tuning.
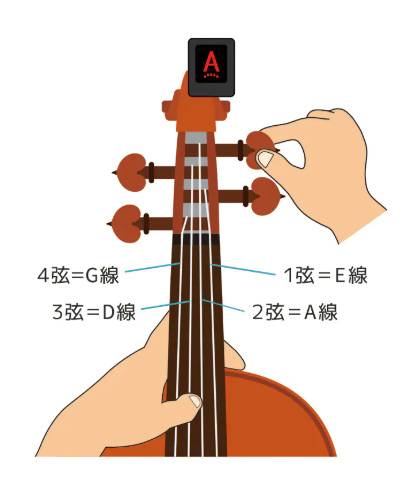
The first string = E string, the second string = A string, the third string = D string, and the fourth string = G string, though,
The general order of tuning is A → D → G → E.
- Attach a clip-on tuner to the head of the violin.
- Hold the neck with the left hand and pluck the A string with the thumb. The tuner will pick up the note and display the pitch at that time.
- The right hand pinches the peg and turns it in the direction that raises the pitch (clockwise to the hole).
At first, the second string (A) is tuned to the note (la). At this point, pluck the A string with the fleshy part of the left thumb. - Next, with the instrument in your right hand, turn the peg with your left hand and play the D string with your right hand, producing the note while playing the note in “Re”.
- In the same way, play the G string to the note of “so”.
When the three ADGs are aligned, the pitch of the A string, which should have already been aligned, should be lowered. This is not an abnormality, but a deviation caused by the bridge starting to tilt forward due to the tuning. Then, please check and correct the angle of the bridge once here. - Next, set the E string to the highest mi tone. Do not panic. When the pitch rises, check the angle of the bridge again. Then repeat the tuning from the A string until all the strings are stable to some extent.
- Once the strings are in tune to a certain degree, use the fine tuners to fine-tune the strings and then tuning is complete.
Finally, check the angle of the bridge one last time. If it is tilted, correct it even if it is troublesome, and if the pitch goes out because of it, tune the strings again. In most cases, you should be able to get the strings in tune with the pegs alone, but you should also use the fine tuners to keep the strings in tune.
It is rare for a string to stay in tune the first time. As you repeat the process, the pitch going out will shrink. Check the pitch with a tuner, but don't worry too much if it is off by a few degrees.
Now you got it, right?
I've read the TORA NO MAKI article and watched the videos, but... the pegs are too tight or loosen too quickly and I can't get the strings in tune.
How to apply force when moving the pegs
Unless you have been involved with the instrument from the manufacturing (production) stage, it is quite difficult to achieve a perfect setting for the pegs. A certain degree of firmness is necessary to secure the pegs, and the range of adjustment for pegs on mass-produced instruments is limited due to their non-geared construction.
■ If the pegs do not stop, basically, you need to push in a loose peg to plug it in place.
When you hear this, you may be tempted to push in the peg right away. But before you do that, here is another confirmation.
Loose pegs→loose strings→strings are not neatly wound on the pegs→may cause string buzzing.
You can see it.
Check the condition of the strings wrapped around the pegs, and if they are loose, correct them and retune the strings.
See the video “How to Change Violin Strings” from TORA NO MAKI.
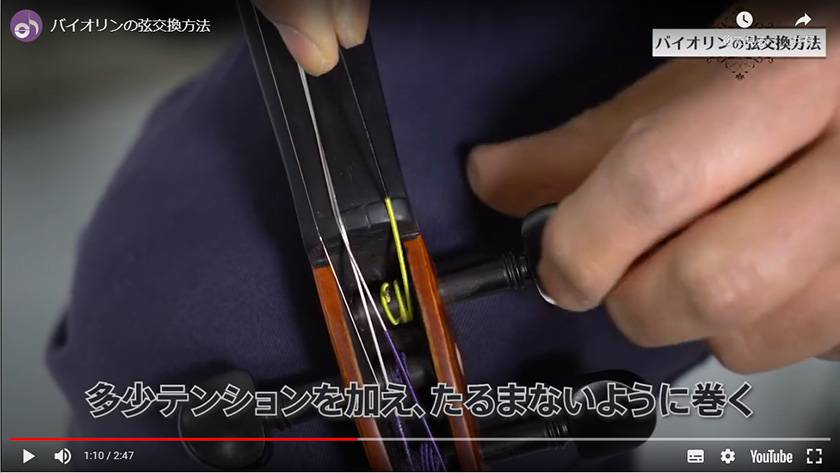
The key is to wrap the string around the peg as tightly as possible, from the inside to the outside, so that there is no sagging!
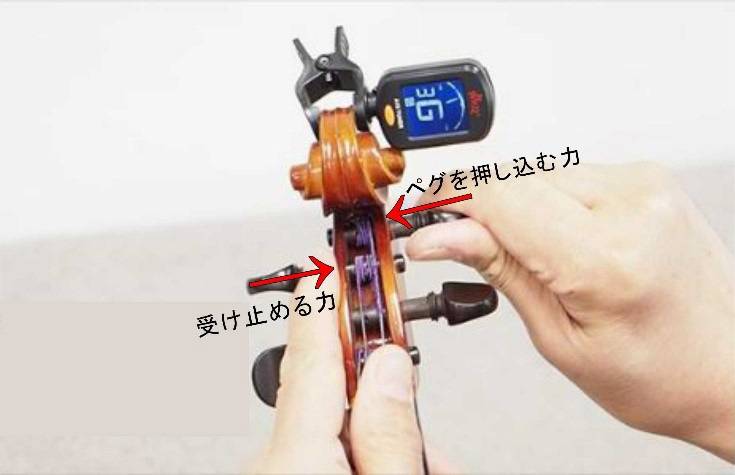
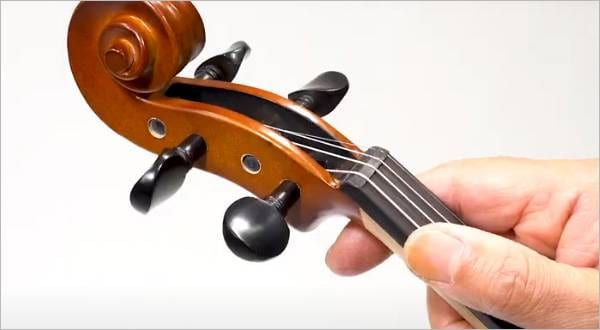
What is “pushing in the peg”? How much force is needed?
When a peg is pushed in, the hand holding the neck must be able to withstand the force of the hand pushing in. The hand holding the neck requires some force. Another method is to put your fingers on the opposite side of the peg to put more force into it.
The image shows the moment when the peg on the violin's A string is pushed in, the index finger of the left hand is attached to the peg to receive the force. The feeling in your hand is everything, so please try it and learn by doing.
■ If the pegs are too tight
Loosen the pegs once. The strings will sag, so wind the pegs up again, paying attention to how the strings are wound as I described previously. The key is to adjust the amount of pressure so that the pegs are not too tight.
It is impossible to explain how much the string pegs should be pressed in numerically. There is no other way but to try it several times and learn the feeling with your hands.
Review and Summary
Although tuning a stringed instrument may seem complicated when the procedure is written out in text, once you get used to it, it is a task of such difficulty that you will wonder why you couldn’t do this before. I would like you to remember to carry out the points I explained in this text.
- How the strings are wrapped around the pegs - Are they neatly wound?
- Is the angle of the bridge kept vertical? Is the position correct?
- Be careful not to turn the pegs too much!
- Make sure the tailpiece fine tuners have the proper amount of leeway.
- Listen and check for correct pitch before tuning. Be careful not to misidentify octaves.
- The general order of tuning is A → D → G → E (violin) A → D → G → C (viola)
- If a peg is loose, push it in to stop it.
- If the pegs are too tight, pull them out, adjust the amount of tension, and reinsert them.
This is all there is to it, but the actual work involves several tasks at the same time, such as applying force, checking the winding of the strings, and checking the angle of the bridge, which can be difficult at first when you are not used to it.
Both hands use muscles that are not normally used, so it is harder on the body than one might think. For example, tuning a cello is such a task that even a somewhat experienced player like myself would break out into a sweat.
Remember to “take your time, don't rush,” and if possible, “don't give up,” and try to take breaks so as not to damage the tendons in your wrists and fingers.
It is essential that you become proficient in the handling of stringed instruments. To begin with, handling a real instrument is not something that progresses as smoothly as playing a smartphone or a game.


![[Strings] An Introduction to Recommended Violin Tuners](/contents/uploads/thumbs/2/2024/2/20240221_2_25757_1.jpg)
![[2025 Edition] Types of Cello Strings and Recommended Cello Strings!](/contents/uploads/thumbs/2/2023/8/20230824_2_23733_1.jpg)
 バイオリンスタートガイド
 PLAYTECH 弦楽器
 バイオリンの手入れ
 バイオリンの弦交換
 バイオリンの調弦 チューニング
 弦楽器 初心者講座