Last August, a friend handed me a guitar with completely unknown origins, and that became the catalyst for starting this "The Mystery Behind Restoring This Guitar" series. Now, we've finally reached the end. I feel a mix of emotions because I’m sad that it’s ending, but I also feel the joy of seeing my beat up guitar being reborn into a fine instrument. It's truly a moment filled with deep feelings.
And with that, here’s my BGM for today!
The kind that goes, “Now, with all my heartfelt emotions…”
Now then, let’s get to the main topic first recap the guitar’s progress from last time.
After refretting and replacing the position markers, all that was left was the final adjustments.
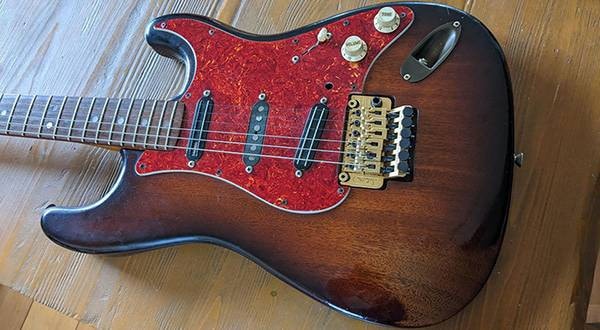
Ideally, I would’ve liked to go into detail about the fine-tuning process, but since I had to rush to meet the hand-off deadline, I’m just going to jump ahead and show you the finished product!
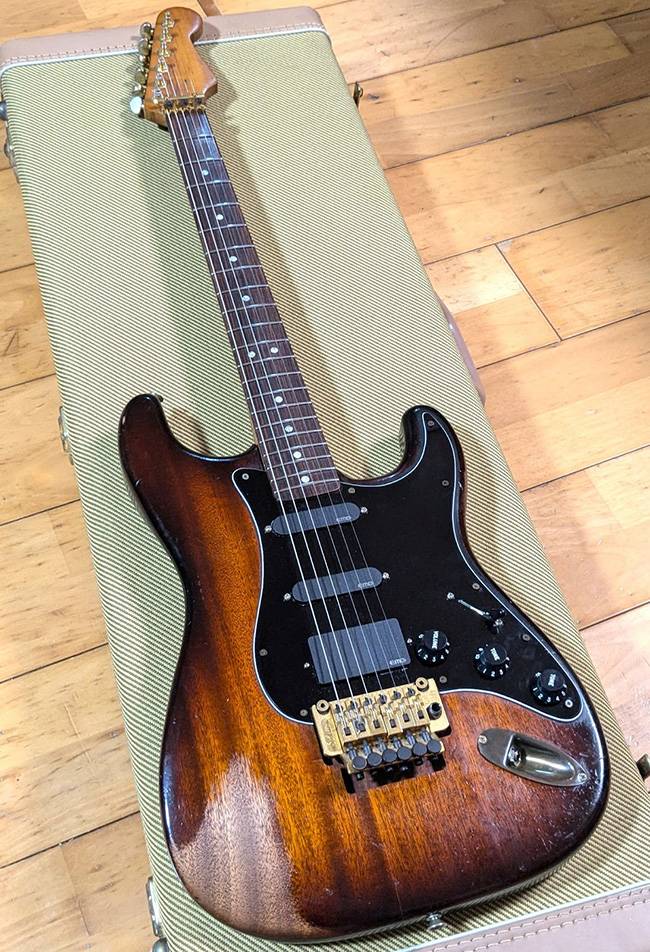
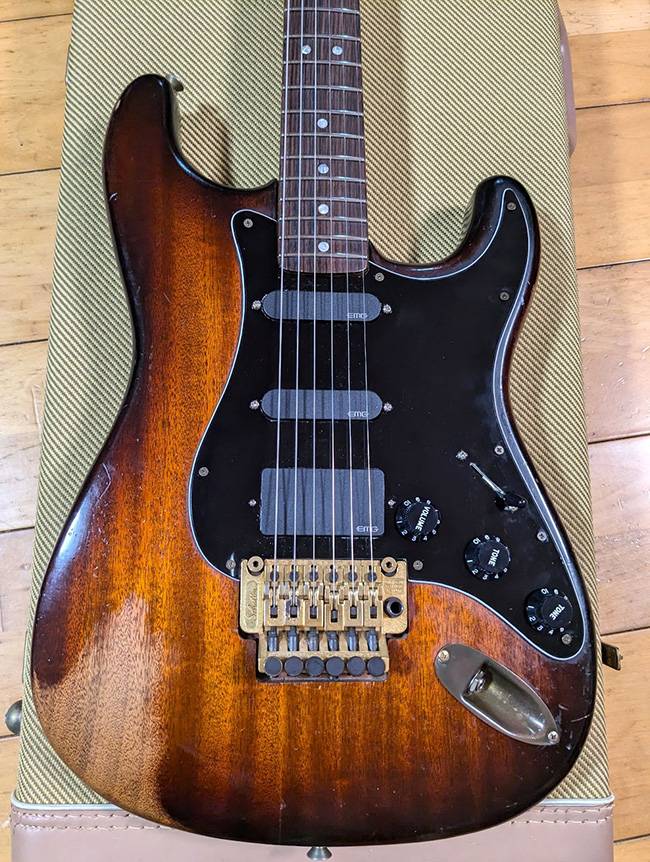
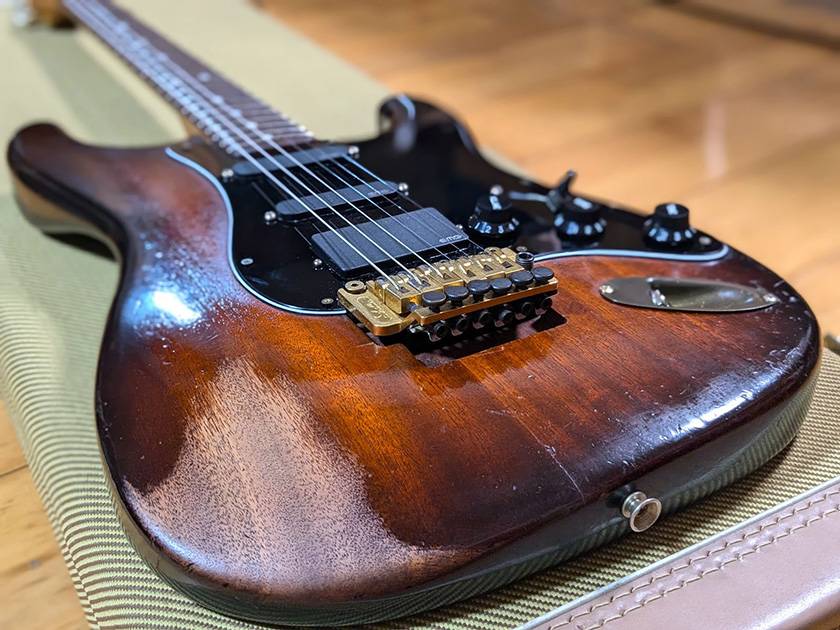
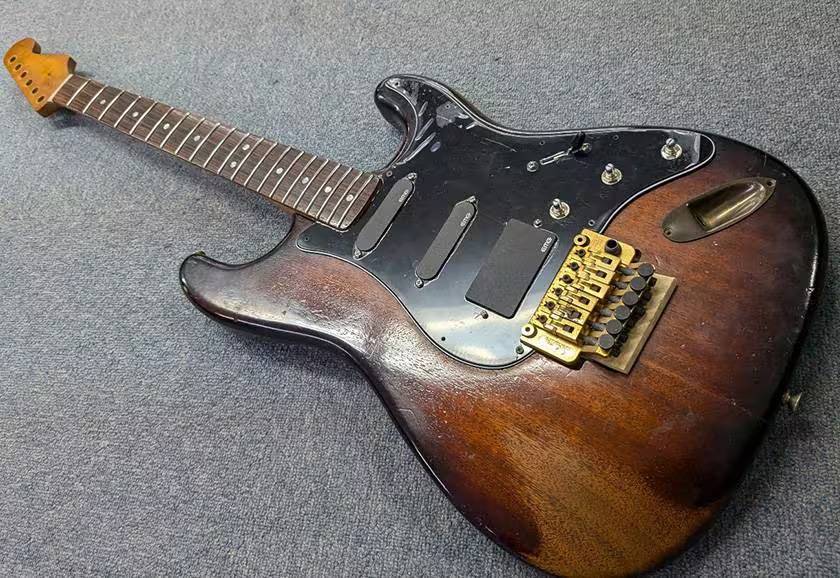
It looked so cool that I couldn’t help but post a bunch of photos.

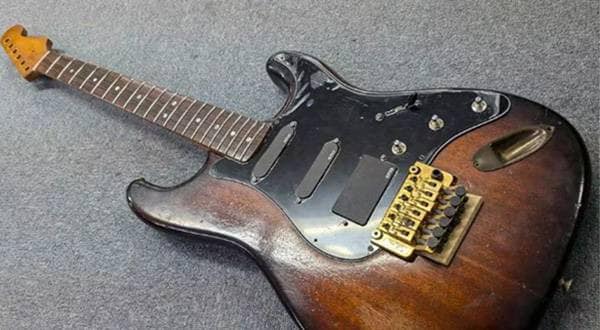
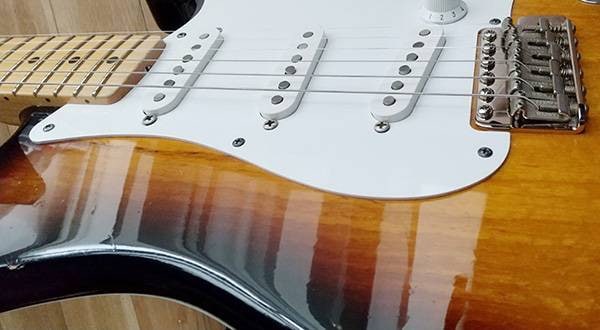
It’s hard to believe this is the same guitar that was literally split in half back in Part 2 — what a transformation, right?
When you compare them side by side, it’s like a completely different instrument.
Some of you might be thinking, “Huh? Was it always this vibrant in color?” after seeing the photos.
Well, just before handing it over, I gave it a thorough polish, and years of built-up grime from nicotine and sweat came off — the cloth turned pitch black! (haha)
But as I kept polishing, the original color gradually came back to life, and it turned into an absolutely stunning shade!
Out of all the work I’ve done on this project, this was probably the most exciting moment for me!
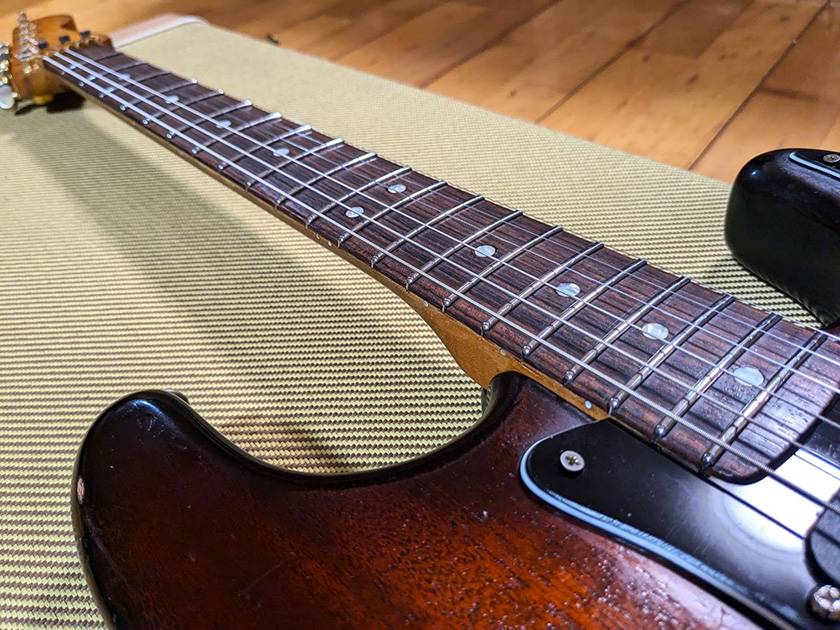
The fretboard on this guitar has a 7.25" radius, while the bridge , an FRT-2, has a 12" radius. Naturally, this mismatch leads to higher string action and notes choking out during bends.
To compensate for that, I deliberately filed down the center area a bit more during the fret leveling process to make it slightly flatter. I also placed small washers under the 3rd and 4th string saddles on the bridge to help reduce the gap between the bridge and the fretboard. As a result, I managed to achieve a very comfortable string action: 1.2 mm on the 1st string and 1.6 mm on the 6th string at the 12th fret.
Even with string bending, there's no fretting out — it plays super clean and is stress-free.
On the nut, I added a shim to eliminate any buzzing from the open strings. That said, there’s still a slight tendency for the 5th and 6th strings and the 1st and 2nd strings to sit slightly higher than the 3rd and 4th strings. It’s not ideal, but it’s a compromise I had to accept for now.
That said, I’d like to revisit this and fine-tune this area more when I have the time.
And finally — the hand-off!
Of course, we didn’t actually exchange it in such an overly dramatic way (lol), but they played along for the sake of the blog!

They really loved it, and later even sent me some audio clips of the “mystery guitar” in action!
Since it turned out so well, I hope you'll give them a listen!
■ Mystery Guitar – Clean Tone
謎ギター クリーントーン
— ミアータ@音家 (@na8cevrlimited) May 22, 2025
(EWSモディファイのアリオンコーラス) pic.twitter.com/maXup4xbF0
■ Mystery Guitar – Distorted Riff
Apparently, they recently saw Loudness live and were clearly inspired by it — lol.
I went to the show too, and honestly, it’s unfair how cool they were!
謎ギター 歪みリフ pic.twitter.com/3ABQIGKS3O
— ミアータ@音家 (@na8cevrlimited) June 4, 2025
■ Mystery Guitar – Distorted Lead
謎ギター 歪みリード pic.twitter.com/ybiaP0rtzc
— ミアータ@音家 (@na8cevrlimited) May 22, 2025
■ Mystery Guitar – In a Band Setting
謎ギター バンドで pic.twitter.com/1A7LhWYTkG
— ミアータ@音家 (@na8cevrlimited) May 22, 2025
What do you think?
It delivers that signature EMG-style responsiveness to effects, along with a tone that fits perfectly with fusion and classic '80s hard rock/metal!
Also, they gave glowing praise for the feel of the frets thanks to the stainless steel fretwork and the low string action adapted to the fretboard radius. Now there's no worry of fretting out during bends.
They even said it plays better than any of their other guitars, which was music to my ears!
At first, it was hard to even call this thing a proper instrument, but after trying all sorts of approaches and putting in the work, I think it turned out to be an even better guitar than I had imagined!
I’ll continue sharing guitar mods and little tips and tricks in the future, so I hope to see you again in the next blog post!


 ギターパーツの沼
 DIY ギターメンテナンス
 ギターの種類
 ピックアップの種類(エレキギター)
 ギターのお手入れ
 ギターの各部名称