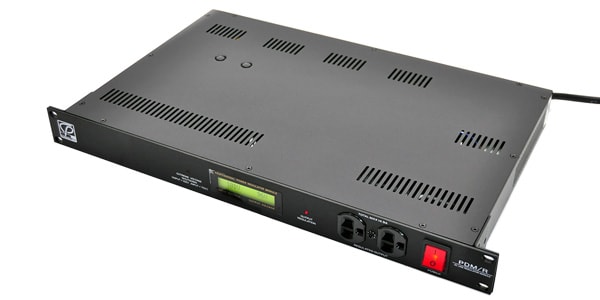
One of the staple products at Sound House is the CLASSIC PRO PDM/R stabilized power supply. This long-selling product has been loved by Sound House users for over 15 years since its release. To help you get to know this beloved product better, I’ll introduce usage precautions based on actual trouble cases and maintenance and adjustment methods for when things go wrong.
Contents
- Product Overview: What is a Stabilized Power Supply?
- Usage Precautions: Actual Trouble Cases
- Maintenance: Detailed Adjustment Methods
1. Product Overview: What is a Stabilized Power Supply?
CLASSIC PRO PDM/R is a stabilized power supply.
But what exactly is a stabilized power supply?
Please refer to the image below for a visual representation.
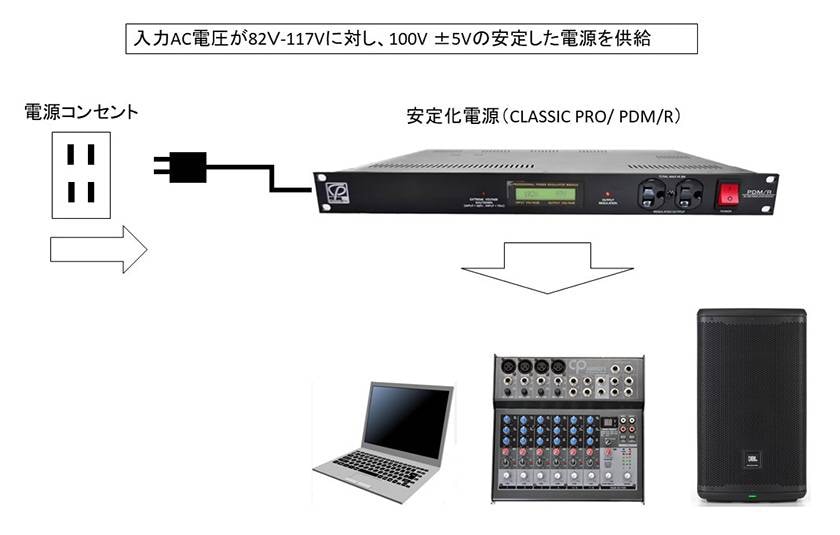
The input voltage refers to the voltage from the main power source (such as a power outlet). The input voltage can become unstable or drop depending on the environment and usage conditions. A stabilized power supply addresses such unexpected situations, maintaining an output voltage around 100V to ensure connected devices operate safely and stably. This is the role of a stabilized power supply.
The CLASSIC PRO PDM/R allows you to check the current input and output voltage status on the display. You can visually confirm on the display whether the stabilized power supply is functioning correctly. It’s recommended to check and adjust the display to ensure it’s showing correctly in your environment before use.
For more details on this adjustment method, you can refer to my previous article:
⇒ [Visual!] Adjusting the Display Voltage of the CLASSIC PRO PDM/R!
2. Usage Precautions: Actual Trouble Cases
Here are some common trouble cases and frequently asked questions regarding the CLASSIC PRO PDM/R.
Using with UPS: Do not use with UPS that outputs a square wave
There are UPSs that output square waves and those that output sine waves. The PDM/R will not operate correctly with a square wave output power source, so it requires an input power source that outputs a sine wave. Additionally, when using a UPS, select one with sufficient power capacity (at least 2000VA/2000W class).
Using with Power Amplifiers: Do not use with power amps with large inrush currents
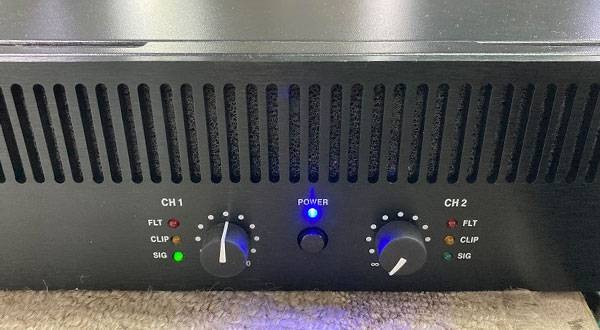
Power amps with large inrush currents at power-on may exceed the PDM/R’s maximum current capacity of 10A per PDM/R outlet, causing the power to shut down each time. Recently, amps with inrush current suppression circuits and switching power supply circuits have become mainstream, generally controlling inrush currents. However, some power amps with linear power supply circuits using power transformers still have large inrush currents. Some amps that have inrush currents exceeding 40A cannot be used with the PDM/R.
Using with Generators: Recommended to use with inverter generators
The PDM/R serves to further stabilize the power from indoor commercial power sources (power outlets). Using it with generators other than inverter types may cause malfunctions in the PDM/R’s microcontroller, so it is not recommended. Also, do not use generators that output square waves.
3. Maintenance: Detailed Adjustment Methods
Inquiries and consultations from customers often reveal that some issues can be resolved through adjustments at home.
We sometimes receive adjustment inquiries for second-hand units, but please note that adjustment work incurs labor costs. Therefore, if you can adjust it yourself, it would be helpful.
To adjust, you will need a multi-tester, rubber gloves, a screwdriver, and a precision screwdriver.
First, to make it easier to understand which parts to adjust, here’s a bird’s-eye shot with the cover removed. The red-squared area is where I adjust today.
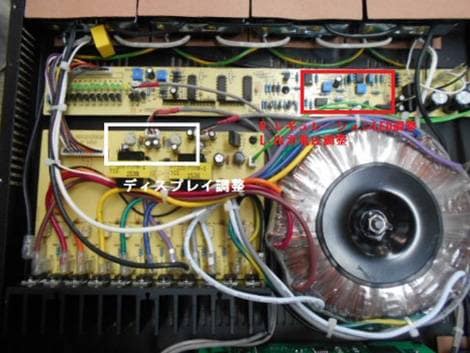
Now, I’m going to introduce the detailed adjustment methods for each part in the red square. When performing any of these tasks, please wear rubber gloves to prevent electric shock. Also, be careful not to let the metal parts of the screwdriver touch the components on the circuit board.
Adjusting Output Voltage
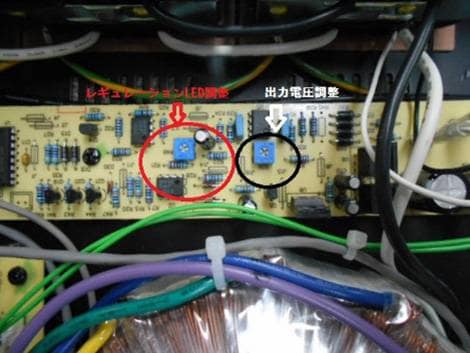
You can adjust the output voltage with the trim pot on the right in the black circle.
Measure the PDM/R’s output voltage with a tester and adjust the output voltage trim to around 100V. A tolerance of ±1-2V is acceptable.
Adjusting Output Regulation LED
The trim pot on the left in the red circle allows you to adjust the lighting range of the output regulation LED.
If the lighting range is off (e.g., the regulation LED is off even within the normal output range), it’s okay to continue using the device if the output voltage measures within 100V±5V using a tester.
If the output regulation LED tends to go out easily, you can adjust the LED lighting by turning the R48 trim counterclockwise about one notch.
I’ve introduced these adjustment methods, but if issues persist, please consult our support team.
I hope you continue to use the CLASSIC PRO PDM/R for a long time. Thank you for your support.


![[Visual!] Adjusting the Display Voltage of the CLASSIC PRO PDM/R!](/contents/uploads/thumbs/2/2022/5/20220519_2_18026_1.jpg)

 電源アダプター特集
 CLASSIC PRO
 CLASSIC PRO パワーディストリビューター特集
 停電時にパソコン、作曲データを守る!!
 簡易PAセットとは
 PAシステム講座