In the previous blogs, I covered the essential equipment and setup needed to start drumming.
Now, let’s dive into actually playing the drums.
Previous articles:
⇒ Drum Performance Starting from Zero - Required Equipment
⇒ Drum Performance Starting from Zero - Equipment Setup
1. How to Hold Drumsticks
There are several ways to hold drumsticks, but here I will focus on the ‘matched grip’ commonly used in pop and rock music.
The matched grip involves holding the sticks in a symmetrical way with both hands.
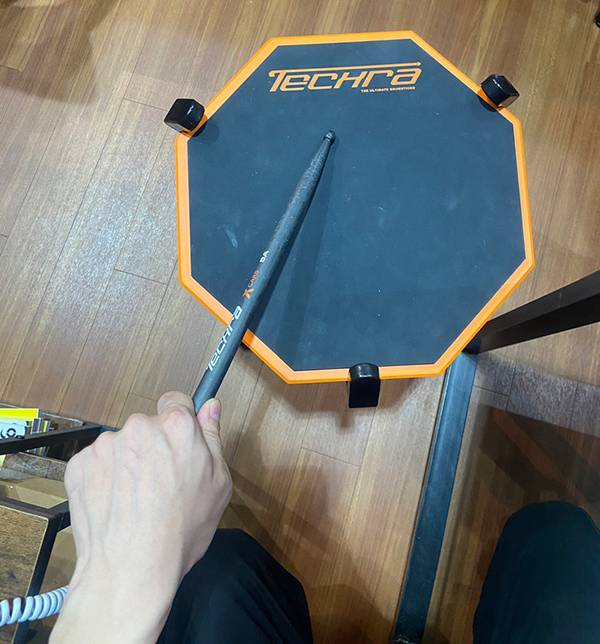
The images show only the left hand, but if you hold the stick in the same way with the right hand, you will complete the matched grip.
It may be hard to convey all the details through images, so here are some key points:
Avoid Excessive Tension
Don’t grip the stick too tightly. While tightness can produce louder sounds with less movement, drumming doesn’t require a lot of force.
Instead, hold the sticks with just enough tension to avoid dropping them.
Support with Thumb and Index Finger
If you grip the sticks with all fingers tightly, it can hinder the stick’s movement and limit your range of motion.
Use your thumb and index finger to control the sticks, with the other fingers just holding the sticks lightly.
2. Basic Exercises
While practicing phrases is important, neglecting basic exercises can slow down your progress.
Hold back your desire to play your favorite songs and practice the basics every day, even if only for a short period of time.
Basic exercises include various menus, but here are some exercises I personally believe useful.
*Use a metronome to develop your sense of rhythm.
Single Stroke
Practice hitting with each hand alternately (right-left, right-left). This simple exercise, when practiced at various tempos and rhythms, will help you maintain a steady tempo during performances.
Being able to start with either hand will also improve stick control.
(R = Right, L = Left)

Double Stroke
Unlike single strokes, double strokes involve hitting with each hand twice (right-right, left-left).
Practice at various tempos and rhythms, and try starting with either hand.
For the second stroke, practice lifting the stick while maintaining a grip.
(R = Right, L = Left)

Paradiddle
This is a fundamental pattern called rudiment.
You might have heard the pattern ‘right-left-right-right / left-right-left-left’.
This exercise can be practiced not only with the right and left hands but also by using the right hand for quarter notes and the left hand and right foot for paradiddles, which will be beneficial for your practice.
(R = Right, L = Left)

3. Note Length and Time Signatures
You may have encountered the term ‘notes’ in the basic exercises. Beginners probably have no idea what they are.
Here’s a brief explanation for time signatures, notes, and measures.
Measure
A grouping of notes (or beats) with a specific interval.
Measures are separated by vertical lines in sheet music, so pay attention to these lines when reading music.
Time Signature
Indicates how many notes of a particular value fit into a measure. For example, ‘4/4’ means four quarter notes per measure. ‘3/4‘ (also known as ‘waltz time’) means three quarter notes per measure.
What is the time signature ‘6/8’ like?
The answer will be revealed in the next post, so please think what it is like.
Notes/Rest Symbols
Notes represent how many notes fit into a measure. For example, a quarter note fits four times into a measure in 4/4 time, and an eighth note fits eight times.
If you’ve studied fractions, you might notice that the names of the notes correspond to the denominators of fractions.
Additionally, though there are exceptions, the length of the notes generally halves as you go from half notes to quarter notes to eighth notes, and so on.
Rest symbols represent silence for the duration of the note value.
Let’s take a look at some sheet music.
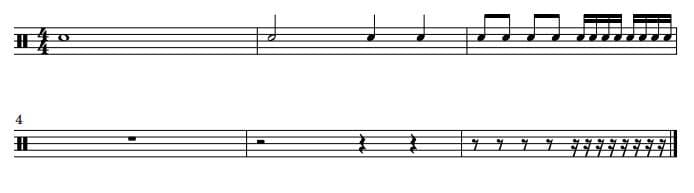
This sheet music arranges notes in order of length. It is read from the top left.
The term for the first note in the top left corner is ‘whole note’, which is equivalent to four quarter notes. Following that are half notes, quarter notes, eighth notes, and sixteenth notes.
The bottom row shows the corresponding rests for each note length. As the length of the notes shortens, you’ll notice that vertical or horizontal lines increase. There are notes beyond sixteenth notes, but I’ll omit those for now.
Now that I’ve covered notes, try the rhythm below.
It’s a bit challenging, but if you take your time and read it carefully, you should be able to play it.

How was that?
You might notice that you are getting closer to actual performance.
The basic exercises mentioned will help you improve steadily with continuous practice. Keep at it, and soon you’ll be able to play the songs you want to perform.


![Recommended! Drum Training Pads [2023]](/contents/uploads/thumbs/2/2021/12/20211202_2_15486_1.jpg)
 PROMARK ドラムスティック
 おすすめ電子ドラムセット
 電子ドラムの選び方
 ドラマーのための耳栓
 ドラムスティックの選び方
 ドラム初心者講座