This is an introduction to SunVox, a free, modern tracker.
SunVox has a concept that differs from conventional DAWs, so trying to use it the same way can lead to confusion. This time, I’ll go over the basic elements you should know and how to configure them. Since detailed explanations are not suitable within a column, I’ll focus only on what I personally consider important.
I’ll cover the core features of SunVox, like the modular system and the pattern editor, in future articles.
Names of Each Section
The main window is divided into four primary regions, and you move between them as you work. Apart from these, there are only a few pop-up windows for settings, which gives SunVox its signature clarity and streamlined interface.
What’s especially great is that even in small window sizes, you can still work efficiently.
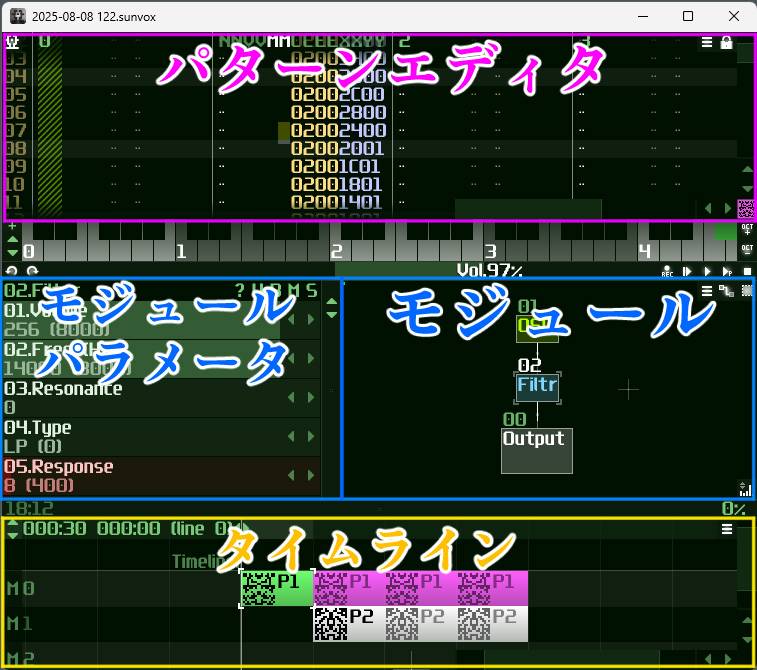
- Pattern Editor: This is the defining feature that classifies SunVox as a tracker. While it's similar to a DAW’s piano roll, it supports multiple tracks (channels). It allows for flexible control via numerical input, though its unique interface has a steep learning curve—some people love it, others hate it.
- Modules: You build your sounds by connecting various modules such as synths, effects, and more. This is the core of SunVox’s modular approach.
- Module Parameters (Controllers): These are the properties of each module, allowing you to control specific parameters in detail.
- Timeline: This is where you arrange your patterns to structure the full song.
The Structure of SunVox
If we organize the relationship between the four regions described above, it looks like this:
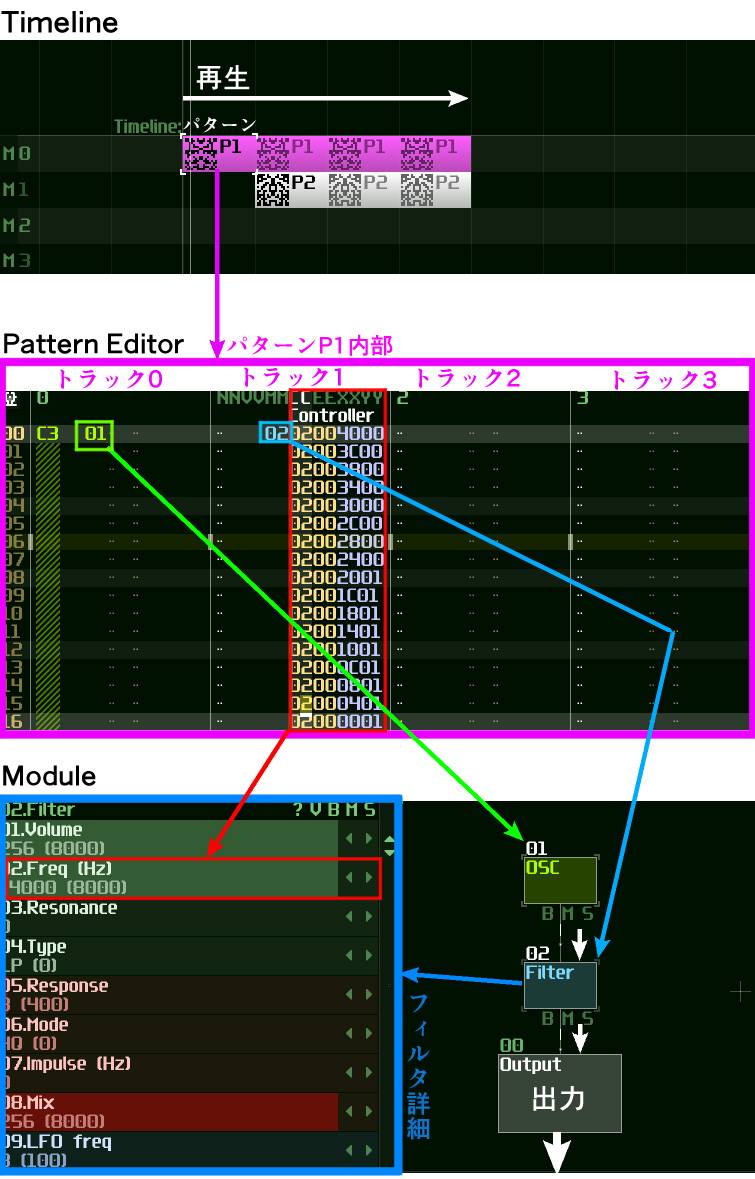
Creating music in SunVox begins with placing patterns onto the timeline. By arranging multiple, different patterns, you gradually build the structure of your song.
In the example diagram, there are two patterns: P1 and P2.
At the beginning of the track, only P1 is played, but later P2 is played simultaneously with P1.
This kind of parallel playback of patterns is a unique feature of SunVox, making arrangement and management much easier.
In contrast, traditional trackers only allow for sequential (serial) pattern playback, which often leads to increased track complexity within each pattern, especially for more intricate arrangements.
The Pattern Editor is where you input and edit the contents of each pattern.
In the diagram, you see the contents of pattern P1. This pattern has four tracks (0 to 3), but SunVox supports up to 32 tracks per pattern.
- Track 0: Sends a command to play note C3 on the module 01OSC (an oscillator). - Track 1: Sends a command to change the 02Freq(Hz) parameter of module 02Filter.
Note that all numerical values are entered in hexadecimal, which can be tricky at first. However, SunVox provides shortcut methods for easier input.
With a little practice, you’ll find it’s possible to input data and compose very quickly and efficiently.
The Module area is where you visually connect synthesizers, effects, and other components.
When you connect modules, lines appear between them, and the direction of the signal is shown with animated arrows, making the signal flow very intuitive and easy to understand.
In the example diagram, the structure is simple:
- 01OSC (Oscillator)
- 02Filter (Filter)
By connecting them to 00Output, you route the final audio signal to the output, allowing it to be heard.
Each of these modules will be explained in detail in future articles.
Important Initial Settings: Font Size Adjustment
SunVox is designed to work well in compact workspaces, so by default, the font size is quite small.
In older versions, you could only adjust font sizes in fixed multiples (2x, 4x), since the UI used a custom bitmap font. Any in-between scaling would break the UI layout.
However, in recent versions, an OpenGL version for Windows has been included, allowing for more flexible font scaling.
That said, if you are using a high-resolution display, some fonts may still appear too small.
Given that SunVox runs on an extraordinary number of platforms and uses a custom unified UI, some compromises are inevitable.
It’s clear the developer has faced considerable challenges adapting to modern environments.
If you’re new to SunVox, adjusting the font size may be confusing at first. Here's a step-by-step:
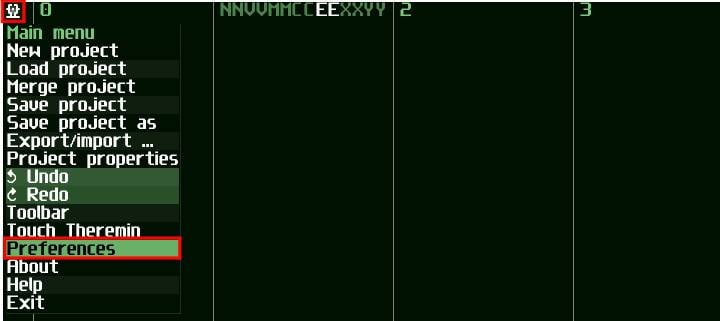
1. Click the top-left icon (this is the main menu access).
2. From the dropdown, select "Preferences" (or "References", depending on the version).
3. In the preferences window, you’ll find the font size settings and can choose a more comfortable size for your display.
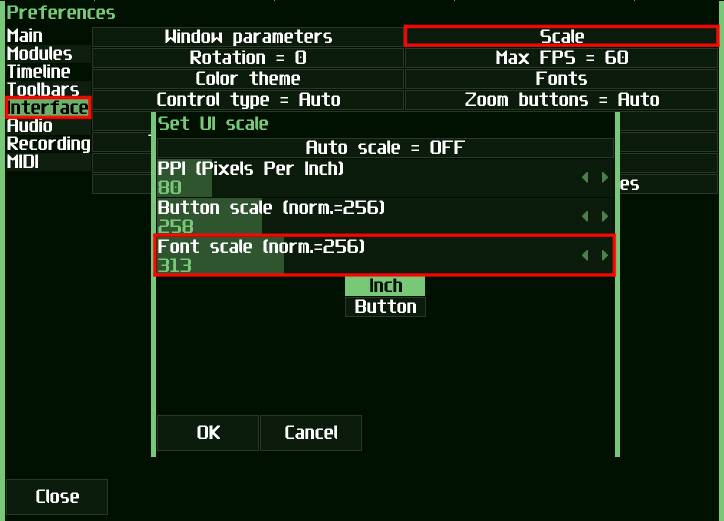
A separate window will open for this, so:
1. Select "Interface" from the preferences menu.
2. Click on "Scale", and adjust parameters like "Font Scale" and others as needed.
3. After adjusting the settings, press "OK", then "Close" to exit the window.
Setting Up the Audio Device
Before you begin composing, you’ll need to make sure sound is actually coming out. This means setting up the audio output device properly.
Note: Once configured, the audio settings will remain active unless manually changed.
To do this:
1. Go to "Preferences" from the main menu (top-left icon), just as you did for the font.
2. Select the "Audio" section from the menu.
Here, you can configure all audio-related settings.
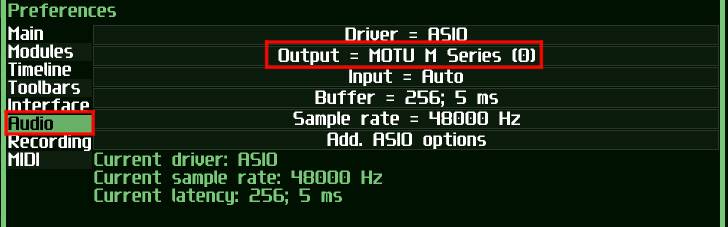
Under "Output", choose your audio interface or desired output device.
Additionally, make sure settings like Driver, Buffer size, and Sample rate are correctly configured for your environment.
Note: You won’t be able to hear anything unless the module routing (e.g., oscillator → output) is properly set up. This will be explained in the next section.
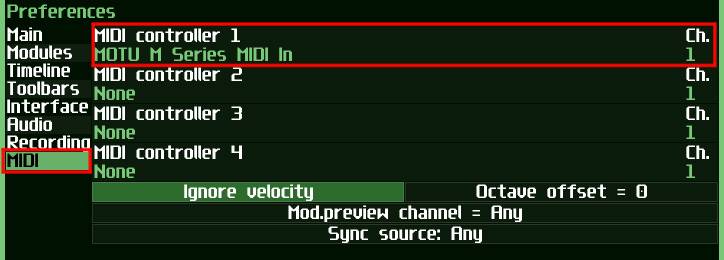
Connecting a MIDI Keyboard
If necessary, configure your MIDI keyboard for use with SunVox.
Trackers generally work well even when notes are input using a computer keyboard, so in many cases, this is not a problem.
However, if you wish to input in real time, a MIDI keyboard becomes essential.
As with font settings, access the Preferences from the main menu.
Select MIDI, then choose the connected MIDI device and configure the settings.
Depending on your needs, you may also need to adjust the Octave offset to shift the keyboard’s pitch range.
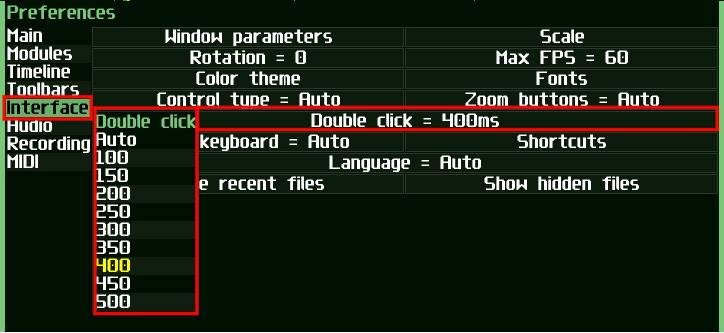
Setting Mouse Double-Click Speed
This isn’t something you usually need to adjust in other software, but it seems to be one of those unique quirks of a multi-platform tool like SunVox.
Personally, I found the double-click speed too fast on Windows, so I slowed it down to 400ms.
To change the setting, open Preferences as described above, select Interface, and choose your speed under Double click.
Next time, we’ll dive into the slightly more complex topic of Ticks.
The “sound & person” column is made up of contributions from you.
For details about contributing, click here.


![Start Recording Instantly! [Multitrack Recorder]](/contents/uploads/thumbs/5/2021/11/20211119_5_15208_1.jpg)
 DTM対談 kors k × かめりあ × Hommarju
 DTMセール情報まとめ
 機能で選ぶ オーディオインターフェイス
 DTMに必要な機材
 おすすめサイレント楽器特集
 人気スタジオモニター徹底比較