Hello, Conservario here.
When I give lessons to beginners, my aim for them is to not make every chord sound perfect. Even if there are some strange notes or places that don't sound right, I let them go as far as they can.
It is only a matter of time before you get it right.
After explaining the lesson to the student, I proceed with the lesson, but there are some students who are not satisfied unless every chord sounds beautiful and perfect.
For such students, I have them practice chords slowly one by one until they sound beautiful.
Here are some notes and tips for playing chords, so please read to the end if you are worried about your chords not sounding clean.
■ Are you pressing down on the string enough?
For example, when playing the C chord, play the 3rd fret of the 1st string with your ring finger.
You only play the chord with one finger.
First, try to play this chord “perfectly” to get a feel for it.
If you are thinking, “This is easy!”, are you also thinking about how much force to apply?
Most of you are just laying the chord by feel.
It is hard to tell how much force you need to apply because it cannot be quantified, but I will teach you how to do it in a way that is as easy to understand as possible.
First, touch your ring finger to the third fret of the first string.
Don’t press down the finger really hard, but just enough to touch the string.
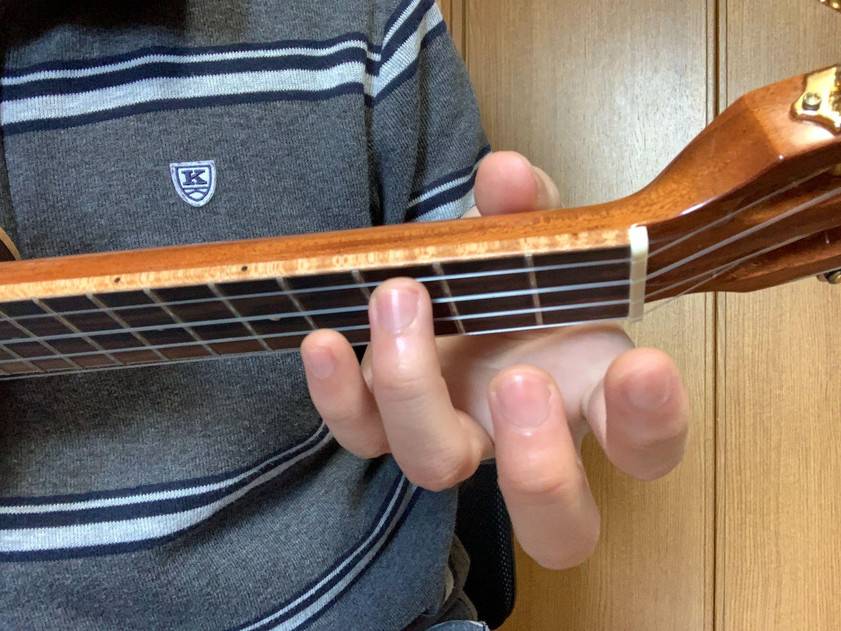
(*The image uses the 4th string for clarity.)
Try plucking the first string in this state.
Since the string is muted, you should only hear a “pluck, pluck” sound.
Once you have achieved this, gradually add more pressure to the third finger of your left hand until you reach the amount of pressure that you normally would add.
Then, although it may be difficult, play the strings with your right hand.
If you force yourself to describe it in sound, it will sound like this.
Bring bring bring bring bri~ng!
The last “bring” is a beautiful sound that is a clean sound.
From the muted sound, the sound of the third fret of the first string gradually begins to be heard, and at the end, a beautiful sound is heard.
This last clean sound is the appropriate amount of pressure on her string.
Beginners inevitably exert too much force in an attempt to make the note sound beautiful.
This causes delayed chord changes and finger pain.
Start by playing softly and then gradually increase the force until you reach the moment when the note sounds beautiful! The most appropriate pressing force is the amount of force you apply at the moment when the sound is beautiful.
If you relax even a little from playing softly, it will not sound beautiful, and it is useless to press any harder.
Some performers liken this state to the moment when the camera is in focus.
Is the pressure too strong? Is it too weak? Always think about this when pressing down.
■ Are the pads of your fingers touching?
For example, when pressing the F chord, the first finger presses the 1st fret of the 2nd string and the second finger presses the 2nd fret of the 4th string.
There are those who think this F chord is easy and those who think it is difficult.
Those who think it’s difficult will have trouble playing the first and second strings.
For the second string, check to see if you are pressing the right amount of pressure as described above.
The problem is that the first string doesn’t come out well.
The reason why the first string, which is not even pressed, doesn’t sound because “the pad of the index finger is touching it.
In this state, the first string is muted and no sound is coming out.
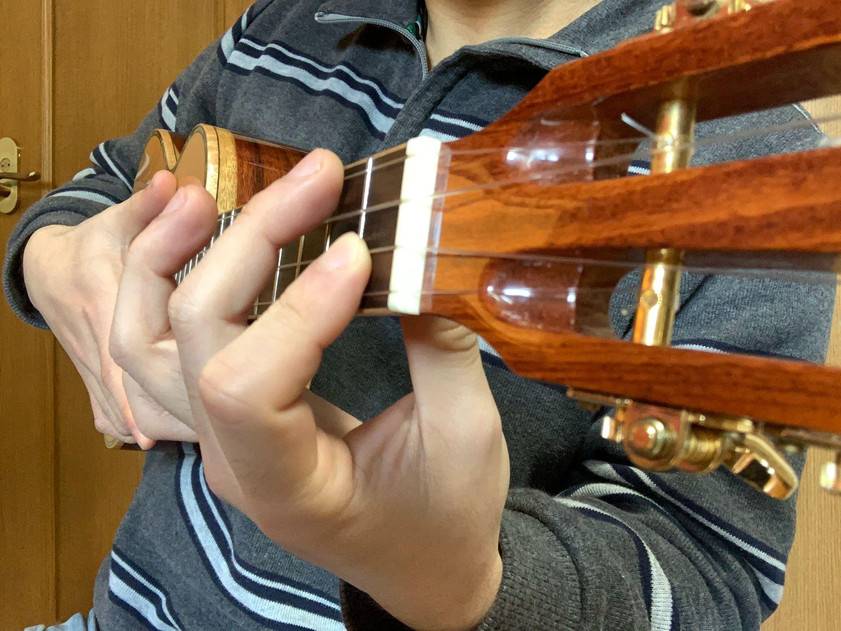
To prevent this from happening, hold it with your fingertips.
If your fingernails are facing you, your fingers are lying on the strings, so you should hold the strings with your fingertips.
“ I'm pressing down with my fingertips, but it doesn't sound…” If there’s no sound even if you press down with your fingertips, consider that your finger pad is still slightly touching.
For example, if the first string of F isn’t sounding, your index finger should be pressed between the second and third strings.
Bring your finger up a little higher, closer to the third string.
By doing this, the pad of the index finger will be away from the first string and it will sound beautiful.
■ To summarize
In this article, I introduced how to apply force when playing chords and how to hold your fingers.
There are many other details that I could not introduce in this article.
Pressing the side of the frets, thinking about the position of the thumb, and so on.
Please take these tips to heart if you are practicing really hard to make your chords sound beautiful.
As I mentioned at the beginning of this article, when I teach chords and chord changes to beginners, I don't give much thought to whether they sound beautiful or not.
There are other things that are more important.
You can create an infinite number of chords by yourself.
Therefore, if you think that you have to make every chord perfect, you will never be able to finish a song!
If you think that it is OK as long as you can press the right frets, then you should try various chords and songs.
After gaining experience, you will be able to play chords that you couldn't play before easily, and this is the ideal step.
Once you get a sense of how to make chords sound good, you can play any chord and any song smoothly.
Please continue practicing so that you can acquire this sense.
Thank you for reading to the end.
The “sound & person” column is made up of contributions from you.
For details about contributing, click here.


![[Enjoy the Ukulele Even More!] Listen to Skilled Musicians Play](/contents/uploads/thumbs/5/2022/3/20220328_5_17282_1.jpg)
![[Enjoy the Ukulele Even More!] Mastering Downstrokes and Upstrokes](/contents/uploads/thumbs/5/2022/3/20220328_5_17270_1.jpg)
![[Enjoy the Ukulele Even More!] What to Do When Your Favorite Song Seems Too Difficult](/contents/uploads/thumbs/5/2022/3/20220328_5_17261_1.jpg)
![[Enjoy the Ukulele Even More!] Thinking About Playing a Sound](/contents/uploads/thumbs/5/2022/3/20220317_5_17099_1.jpg)
![[Enjoy the Ukulele Even More!] Hacks to Keep Your Strings Going Longer](/contents/uploads/thumbs/5/2022/3/20220317_5_17094_1.jpg)
![[Enjoy the Ukulele Even More!] For Those Who Feel Their Strumming Has Become Repetitive](/contents/uploads/thumbs/5/2022/2/20220228_5_16890_1.jpg)
 エレキギター弦の選び方
 弦の張り替え(エレキギター)
 ギターのお手入れ
 ギターケースの選び方
 ギターの各部名称
 ギター演奏に必要なものは?