


Hello. Conservario here.
Chords are very important and useful when playing and practicing the ukulele.
Unlike guitar, ukulele has many chords that can be played with one or two fingers (there is even an Am7 chord that doesn't even use one finger!).
Although these chords are indispensable on the ukulele, there are some chords that are difficult to play.
Also, it is troublesome because such difficult chords are often applied or sound important in a song.
In this article, I will introduce the D and B chords, which appear frequently.
Please take this opportunity to master them and try out even more different songs!
■ The D chord
The index finger is held down on the 2nd fret of the 4th string, the middle finger holds down the 2nd fret of the 3rd string, and the ring finger holds the 2nd fret of the 2nd string.
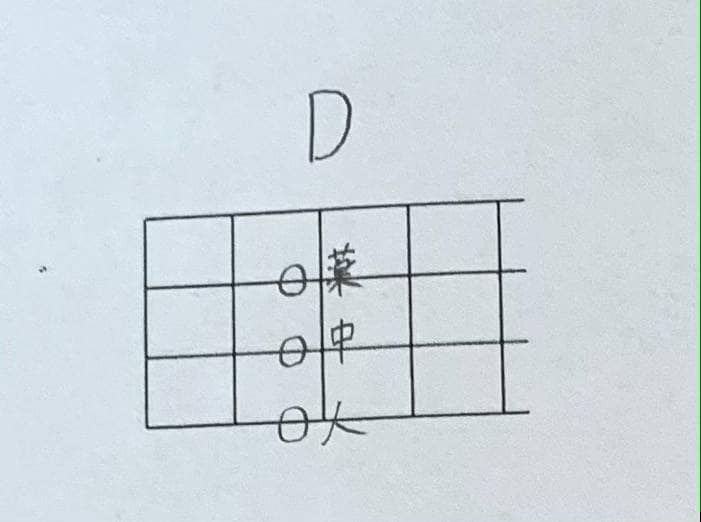
To say the least, this is a rather difficult chord.
The reason it is difficult is that all fingers must hold the second fret.
I would say that most chords have the second finger play on the second fret and the first finger plays on the first fret.
The D chord, however, requires all fingers to play in the second fret on all the strings.
Even if you try your best with your usual form and fingering technique, your fingers will stick out.
So, what do you do?
The correct answer is to change the angle of your wrist.
The wrist is usually pointing straight down, but tilt it toward the head.
This will change the angle of your fingertips, so that they are pointing toward your body or the body of the ukulele.
This is the basic form of playing the D chord.
There are actually many ways to play this D chord.
Some people play it with their middle, ring, and pinky fingers, while others play it with their index finger!
Since these are the most common ways of playing the D chord, let's practice with the most basic three fingers: index, middle, and ring.
Once you know the form and which frets to play, let's give it a try.
What do you think? I'm just guessing since I can’t hear how you sound, but did you find some strings that aren’t sounding clean?
If so, your fingers may be too far from the frets.
The ukulele should be pressed right next to the frets (just to the left of the steel frets).
Don’t press anywhere between the frets.
If you practice your form and set up your fingers right next to the fret board, you will always be able to play the D chord.
■ The B chord
Your third finger plays the fourth fret of the fourth string, the middle finger plays the third fret of the third string, and the index finger simultaneously plays the second string and the second fret of the first string.
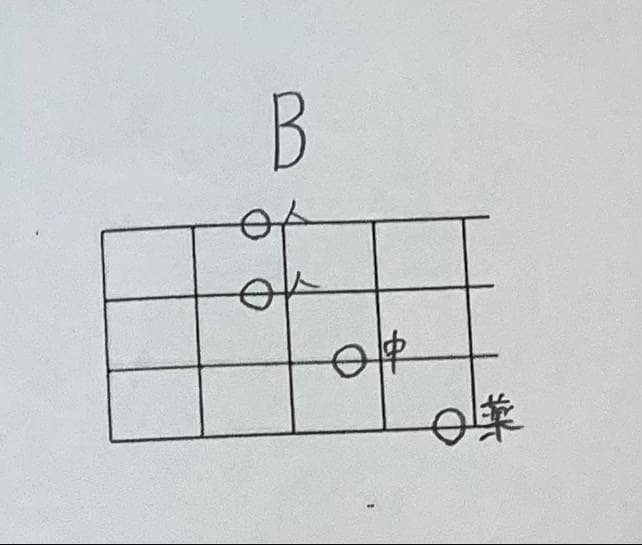
Finally, we have a chord in which two strings are pressed with one finger at the same time.
This pressing of multiple strings with one finger is called a valley (or barré chords).
The trick to playing this B chord well is to make sure that two strings that are held down by the index finger can be strummed beautifully.
So, forget about the ring and middle fingers for once.
Use your index finger to press only the second fret of the second string.
At this point, the index finger should not be pressed straight down with the belly of the finger, but with the side of the finger.
The index finger should be pressed with the side of the finger so that the nail of the index finger points toward the head (toward the first fret).
The reason for using the side of the finger is that it’s easier to force the finger joints, and considering the indentation of the finger joints, it is easier to make a beautiful sound than by pressing straight down.
When you play two strings but at first only the first or second string sounds good, you may have to change the amount of force you apply.
If this happens, change the amount of force you apply or move your index finger up or down a little.
If you keep practicing while fine-tuning the force and position, one day it will sound beautiful. Remember that moment when you hear that beautiful sound with your fingers and eyes!
At first, it may take some time until you can get both fingers to ring nicely at the same time, but gradually you will get used to it and soon you will be able to do it.
Once you are able to get a beautiful sound after playing the first finger, try holding down the second and third fingers as well.
Even though you have managed to get a nice sound from your first two fingers, you may not be able to get a good sound again when adding the middle and ring fingers.
I understand that you may feel frustrated, but once you have reached this point, the goal is only a short distance away. Please fine-tune the force and position again.
If you keep practicing steadily, you will be able to make the four B chords sound beautiful.
■ Summary
I have shown you some tips on how to play the D and B chords.
For beginners, these two chords are quite difficult.
However, as I mentioned at the beginning of this article, the D and B chords are quite versatile.
I will explain in detail in the next article, but speaking of the B chord, if you shift its shape to the right by one chord, it becomes the C chord.
If you shift the D chord by two frets, you can make an E chord.
What does this mean? You may be thinking, “What does that mean?” But remember that these two chords can be changed to various other chords without changing the shape of your fingers.
When you master both of them, you will be able to play a wide variety of songs, so please try them.
Thank you for reading to the end.
The “sound & person” column is made up of contributions from you.
For details about contributing, click here.


![[Enjoy the Ukulele Even More!] Who Is Suited for the Ukulele?](/contents/uploads/thumbs/5/2022/4/20220419_5_17569_1.jpg)
![[Guitar Guide] How to Connect Arpeggios Smoothly](/contents/uploads/thumbs/5/2022/4/20220419_5_17565_1.jpg)
![[Enjoy the Ukulele Even More!] Let’s play “Aloha ‘Oe”](/contents/uploads/thumbs/5/2022/4/20220419_5_17558_1.jpg)
![[Enjoy the Ukulele Even More!] Bad habits that Often Happen in Beginner to Intermediate Ukulele Players](/contents/uploads/thumbs/5/2022/4/20220418_5_17527_1.jpg)
![[Enjoy the Ukulele Even More!] Playing, Extending, and Stopping the Sound](/contents/uploads/thumbs/5/2022/2/20220218_5_16781_1.jpg)

 サウンドハウス社員が選ぶ 『おもしろ商品』はコレだ!
 ウクレレのチューニング方法
 ウクレレの各部名称
 ウクレレの種類
 ウクレレスタートガイド
 ウクレレ初心者講座


