


Hello, this is Conservario.
This time, I’d like to introduce the chords for the famous song Aloha ‘Oe, which always comes up when talking about the ukulele and Hawaiian music.
Although this song is considered beginner-friendly, I’ve arranged it even more simply so that complete beginners can play it.
If you’re looking for an easy song to play but don’t know which one to choose, be sure to check this out and give it a try!
Aloha ‘Oe is a very famous song with many different versions and keys.
If you search for “Aloha ‘Oe chords,” you’ll find countless articles with sheet music and tutorials.
This time, I’ll be introducing only the most well-known chorus section of Aloha ‘Oe.
I’ve simplified the chords as much as possible, using only C, G6, and D7.
However, I’ve made sure not to ruin the feel of the song, so you can practice with confidence.
Now, let’s go over how to play each chord one by one.
■ C Chord
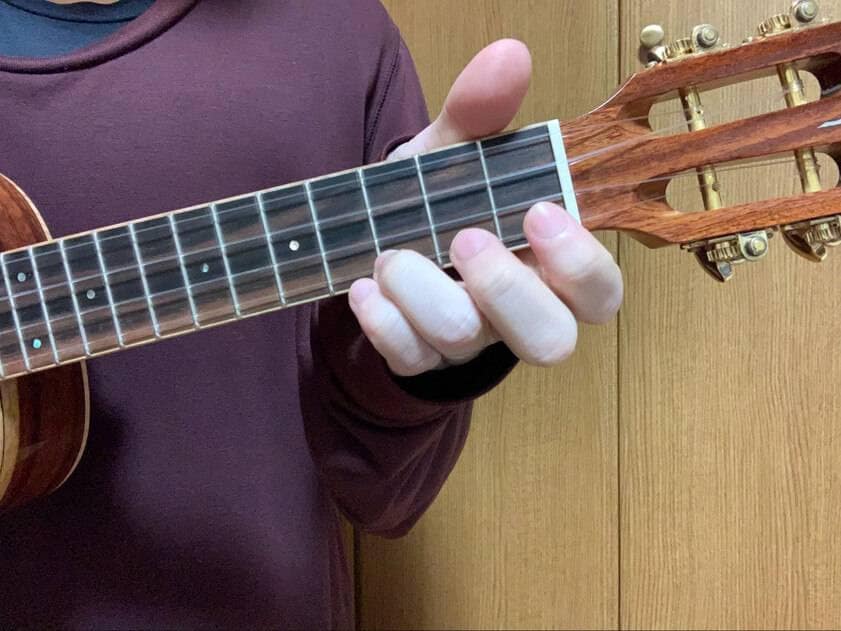
Place your ring finger on the 3rd fret of the 1st string.
That’s it! Your C chord is complete. Now, strum all four strings with your right hand and listen to the sound.
Since it’s very simple, this might be one of the first chords beginners practice when starting the ukulele.
Tip: Use your fingertip to press the string. If your nail is facing your face, you’re pressing correctly with your fingertip.
Some people press with the pad of their finger, but using the fingertip allows for better control and prevents finger pain, so I don’t recommend using the finger pad.
Be careful not to let your ring finger touch the 2nd string, as it will mute the sound.
Once you’ve got the C chord in position, strum four times—jan, jan, jan, jan!
If you played it correctly, let’s move on to the next chord: G6.
■ G6 Chord
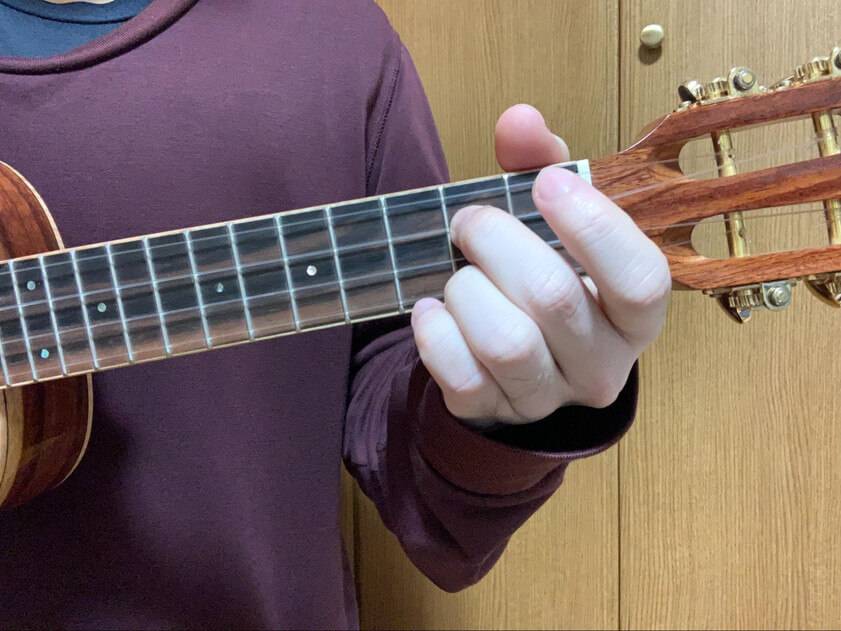
Place your middle finger on the 2nd fret of the 3rd string and your ring finger on the 2nd fret of the 1st string.
Now, you're using two fingers, but don’t overthink it!
In the C chord, your ring finger was on the 3rd fret of the 1st string. To switch to G6, simply move that ring finger one fret to the left (to the 2nd fret) and place your middle finger on the 2nd fret of the 3rd string.
That’s all it takes to play G6!
This kind of movement—switching from one chord to another—is called “chord change” (pretty straightforward, right?).
The key to playing G6 cleanly is making sure the 2nd string rings out clearly.
Since I can’t hear how your G6 sounds, I’ll make an educated guess—about half of you might not be getting a clean sound on the 2nd string.
Why?
Because your middle finger is pressing the 3rd string, but if the pad of your middle finger accidentally touches the 2nd string, it will mute the sound.
If your G6 chord sounds clean, try slightly touching the 2nd string with your middle finger.
Even a light touch with the pad of your finger can change the string’s vibration and make it sound muted.
If your G6 isn't sounding right, focus on pressing the 3rd string with the fingertip of your middle finger.
Tips:
Keep your finger upright
Make sure your nail is facing your face
By practicing with these two points in mind, you’ll definitely be able to play a clean G6 chord!
Once you’ve mastered C and G6, let’s move on to the final chord: D7.
■ D7 Chord
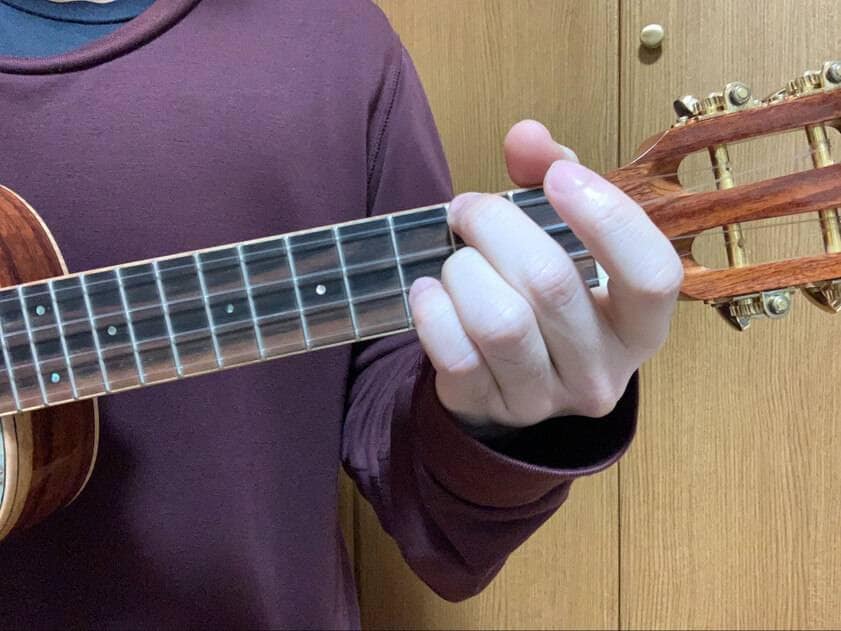
Place your middle finger on the 2nd fret of the 4th string and your ring finger on the 2nd fret of the 2nd string.
Does this chord shape seem familiar? Did you notice the similarity?
That’s right—it’s just like G6! (If you didn’t catch that, go back and practice G6 again.)
The only difference is that the position of the fingers has shifted:
Middle and ring fingers on the 4th and 2nd strings → D7
Middle and ring fingers on the 3rd and 1st strings → G6
Memorize this pattern!
Having similar chord shapes can be both an advantage and a challenge.
The advantage is that since the shapes are similar, chord changes are easy.
The disadvantage is that because they look alike, you might hesitate—"Which one was it again?"—and stop playing.
If you can play G6 correctly, then D7 should be easy as well.
Once you get used to pressing the chords, make sure not to mix up these two in your head.
If you memorize them incorrectly, the song will sound completely different, so be careful!
Once you can play D7, G6, and C, it’s time for the final test—playing them in the actual song!
Now, let’s take on Aloha ‘Oe!

There are eight chords in total, using the three chords we’ve learned so far.
Each chord is strummed four times before moving to the next one.
If you play them in order from the top left, the progression is:
C → G6 → D7 → G6 → C → G6 → D7 → G6
Here’s a little secret—the first two lines and the last two lines are exactly the same!
So, if you can play the first two lines smoothly, all you have to do is repeat the same pattern.
Chord diagrams and finger placements are included, so use them as a guide.
I know I’m repeating myself, but be careful not to mix up G6 and D7!
For now, don’t worry about strumming with your right hand.
Once you’ve mastered the chord order and finger placement, try strumming with your right hand as well.
If you can strum while smoothly changing chords, congratulations—you’ve passed Aloha ‘Oe!
If you enjoy this song, why not challenge yourself with the full version, not just the chorus?
That was a quick rundown, but we covered how to play three chords and the chord progression for Aloha ‘Oe.
There are many other chords out there, so take your time and gradually add more to your repertoire.
The more chords you learn, the more songs you’ll be able to play!
Start with songs that feel fun and easy to play, and move forward at your own pace.
Thank you for reading until the end!
The “sound & person” column is made up of contributions from you.
For details about contributing, click here.


![[Enjoy the Ukulele Even More!] Listen to Skilled Musicians Play](/contents/uploads/thumbs/5/2022/3/20220328_5_17282_1.jpg)
![[Enjoy the Ukulele Even More!] Are You Practicing A Lot, But Still Can’t Get the Chords to Sound Good?](/contents/uploads/thumbs/5/2022/3/20220328_5_17277_1.jpg)
![[Enjoy the Ukulele Even More!] Mastering Downstrokes and Upstrokes](/contents/uploads/thumbs/5/2022/3/20220328_5_17270_1.jpg)
![[Enjoy the Ukulele Even More!] What to Do When Your Favorite Song Seems Too Difficult](/contents/uploads/thumbs/5/2022/3/20220328_5_17261_1.jpg)
![[Enjoy the Ukulele Even More!] How to Make the Most of Instructional Books and Lesson Videos](/contents/uploads/thumbs/5/2022/3/20220325_5_17245_1.jpg)
![[Enjoy the Ukulele Even More!] Hacks to Keep Your Strings Going Longer](/contents/uploads/thumbs/5/2022/3/20220317_5_17094_1.jpg)
 ウクレレのチューニング方法
 ウクレレの各部名称
 ウクレレの種類
 ウクレレスタートガイド
 めちゃラク!ギター講座
 ウクレレ初心者講座


