


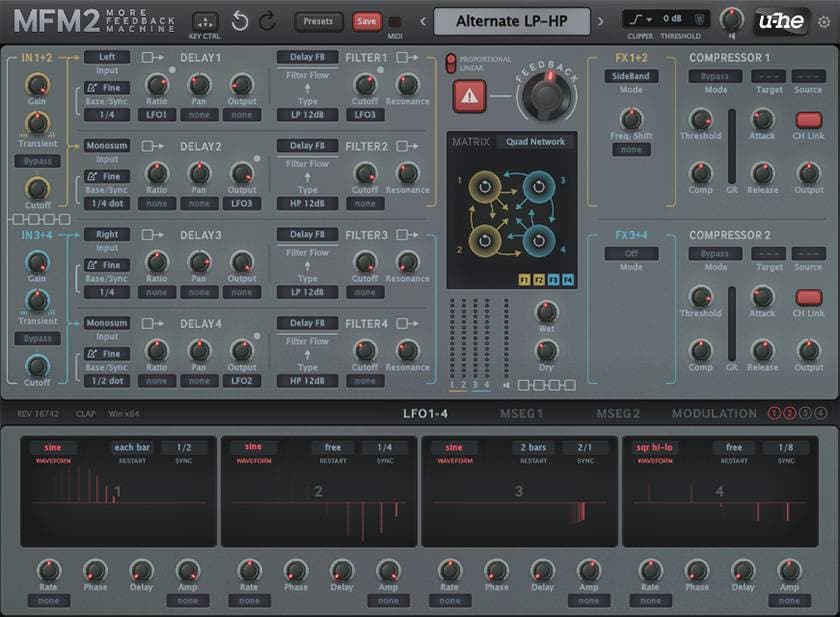
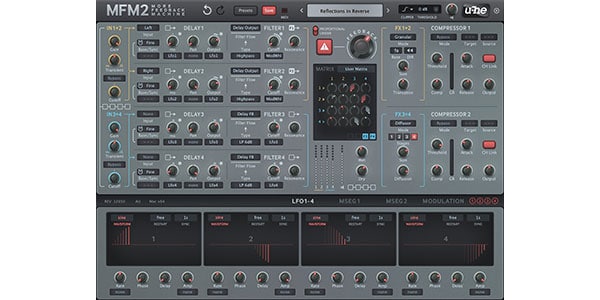
In this article, I will use specific examples to explain.
Transient Adjustment for Wet

It is normal to apply a low-pass filter to wet signals, but with MFM2 you can also adjust the transient. It is a function that is not often seen in other delays, and is very useful depending on the timbre, as it allows you to cut the attack without muffling it. The sample below compares the differences between no filter, low-pass filter, transient -100, and transient +50, with a sound that has a strong attack. Please listen to the differences in the wetness. I think you will get an effect you have never heard before if you use the wetness of only the transient component for percussion.
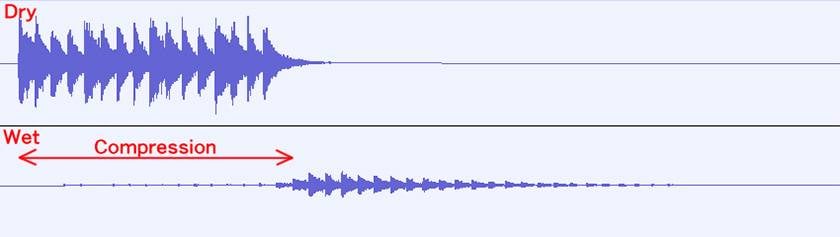
Ducking
This is a useful method if you find the constant delay sound annoying. While the dry sound is playing, reduce the wet sound, and when the dry sound stops playing, the wet sound will return to its normal volume. In MFM2, the compressor's side channel (Source) is used to compress the wet sound in accordance with the volume of the dry sound.

The waveform when the dry and wet channels are split into separate channels is as shown below. When the dry channel stops sounding, the delay of the wet channel is restored.
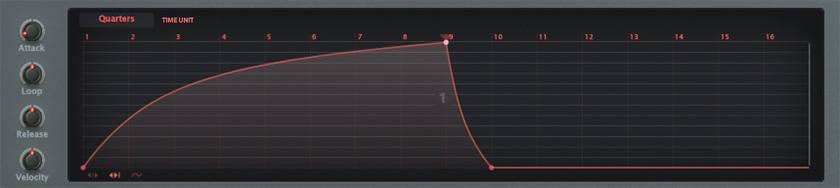
Bouncing Ball & Ping-Pong Delay
The delay interval is set to get narrower as time passes, like the ball bouncing in MFM2. You can control the delay time etc. using the following curves. I don't think you can achieve this with many delays. I also tried to combine the ping-pong delay that is often used. This is a setting where the sound jumps back and forth between the left and right channels for each delay.
The following example contains a strong, metallic attack. All the subsequent notes are wet.
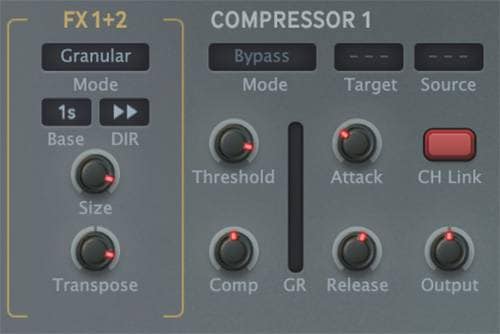
Granular
Rather than the granular effects that are generally referred to, this is an FX that uses granular effects for pitch shifting. It can also be used for reverse playback, and it is possible to create complex behaviors that are not possible with normal delays. In addition, the size of the grains can be adjusted to match the host tempo, not just the absolute time.
Here, I tried using the sound as if it had been broken up into grains and dispersed. First, the sound is dry only, and then it is passed through MFM2. The sound is like wet being broken up into pieces.
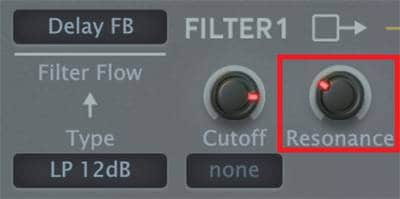
Filters with Resonance
I think it's unusual to have a filter with resonance. It can create a distinctive, assertive wet sound. In the sample, I've placed the filter in the feedback section of the delay line. The first beat is a piano-like sound, and the second beat is a delayed sound processed to sound like a synthesizer. This is repeated, creating a contrast between acoustic and electronic sounds.
Delay that Responds to MIDI Input
This is a function unique to MFM2 and is not found in many delays. It is mainly effective when using MIDI input for synthesizers, etc., and the behavior can be changed by turning the keyboard on and off. In the sample, the delay is set to be applied infinitely while the note is on, and the delay time is changed and the sound fades out when the note is off.
Modulator (Chorus, Flanger)
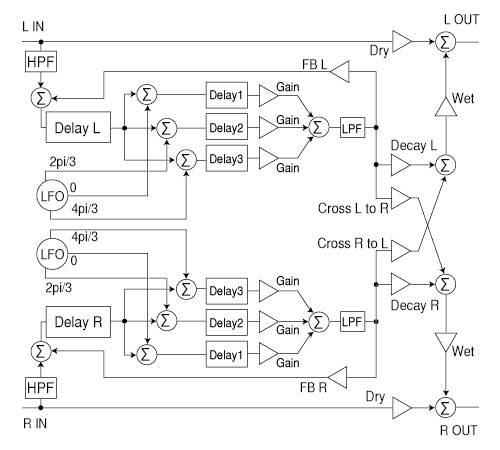
This is a common feature of high-function delay, and it is clear that it is a development of delay. With MFM2, you can design it because you can handle each element separately. However, you need to know the principle. Internally, chorus can be achieved by using a low-frequency oscillator called an LFO to shake the delay time. Adding feedback makes it a flanger.
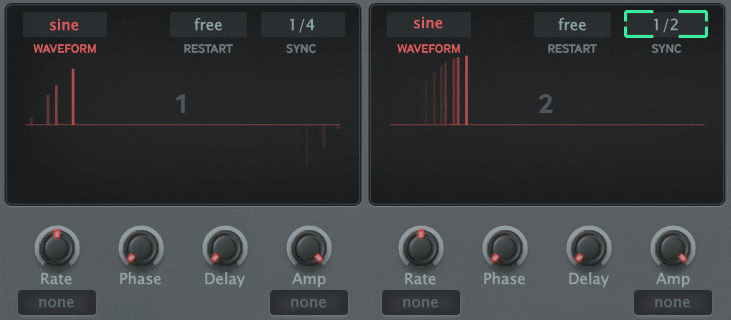
The block diagram below shows a self-made modulator, but you can build a circuit like this with the MFM2.
The samples are arranged in a typical chorus formation, with the dry and wet channels in that order. This gives a multi-layered sound and a sense of spaciousness.
Use as a Reverb
A typical digital reverb is a combination of delays. By combining multiple delay lines, complex reverberations are created.
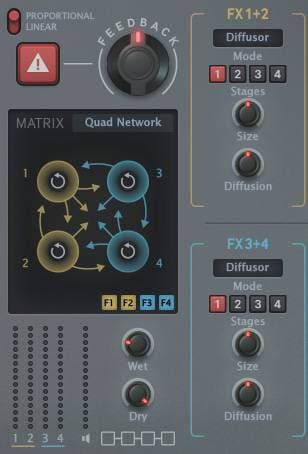
MFM2 has an FX called “Diffusor”, which is based on an all-pass filter. It can be used to adjust the diffusion of reflected sound, and it can soften metallic sounds. There are also classic digital reverb patterns in the feedback matrix. Here is a sample of one of these patterns.
This is a special effect that deliberately emphasizes a metallic sound. It can create a different sound to reverb.
Use as a Comb Filter
This may be a perverted function compared to general delays. A comb filter uses a very short delay to cause resonance at a specific frequency. It is called a comb filter because its frequency spectrum resembles a comb. This allows you to add pitch to a sound that does not have any pitch. Although the basic principle is delay, it is used in a way that is very different from the general delays used in music. MFM2 also has a keyboard, and you can control the pitch using MIDI, but many people may be wondering why.
The waveform below is MFM2, which is a comb filter applied to a pulse wave to create a pitch. You can see that the pulse wave is delayed in accordance with the pitch. As they are in different octaves, the intervals are doubled.

I tried adding pitch to the percussion instrument. The sound at the beginning, like a count, is the raw sound, and after that I'm playing around with the pitch using a comb filter.
Summary
I've given a brief introduction to MFM2, but I hope you now understand that it is not a general delay, but a plugin that combines a delay line and related functions. Since users need to design and use it, it is a plugin with a somewhat high threshold, but the high degree of freedom it offers is something you won't find anywhere else.
The “sound & person” column is made up of contributions from you.
For details about contributing, click here.


 厳選!人気のおすすめオーディオインターフェイス特集
 ZOOMマルチトラックレコーダー Rシリーズ比較表
 DTMセール情報まとめ
 機能で選ぶ オーディオインターフェイス
 人気スタジオモニター徹底比較
 DTM・DAW購入ガイド


