In the previous articles, I gave a very brief overview of Dolby Atmos and its operation. A ‘rough understanding’ of it is completely fine for now. The most important thing at this stage is to spark your interest.
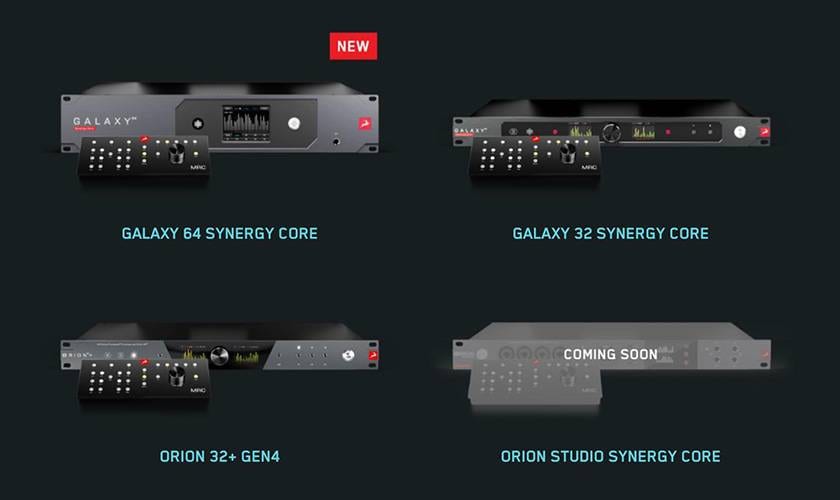
Currently, Dolby Atmos is supported by three devices: Galaxy 32, 64, and Orion 32 Gen4. It seems that Orion Studio SC will also support it through an update.
The most challenging aspect of Dolby Atmos production in a 9.1.6 setup is controlling speaker volume, alignment, and LEF settings.
It’s necessary to control the signals of up to 16 speakers simultaneously, which is actually quite a complex task.
Antelope Audio’s control panel includes features designed to support Surround Systems using FPGA technology.
01 Flexible Control Panel
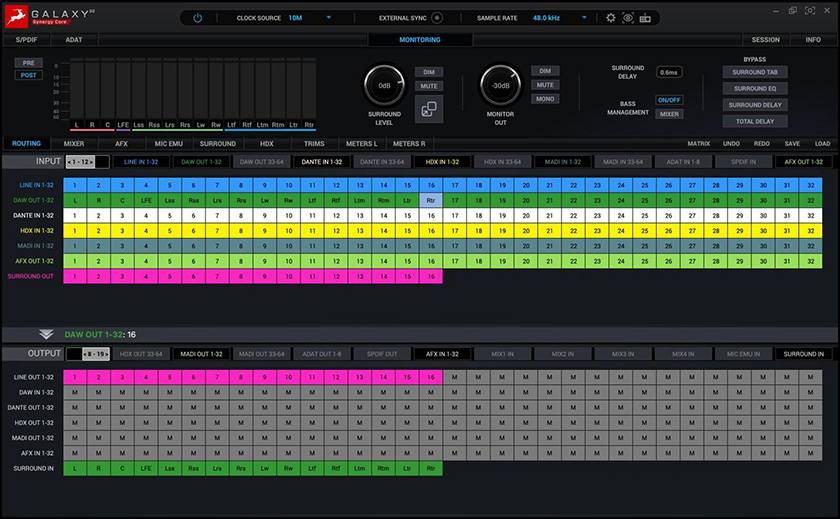
For those using Antelope Audio products, the familiar control panel allows for the flexible construction of signal routing.
Thanks to the control panel’s ability to handle complex routing, you can actually set up the label placement of your speakers freely. (There isn’t a strict standard for this layout yet, but there are provisional standards from Film and Dolby.)
The image above shows how Dolby Atmos Renderer is controlled via Core Audio, with analog output sent to each speaker from Line Outs 1-16.
Antelope Audio’s routing matrix offers a high degree of flexibility. As a result, the surround output signals can be routed to both Dante and MADI, allowing full control of volume even when you want to operate all speakers via digital inputs.
This is huge. Currently, devices that allow you to control the level of digital outputs via physical knobs (control knobs) are quite rare, so being able to adjust the levels before the digital output using a control knob is something I personally really appreciate.
This routing functionality plays a crucial role in practical tasks, but for those without studio experience, it can be challenging to fully understand its usefulness and practicality. Therefore, I recommend watching Antelope Audio’s control panel introduction videos to gain a deeper understanding of its versatility and applications.
02 Features for Dolby Atmos
While it’s possible to adjust speaker volume using the control panel or the device’s control knobs, Antelope Audio also offers a dedicated controller called the MRC.
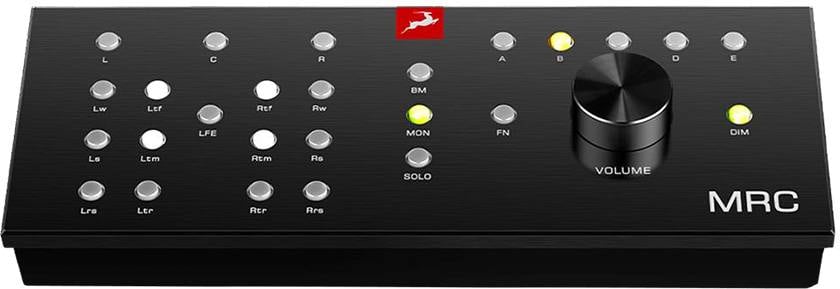
MRC Dedicated Controller
When working with surround systems, Speaker Management and Bass Management are essential. This includes mixer adjustments for the LFE (subwoofer) and delay adjustments to address timing discrepancies across multiple speakers.
You can adjust the HPF (high-pass filter) and LPF (low-pass filter) for each channel, and the filtered signals are sent to the LFE (subwoofer). This eliminates the need for complicated settings. In some rooms, even if Bass Management becomes difficult, adjusting the signal for the LFE can help resolve room acoustic issues.
Such adjustments may be necessary at times. However, there are now hardware solutions like Trinov, which provide room correction for Dolby Atmos—although these are quite expensive.
With Antelope Audio products, similar sound field correction can be manually adjusted through the control panel. It is hoped that, in the future, Antelope Audio will offer semi-automatic adjustments as well.
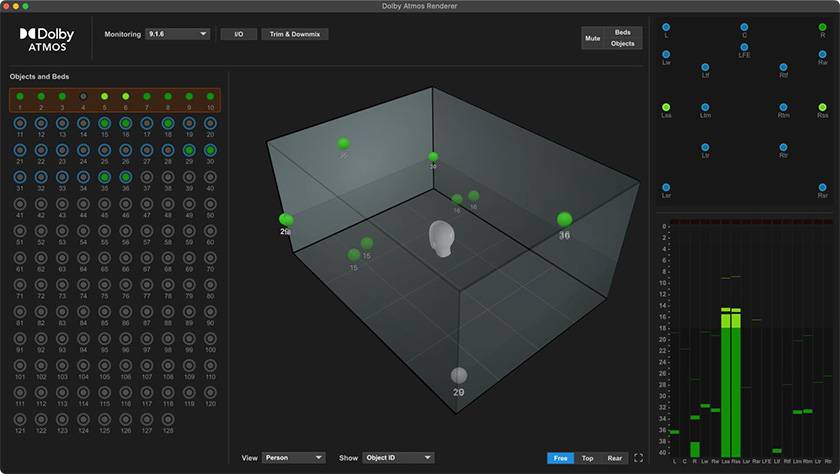
The Dolby Atmos External Renderer allows speaker management adjustments, so it can be used in conjunction with Antelope Audio products.
With an external renderer, EQ adjustments and delay adjustments are also possible.
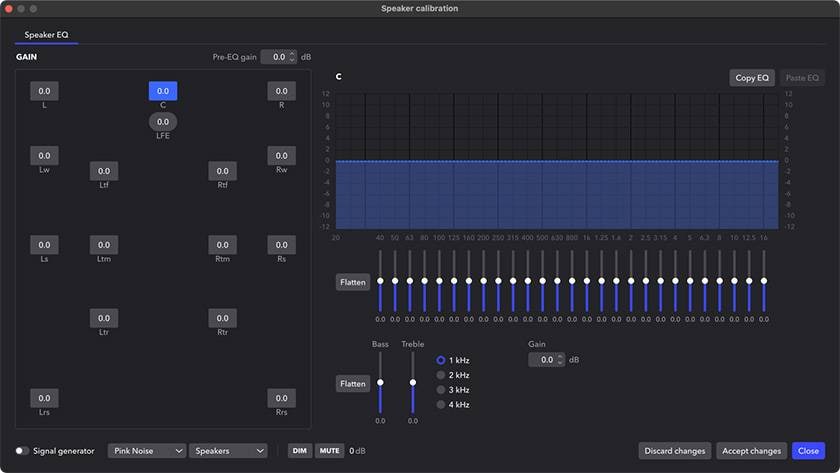
03 Speaker Management (Sound Field Correction)
Speaker management has become quite a hot trend nowadays, and even in traditional 2ch environments, many professionals are adjusting their systems with hardware or software.
Recently, IK Multimedia has introduced a hardware product called ARC Studio, and there is also a sound field correction software called SoundID Reference, which supports surround sound and Dolby Atmos systems. These are very affordable (around 1/20th of the cost compared to traditional methods) and while not mandatory for recent productions, many creators are making use of them.
Some speakers now come with built-in sound field correction features, so they can be used in conjunction with such software.
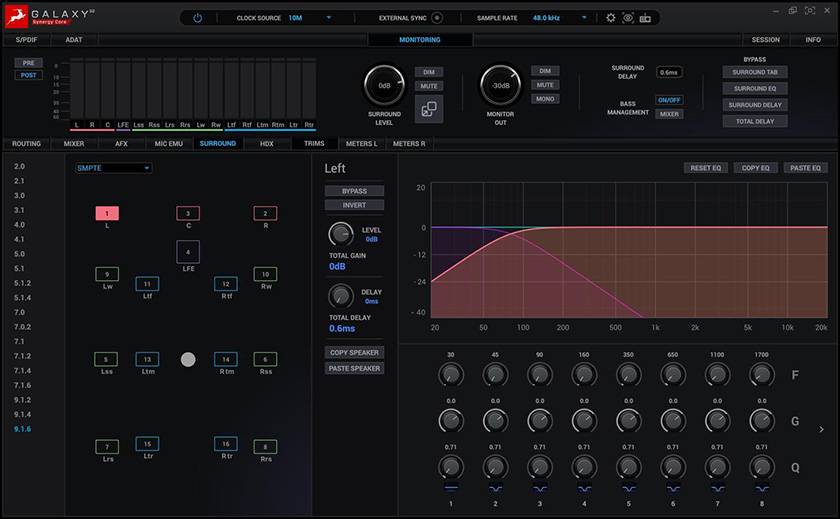
Antelope Audio’s control panel comes with a wide range of presets, covering configurations from 2.0 to 9.1.6, which means it can accommodate any studio.
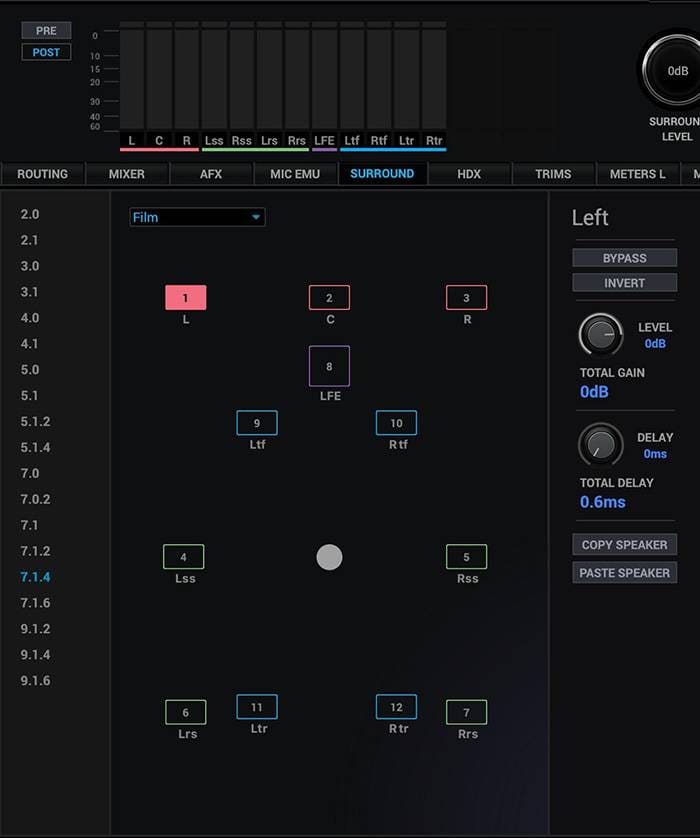
This is a 7.1.4 configuration preset. It allows for switching between Film and SMPTE layouts.
Speakers can each utilize corrective EQ. This is also available for 2ch setups, so it can be used for regular stereo mixes as well. This is quite convenient as monitoring adjustments can be made in real-time on FPGA-based calculations.
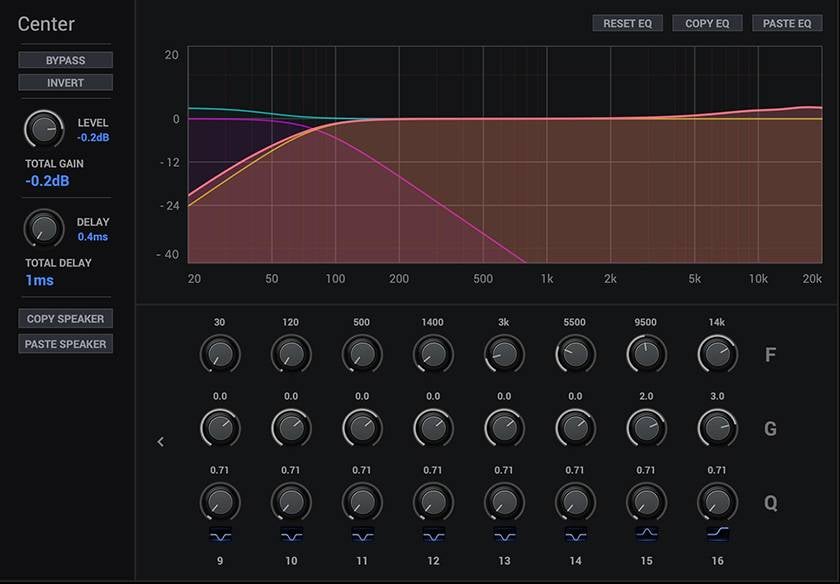
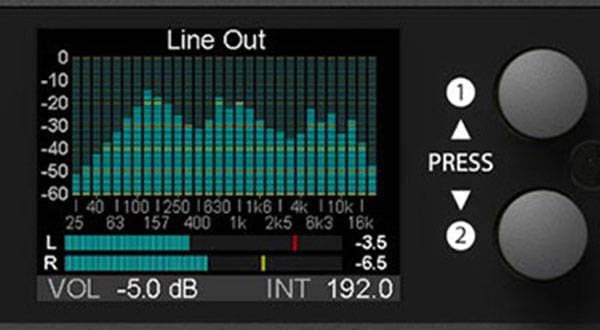
The following image is just one example, but it shows output level adjustment (-0.2dB), delay adjustment (0.4ms), and corrective EQ. The EQ correction allows for up to 16 bands, and in this case, low-end and high-end corrections are applied.
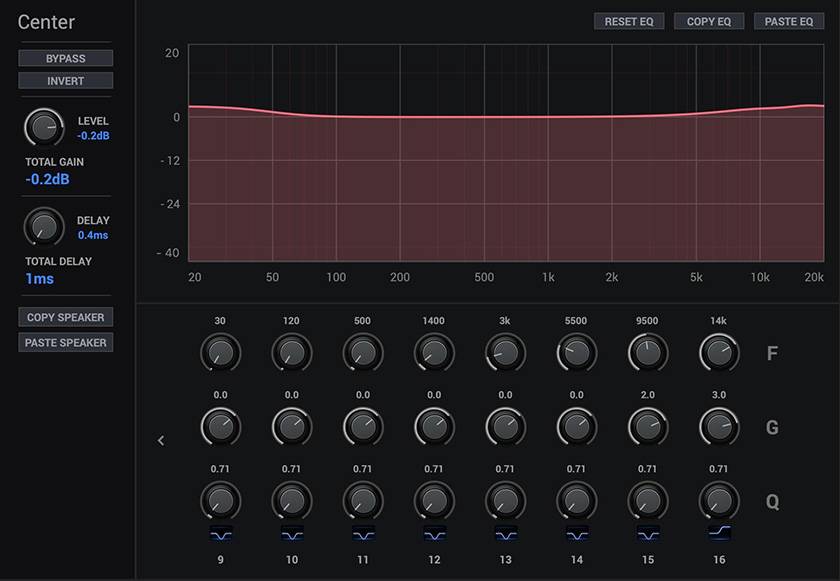
TOTAL DELAY is the delay time used for calculating the entire system, and if no delay is set, it will default to 0.6ms. This is an extremely fast processing time that leaves competitors behind. Most traditional speaker management hardware or software, depending on the environment, requires at least 20ms or more, and even recent DSP-related products often require around 10ms of latency. This is very beneficial, as it applies to regular 2ch speakers as well.
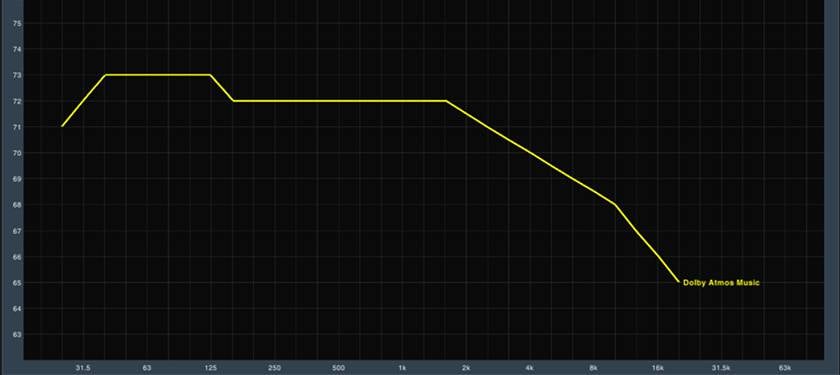
For Dolby Atmos Music corrections, there are specific guidelines that should be followed, and adherence to them is highly recommended. There are target curves like the ones shown below.
While the detailed explanation is long, if you’re interested, it's recommended to receive a lecture from the Partnership Team about the Dolby Atmos Music guidelines.
04 Bass Management
Bass Management can be accessed from the following button in the Surround section.

When you enable the BASS MANAGEMENT ON/OFF button, the MIXER button for detailed LFE settings becomes available.
Enabling this will add new displays to the corrective EQ.
Purple low-pass and yellow high-pass filters will appear as additional options.
This shows the filter settings for LFE’s Bass Management. To adjust these settings, the BASS MANAGEMENT MIXER screen should be used.
The following image is the Bass Management mixer screen.
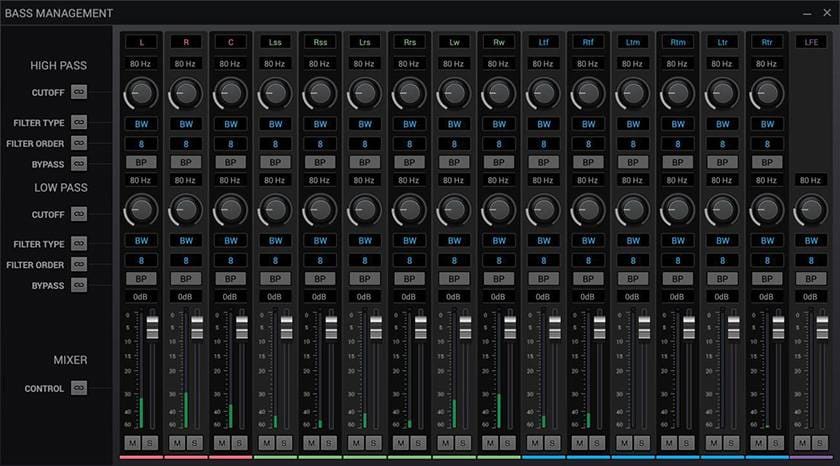
The upper section is for the High-Pass Filter, and the lower section is for the Low-Pass Filter settings. The signal level that passes through the Low-Pass Filter is displayed on the lower fader. The upper section is for the High-Pass Filter, which sets the frequencies that won’t be played by the subwoofer. Essentially, it filters the frequency range of the sounds produced by normal speakers.
The lower section is for the Low-Pass Filter, which represents the frequencies played by the subwoofer. The filter settings on the subwoofer or the Bass Management settings on the speakers are fundamentally similar.
By using this, bass management can be adjusted on the device even for a 2ch mix, making it very convenient and allowing for fine-tuning with ease. Of course, delay adjustments can be made for LFE signals, allowing for the creation of advanced 2.1ch or 2.2ch environments.
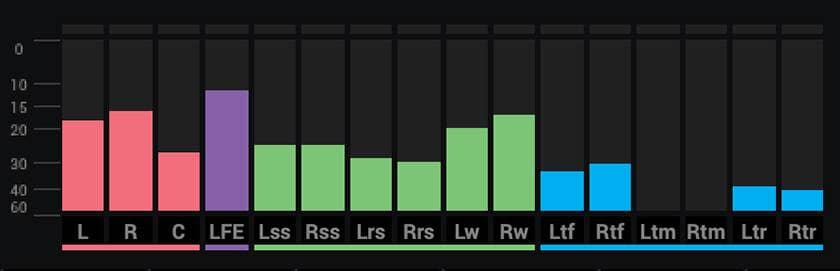
The meter shows the LFE being adjusted. This ensures that low-end adjustments can be made in any environment.
The following is a more technical and professional discussion, so feel free to skim through it.
Currently, Dolby Atmos does not recommend directly using LFE (subwoofer) channels with LFE feeds. This is related to operational methods, as explained by Dolby below:
How Should I Route LFE in a Dolby Atmos Music Mix?
Additionally, there are some complex production processes where 2Mix or surround elements produced in a channel-based format are sent to the Beds channel bus, and those Beds signals are further routed to the Objects channels, playing at any desired Pan position.
This means that in channel-based setups, the LFE physically disappears (since there is no LFE concept in the 11-128 Objects channels), and the LFE channel’s output will depend on the environmental equipment and settings.
This also helps avoid the discomfort of binaural playback and excessive adjustments related to LFE settings.
05 Pro Tools Implements Internal Renderer
The Dolby Atmos Renderer has been internally implemented in Pro Tools Studio and Ultimate.
As a result, you can now start creating immersive audio without any additional costs, as long as you have headphones.
Both professionals and amateurs should take this opportunity to explore immersive audio. Pro Tools comes with a demo session called the Stratosphere Dolby Atmos Demo, so be sure to open the demo session and try it out.
Pro Tools Studio and Ultimate users can immediately experience immersive production. For those who feel limited by binaural headphones, consider trying out speakers and a Dolby Atmos-compatible Antelope Audio device.
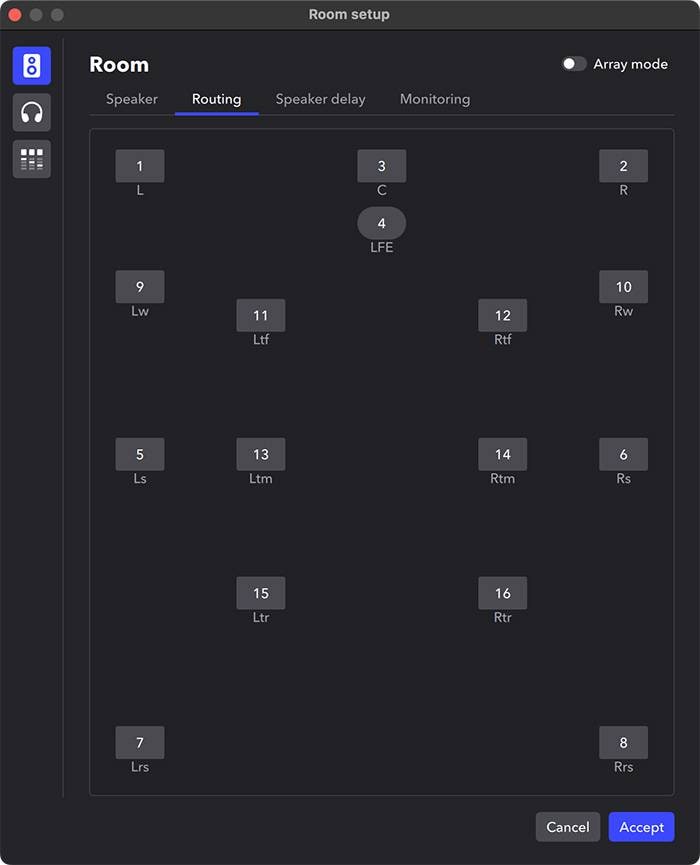
For advanced users, there is still no standardization, but there are cases where the channel assignments defined by SMPTE and the channel assignments defined by the Dolby Atmos Internal Renderer differ.
Pro Tools adopts the configurations defined by SMPTE and Film, but the Dolby Atmos Internal Renderer does not follow this standard.

The above shows the label layout for the Internal Renderer, where C and LFE follow the Film standard.

Pro Tools allows you to choose between Dolby (SMPTE) and Film configurations. However, the Internal Renderer uses the Film configuration, and it cannot be changed.

Antelope Audio’s Surround setup uses the Dolby (SMPTE) configuration, though Film configurations may also be selectable depending on the channel count.

The Dolby Atmos External Renderer follows the Dolby (SMPTE) configuration.
These layouts can be adjusted in external renderers, but currently, there are no options to do so within the Internal Renderer.
In external renderers, you can also adjust the speaker configurations.
![[Limited in quantity] Buy ANTELOPE AUDIO Orion 32+ | Gen 4 and get an MRC as a gift!](https://www.soundhouse.co.jp/contents/uploads/5/2024/6/20240614_5_27182.jpg)
The “sound & person” column is made up of contributions from you.
For details about contributing, click here.


![[In-Depth Review] Antelope Audio Zen Quadro Synergy Core!](/contents/uploads/thumbs/2/2024/5/20240520_2_26913_1.jpg)
![[Thorough Review!!] Antelope Audio / Discrete 4 Synergy Core](/contents/uploads/thumbs/2/2021/8/20210806_2_13613_1.jpg)
 厳選!人気のおすすめオーディオインターフェイス特集
 自宅スタジオの作り方
 ANTELOPE AUDIO 特集
 DTMセール情報まとめ
 機能で選ぶ オーディオインターフェイス
 DTMに必要な機材