Hello, this is Conservario.
There are various types of chords in guitar playing, but have you heard of power chords?
For those who know them or have played them, they’re often called “the easiest chord!” If you don’t know them, I encourage you to give them a try after reading this column (or even while reading it).
For those who are familiar with them, there are some important tips, so please read this as a reminder.
Precautions and Tips for Playing Power Chords
A power chord is a chord formed by pressing down two notes: the root and the fifth.
This might sound technical, but only those who want to know the theory can remember it.
Here’s how it looks in tablature and a diagram:
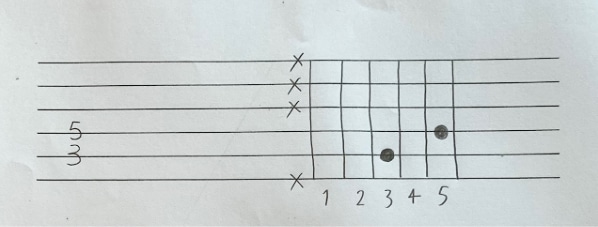
Your index finger presses the 3rd fret of the 5th string, and your pinky presses the 5th fret of the 4th string.
It’s fine to use your ring finger instead of your pinky.
Just use whichever finger is more comfortable, either the ring or pinky finger.
That’s all you need to do—there are no other fingers involved.
Compared to basic chords like C or Am, which beginners often try first, fewer fingers are needed for a power chord, so it seems easier.
It makes sense why it’s called the easiest chord.
However, while it may seem easy, power chords are a deep skill.
There are important points to be aware of.
Don’t let unpressed strings ring.
This is the most important thing, but many people fail to do this.
The image shows a C power chord.
You’re pressing the 3rd fret of the 5th string and the 5th fret of the 4th string.
In this case, you should NOT let the 6th, 3rd, 2nd, or 1st strings ring.
Even a slight sound from those strings is a no-go.
So how do you make sure only the 5th and 4th strings ring? You can use one or both of these methods: 1) Adjusting with your right hand and 2) Muting with your left hand.
1. Adjusting with the Right Hand: This means playing only the 5th and 4th strings while minimizing the movement of your right hand.
To be honest, it’s quite difficult.
It’s easy to play one string or all of them, but playing just two specific strings takes some practice.
Start by practicing just down-picking to play both strings at once.
The trick is to focus on the 4th string.
When down-picking, the 5th string is up high and thick, so you’ll likely hit it without thinking. But if you don’t focus on the 4th string, you won’t hit it cleanly.
Aim for both strings to ring almost simultaneously.
If you don’t play fast enough, it will sound uneven, so play quickly.
Once you’re used to it, try practicing up-picking as well.
It’s tough, but once you master it, it will greatly expand your playing range.
For up-picking, aim for the 5th string, just like the reverse of down-picking.
2. Muting with the Left Hand: This involves using your unused fingers or the side of your hand to mute the strings that shouldn’t ring.
For example, your index and pinky fingers are already being used, so your middle and ring fingers are free.
By gently touching the 6th string with your middle and ring fingers, you mute it, and it won’t ring even when you pick it.
Be careful not to press too hard, as that will cause the 6th string to ring.
As for muting the 3rd, 2nd, and 1st strings, you can use your index finger.
You’re already using your index on the 5th string at the 3rd fret, right?
So, use the side of your index finger or the part of your hand near the belly to mute those strings.
Have you ever practiced barre (or ‘seha’) chords?
For example, the F chord, which uses all 6 strings.
When practicing F, there were probably strings that didn’t ring clearly.
Well, that’s similar to muting. (Positively thinking!)
With the F shape, your index finger presses all the strings from the 5th to the 1st, and you’re pressing the 5th string with just the fingertip.
If you can mute properly with your left hand, then even if you pick all the strings, only the 5th and 4th strings should ring.
It might take time to get it right, so keep adjusting and finding the sweet spot where you mute correctly.
Conclusion
I’ve introduced the precautions and tips for power chords.
So, what’s the difference between regular chords and power chords?
It’s this: With regular chords, it’s okay to play all the strings, but with power chords, any string that you’re not pressing should not ring.
There are 6 strings on the guitar.
You can think of a power chord as playing just two strings, but it’s just as important to ensure the other 4 strings don’t ring.
Even if you use distortion with an amp, aim for a clean-sounding power chord.
This is especially important with clean or acoustic sounds, where it’s harder to tell whether you’re muting properly.
Power chords are often called easy because they require less finger pressure, but muting and getting them to ring cleanly is actually quite a technical skill.
Once you can play both regular and power chords, your rhythm guitar skills will expand.
For those who focus on singing and playing, power chords can add an accent to the song, so they’re highly recommended.
Thank you for reading until the end!
The “sound & person” column is made up of contributions from you.
For details about contributing, click here.


![Learning from Tomoyasu Hotei, How to use your right hand for cutting [Guitar Hero Posture Analysis]](/contents/uploads/thumbs/5/2020/8/20200815_5_10914_1.jpg)
![Cutting and how to use the right hand as learned from Abe Futoshi [Guitar Hero Posture Analysis]](/contents/uploads/thumbs/5/2020/7/20200725_5_10738_1.jpg)
![Actually wrong -- Is your wrist angled to pick parallel to the strings - [Things guitarists should know about their body]](/contents/uploads/thumbs/5/2020/5/20200529_5_10258_1.jpg)
 ギターパーツの沼
 超オススメのフレーズ道場 アコースティックギター
 ギターのお手入れ
 ギタースタートガイド
 めちゃラク!ギター講座