About Ableton Live 10
Live, which is a DAW, is used not only in the field of stage sound such as theater and musicals, but also in the field of PA events, and interestingly in those fields, it is used for reproduction of music and sound effects (pop-out sample playback).
By introducing Live, even replacing and editing a problematic sound source for cueing can be easily completed, and the time spent will be greatly reduced and you can spend this time on other things.
This time, I will introduce tips for users who want to introduce Live for pop-out sample playback.
I think Ableton Live is the only DAW that specializes in pop-out sample playback so far.
The following is a long story, but it will be a detailed explanation of the operation.
- Introduction of peripheral devices
- How to set up Live for PA / stage sound
- MIDI controller settings
- About each interface and routing
- About the browser
- Clip settings used in session view
- Basic method used for sound effects, etc.
- Sound source output in session view
- Click out at the live venue
- Sound source output in the arrangement view
- Max for Live (M4L)
- How to save
- Lastly…
Introduction of peripheral devices
The most important peripheral device is the audio interface.
Your choice depends on how many playback devices you want to work with and whether it is easy to switch to a secondary computer.
If you want to put everything together in Live and output sound with a stereo mix, there is no problem even with a model with 2 output channels (4ch or more is recommended).
If you want to operate the faders in real time with an audio console, you need a model with a large number of output channels in order to separate the outputs.
"Audio interface for multi-channel output"
(Examples: iConnectivity PlayAudio12, ESI GIGAPORT eX, ESI GIGAPORT HD+, Focusrite Scarlett4i4, etc.)
If you want to use a pad-type MIDI controller or MIDI keyboard to output an arbitrary sound source when you press it like a “pop-out” sampler, it will be easier to use intuitively.
Also, if you want to operate Live's faders and PANs, you can choose a MIDI controller with faders and knobs to create a wider range of operations and a sense of unity.
"MIDI controller / MIDI keyboard"
(Examples: KORG nano series 2, Roland A-49, Novation LaunchControl XL, Launchpad series, Akai APC mini, etc.)
Recently, some products such as the YAMAHA 01V96i, the Roland M-5000C, and theMIDAS M32-Live have an audio interface function for the sound desk itself, and even for event PAs where the system is temporarily set each time, multiple cables can be used. It is also possible to handle audio signals.
In addition, some sound desks support MIDI, and you can recall scene changes and internal effect settings of the sound desk from Live's MIDI track at any time, and you can remotely control Live from the sound desk using MIDI. By doing so, it becomes a seamless sound effect system that integrates hardware and software.
By utilizing an acoustic desk with such functions, the set-up time is greatly reduced, and there is the advantage that you’ll have more time.
How to set up Live for PA / stage sound
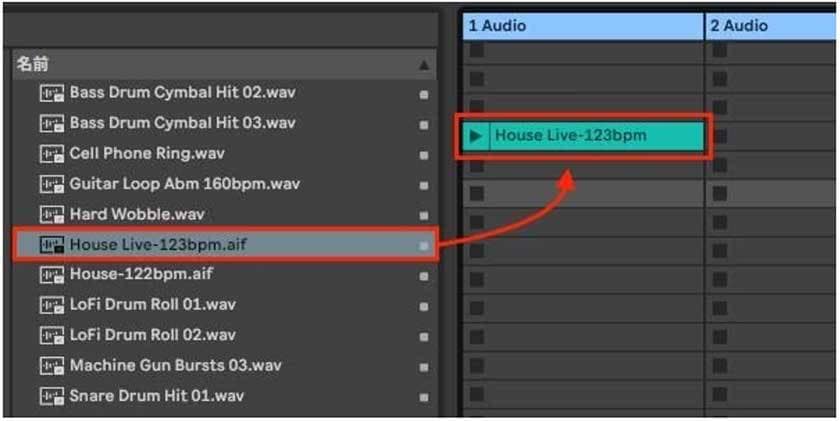
For pop-out applications, we mainly use an operation screen called "session view" where many squares are lined up.
Each square is called a slot, and the one created by throwing an audio file into the slot is called a clip.
If the current display is a screen like other DAW software where the time axis flows from left to right, the "arrangement view" is being displayed.
Press the [tab] key to switch to "Session View" alternately.
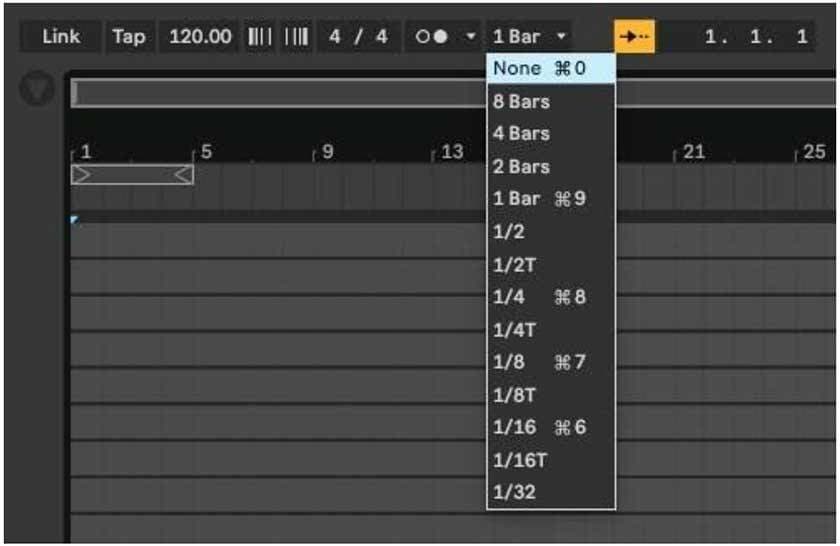
Change [1Bar] at the top left of the screen to [None] so that the clip will start playing as soon as you start playback.
Execute "Insert Audio Track" from the
You can also delete unnecessary tracks by selecting the track name and pressing the [delete] key.
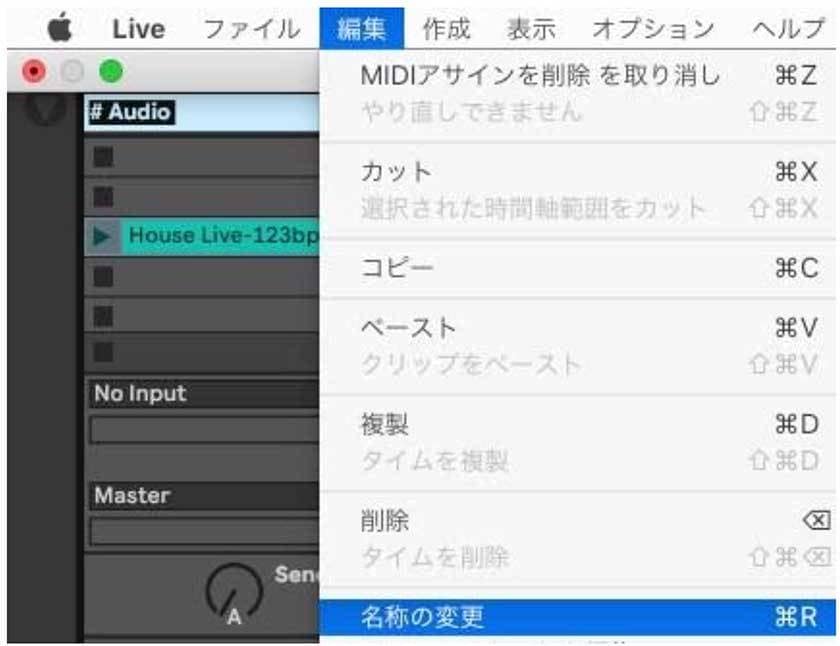
If you want to give the track an arbitrary name, you can select the track name section in the same way and edit it by selecting "Rename" from the
If you want to continue renaming the tracks that follow, you can use the [tab] key to move to the next one without pressing the [enter] key.
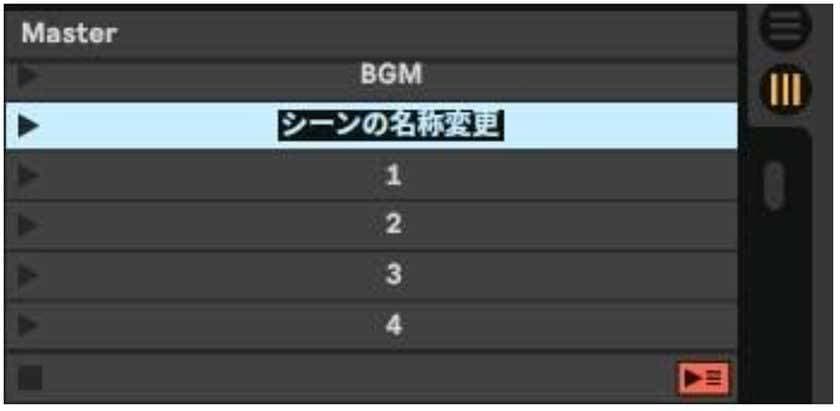
Renaming is often used in scenes and clips. Remember the shortcut for the rename is R.
It's very modest, but it's one of the features that accelerates the workflow.
- For Mac, rename [Cmd + R]
- For Win, rename [Ctrl + R]
If you want to optimize for pop-out sample playback, you have to change the musical features that are also a feature of Live.
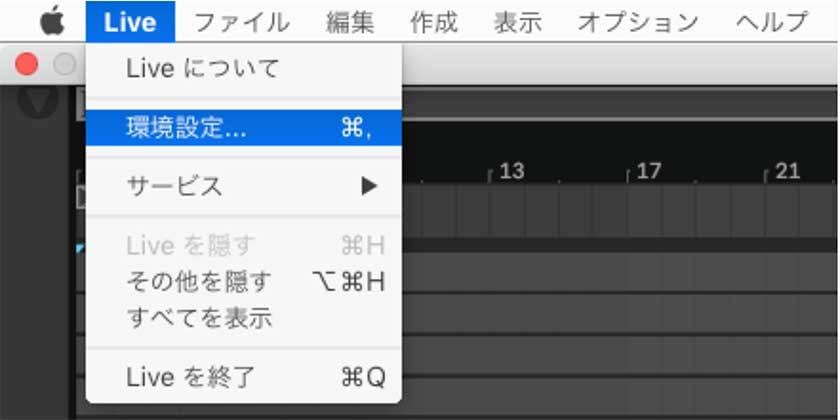
- For Mac, select "Preferences" from the
menu - For Win, select "Preferences" from the
menu
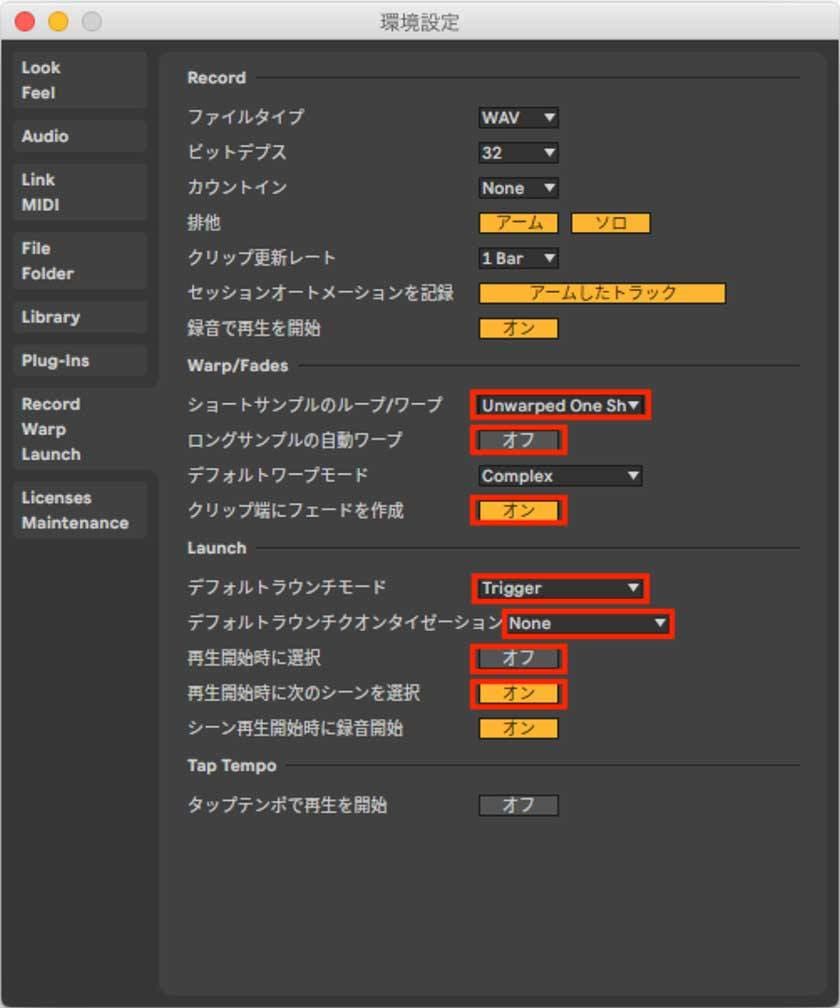


- Open the Record / Warp / Launch tab and change the following items.
- Short Sample Automatic Loop / Warp [Unwarped One Shot]
- Long sample automatic warp [off]
- Create a fade at the end of the clip [On]
- Default launch mode [Trigger]
- Default Launch Quantization [None]
- Select at the start of playback [Off] (If you want to use it exclusively for the pop-out sampler, you can also select [On])
- Select the next scene at the start of playback [On]
- Open the Audio tab and set up your audio device.
- For Mac, select the driver type [Core Audio] ・ For Win, select the driver type [Asio] (may be other than Asio)
- Audio input device [Audio interface name you want to use]
- Audio output device [Audio interface name you want to use]
- Input settings [Enable mono / stereo channels for the number you want to use]
- Output settings [Enable mono / stereo channels for the number you want to use]
- Open the File / Folder tab, execute "Save current set as default" and close "Preferences" to complete the basic set-up. * At this time, this operation overwrites the contents of the set currently set as default.
* In addition to the environment settings, you need to check whether the power saving function of your Mac / Win is disabled.
MIDI controller settings
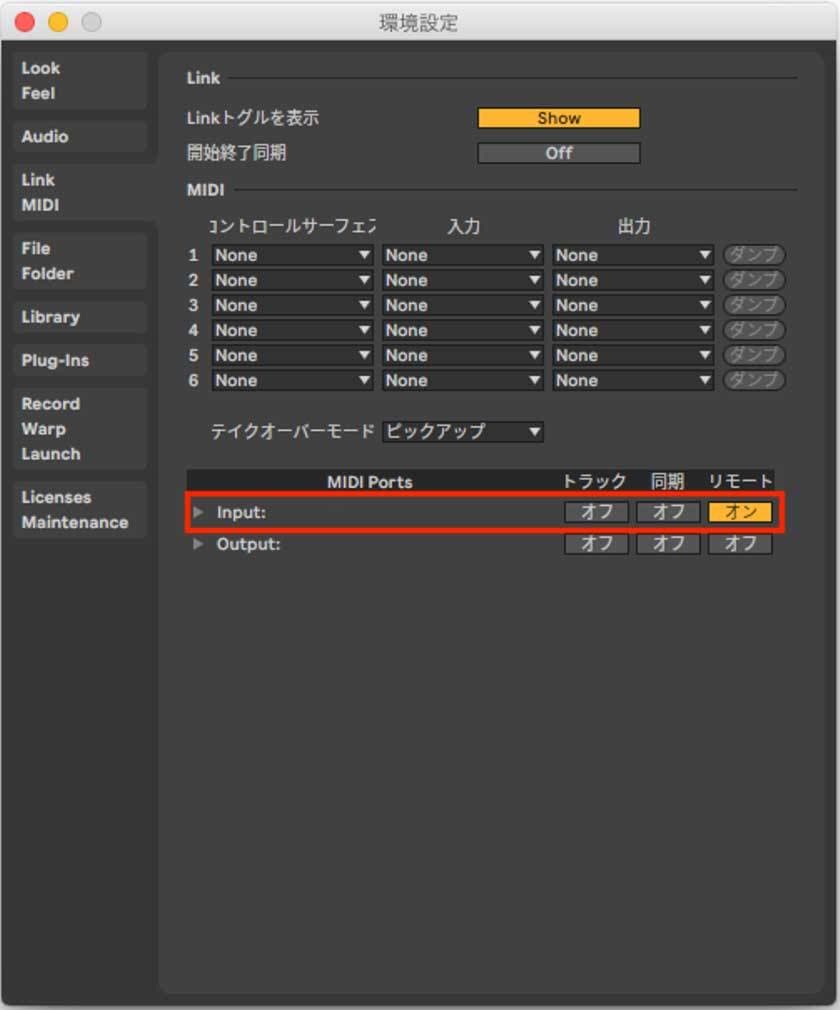
Connect the controller you want to use, open the "Preferences" Link / MIDI tab, and enable MIDI INPUT [Remote] for the controller.
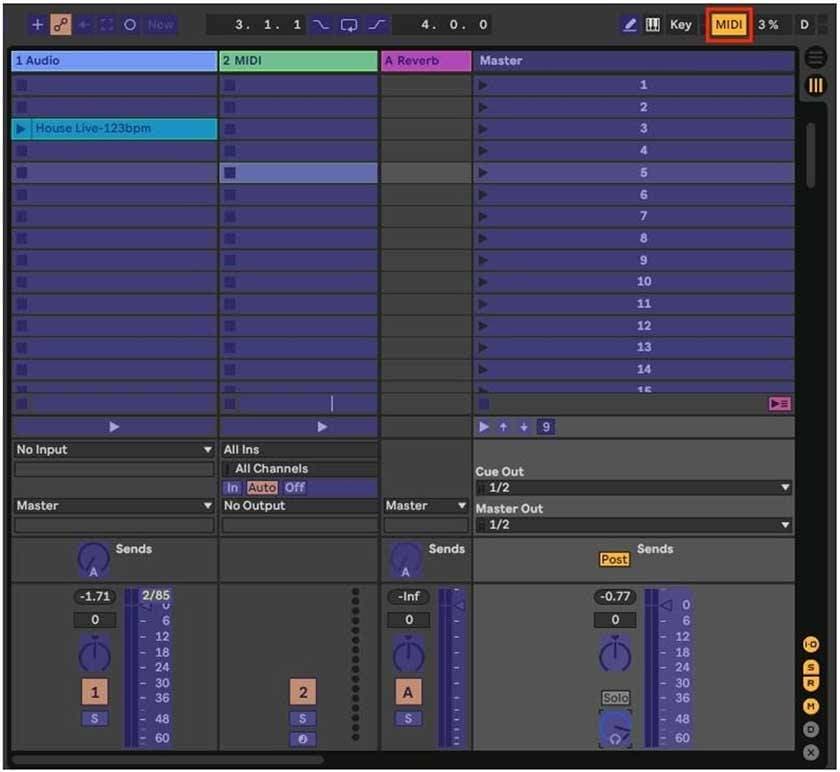
Enter the blue MIDI map mode from "MIDI" at the top right of the screen, select the location you want to operate, and move the MIDI controller to assign it automatically. * Some MIDI controllers such as Launchpad and APC can be set as a control surface.
For pop-out applications, they are often assigned to the slot where the clip is placed, the fader of the track, and the [□] [▶] [↑] [↓] of the master.
[□]: Stop all CLIPs ... STOP
[▶]: Scene launch (execution of scene)… GO
[↑]: Move the scene selection up ... UP
[↓]: Move the scene selection down ... DOWN
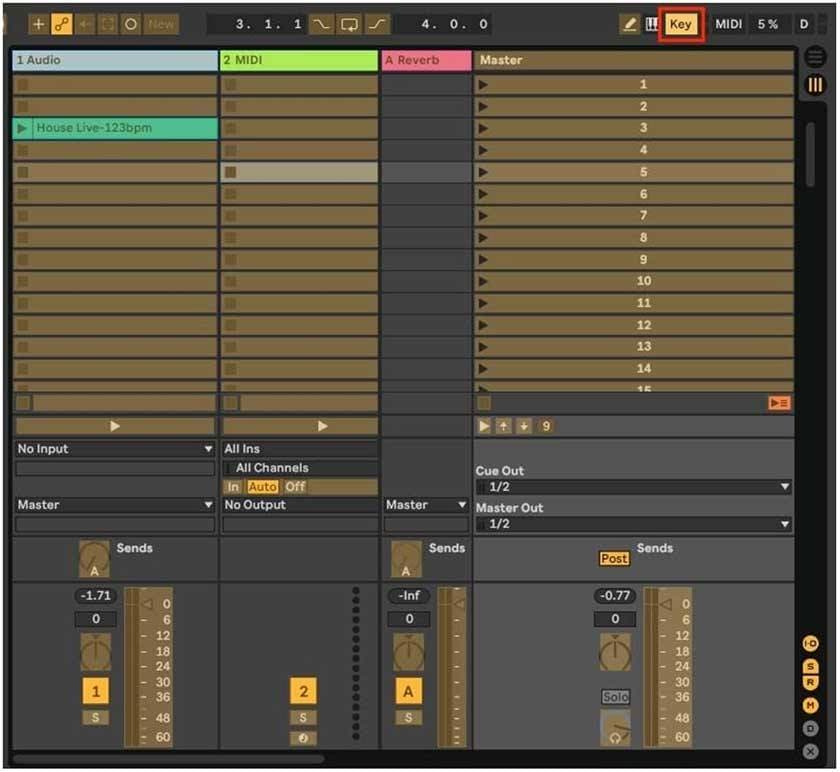
You can call up the orange keymap mode from "KEY" on the upper right of the screen, and you can also assign it to the PC keyboard or numeric keypad.
* When setting a MIDI-compatible sound desk as a controller, be sure to make the settings on the sound desk side as well.
- Set MIDI signal to user-defined key
- Select the send / receive terminal on the [MIDI / HOST] page
- Select the signal to send / receive on the [SETUP] page
About each interface and routing
This is explained using the session view screen.
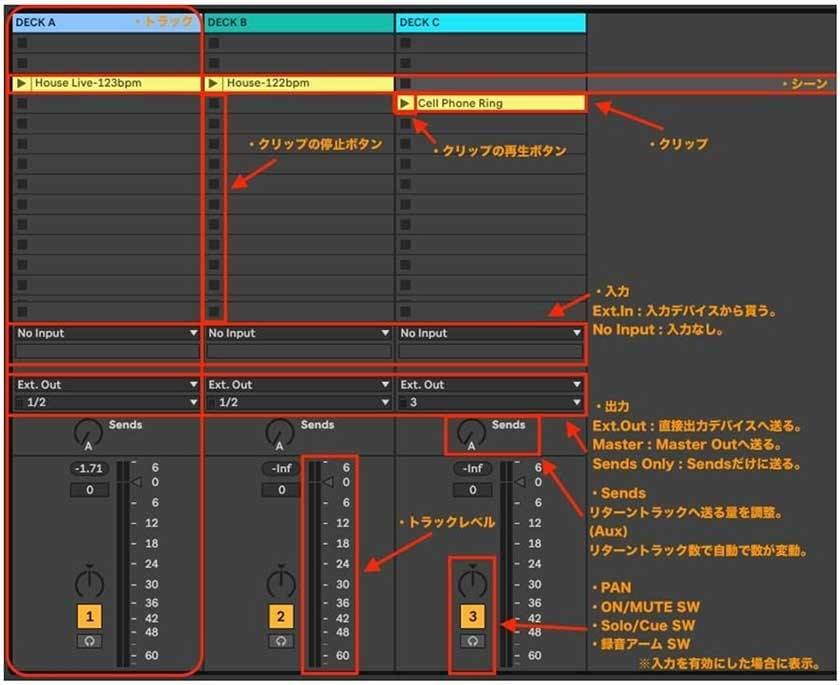
- Tracks ... There are basically two types, audio & MIDI, which handle audio clips and MIDI clips, respectively.
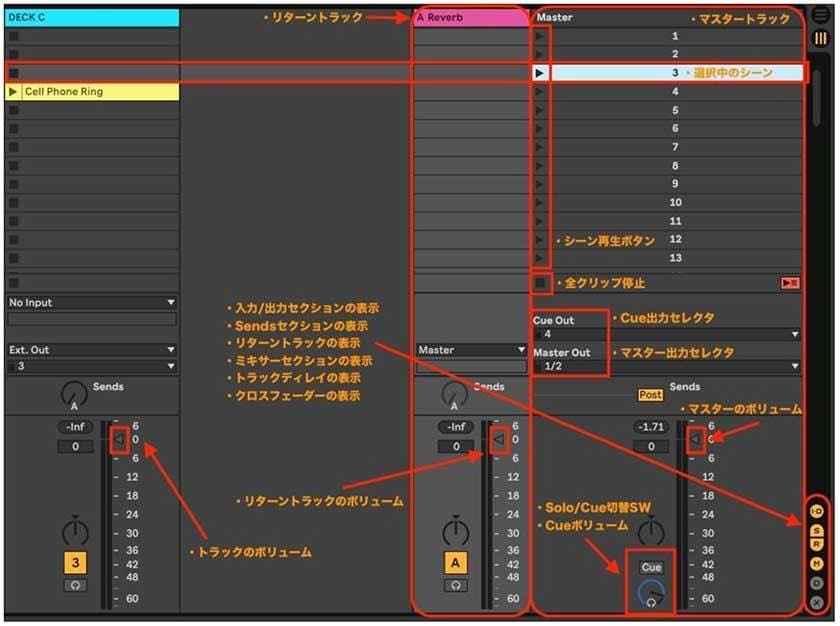
The stop button of the slot in the track can be deleted by selecting "Delete stop button" from the right-click menu, which is very effective when you want to superimpose the sounds of different tracks from scene 1 to scene 2. - Return track ... The sounds sent from Sends are gathered here. You can use the Reverb effect or choose a pattern to use as the Aux master.
- Master track: Select a scene and set the output destination of Cue and master. If you press the [S] key while Solo is set, the selected track will become Solo and other sounds will be cut.
- Scene… Select with the mouse or cursor keys, and press the [enter] key / [return] key to execute the scene playback. When playing a scene, the entire horizontal row is executed.
About the browser
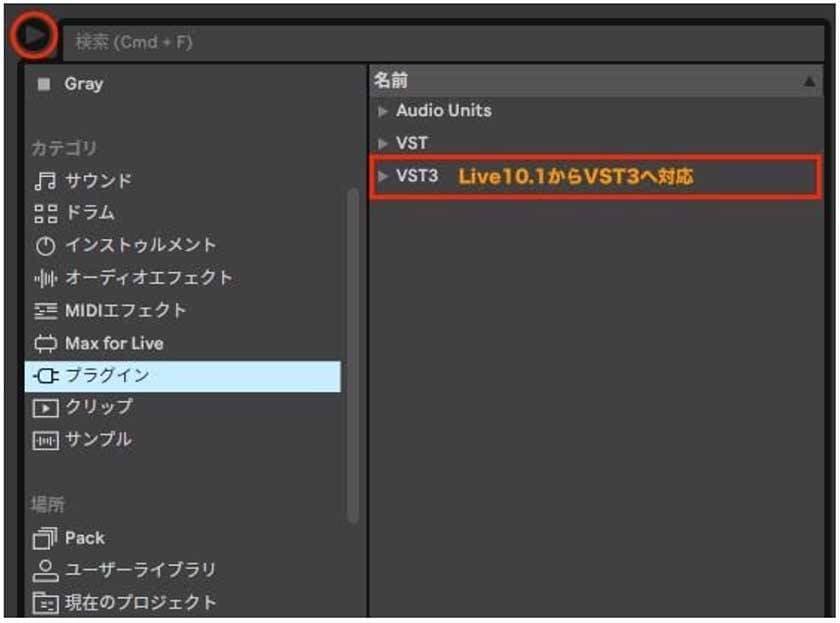
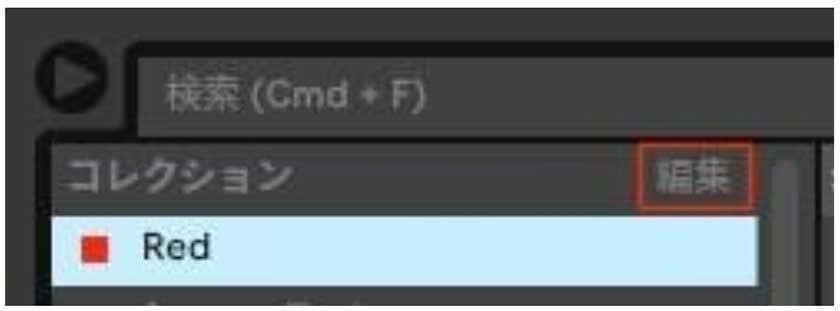
"Browser" is displayed by clicking the triangle in the upper left of the screen.
Color labels are added to sound sources and plug-ins from the [Collection] category, etc., and they are automatically collected here. The color is the image to tag.
[Category] Live's built-in EQ Eight and Reverb are stored in "Audio Effects", and third-party ones are stored in "Plug-ins". Supports VST3 from Live 10.1.
Some are preset to make it easier to access the Location file. You can bring your favorite folder with "Add folder ...".
You can change the name of the color of the collection label, and you can also organize the display from "Edit".
Clip settings used in session view
Drag and drop the sound source to Live and double-click the name of the clip.
Alternatively, display the "detailed view" with the triangle mark at the bottom right of the screen. Press [Shift + Tab] to switch between "Clip / Device View".
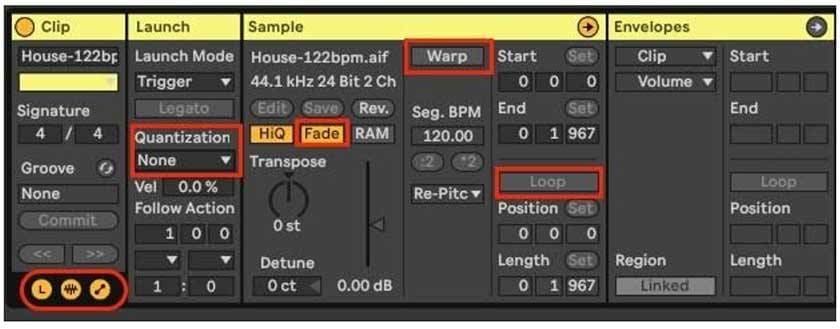
- Press the three circles at the bottom left of the screen to display all the clip information, and check that it looks like the one below. (Based on the initial settings)
- Loop [Invalid]… Do not play the loop.
- Warp [Disabled]… A setting that does not time stretch the audio file to match the master BPM.
- Fade… Generates a short fade at the end of the clip. You can avoid the clicking sound at the end of the waveform.
- Quantization [None]… Plays instantly when executed.
- Set the Launch Mode. In most cases, Trigger is fine.
- Launch Mode [Trigger]… A mode that plays to the end when executed. Basic configuration.
- Launch Mode [Gate]… Plays only while pressing, and stops when released.
- Launch Mode [Toggle]… Press once to play, press again to stop.
- Launch Mode [Repeat]… When pressed and held, Trigger again according to Quantization.
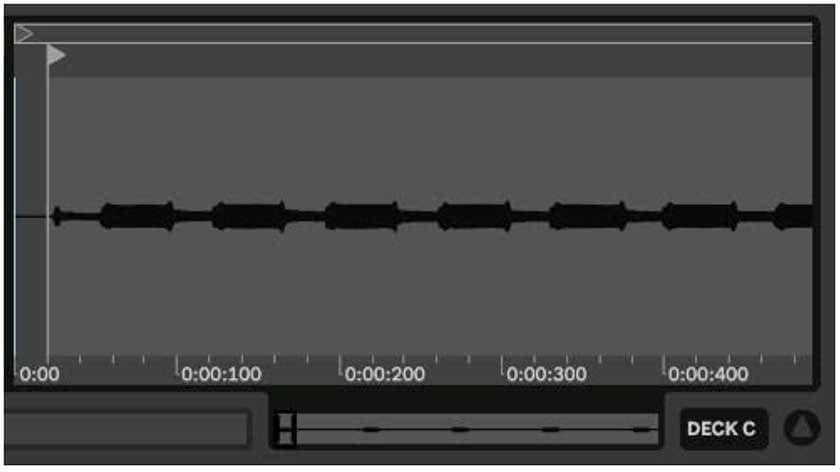
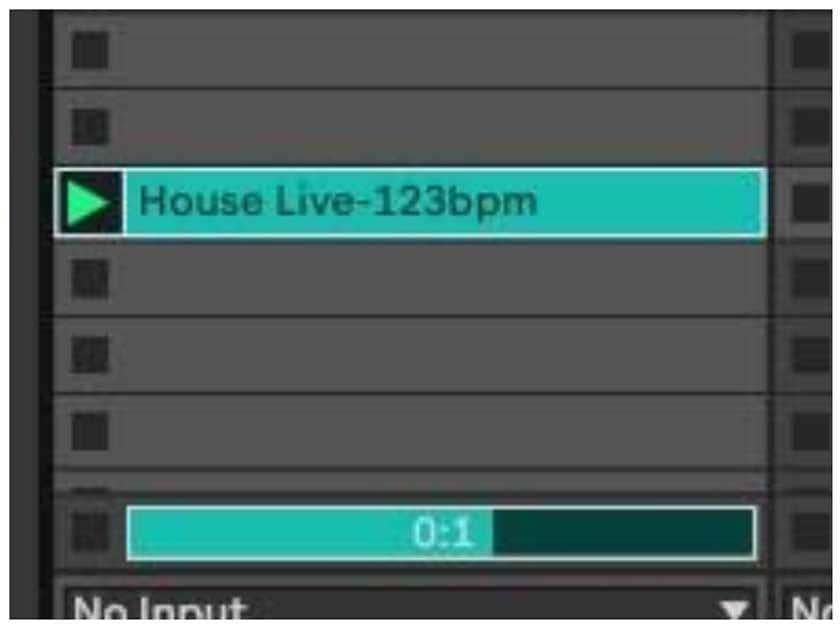
The flag-shaped triangle mark is the "start marker".
By moving the start marker, you can easily find the cue of the sound source without editing the waveform.
When [Warp] is enabled, you can move the waveform regardless of the grid by setting the fixed grid to [Off] from the right-click menu on the waveform.
It will be like this. The horizontally long rectangular triangle mark above the start marker is the "LOOP start position".
Drag up and down to zoom in and out on the horizontal time axis. Even the trackpad can be expanded by pinching out. You can also enlarge by pressing the [+] key / [-] key.
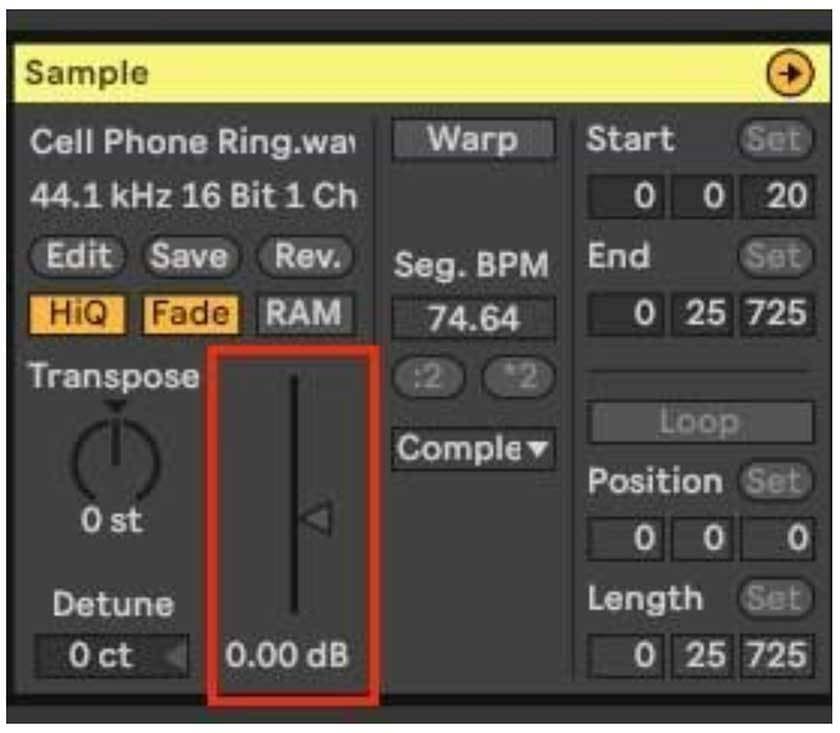
Adjust the volume individually by raising or lowering the clip gain of "Sample". At this time, the waveform is scaled on the vertical axis.
When the waveform is extremely enlarged with clip gain, turning off the track or lowering the fader a little can prevent a loud noise accidentally being emitted.
Don't forget to restore the original value after set-up. Double-click to return to 0 dB (default value).
Basic method used for sound effects, etc.
Example 1 TV show
Instead of setting the stereo mix output via the master, assign the sound effect to a single speaker so that it sounds natural.
- Track 1 → "Music.wav" Output from Ext. Out 1-2 to the main speaker for the audience
- Track 2 → "TV program state.wav" Output from Ext. Out 3-4 to TV speakers on the stage
Example 2 Announcement of examination results
Play the drum roll in LOOP, switch to the texture of the drum roll at any time, and play the fanfare after the announcement of the moderator.
This uses the function that only one clip of one track is played at one time.
- Track 1 slot 1 → "SE drum roll"
- Track 1 slot 2 → "SE drum roll texture!"
- Track 1 slot 3 → "SE fanfare"
Example 3 School chime
The school chime sound is not actually sampled using a microphone, but the school chime is played live with MIDI Notes.
With this method, a beautiful tone with less noise can be delivered to the audience, and the merit is that that the sound can be easily adjusted.
- MIDI Track Operator → Throw "Classic Bell1 Basic Bells" into the track and double-click the slot to create a MIDI clip.
Example 4 Reverse playback
If you press the [Rev.] Button of the Clip Sample once, the waveform will be reversed, and you can easily play it in reverse. Ideal for creating sounds.
Sound source output in session view

- Only one clip in the same track can be played. (In the same way that you can play only one track on a CD on a playback device.)
- If you continue to play clips on the same track, the previous clip will stop and you will switch to the clip that was selected after.
- When you press "Return to Arrangement", the sound of the arrangement takes precedence over the sound of the session. Pay attention to the [F10] key.
- Rewind & fast forward can be operated as a whole by dragging up or down on the bar counter (arrangement position).
- The remaining time of the playback clip is displayed to the right of the clip stop button on the track.

- Using a MIDI / KEY map, place a sample in an empty scene away from the actual scene and assign it to each button.
- Use a control surface such as the Launchpad series to place the sample in an empty scene away from the production scene.
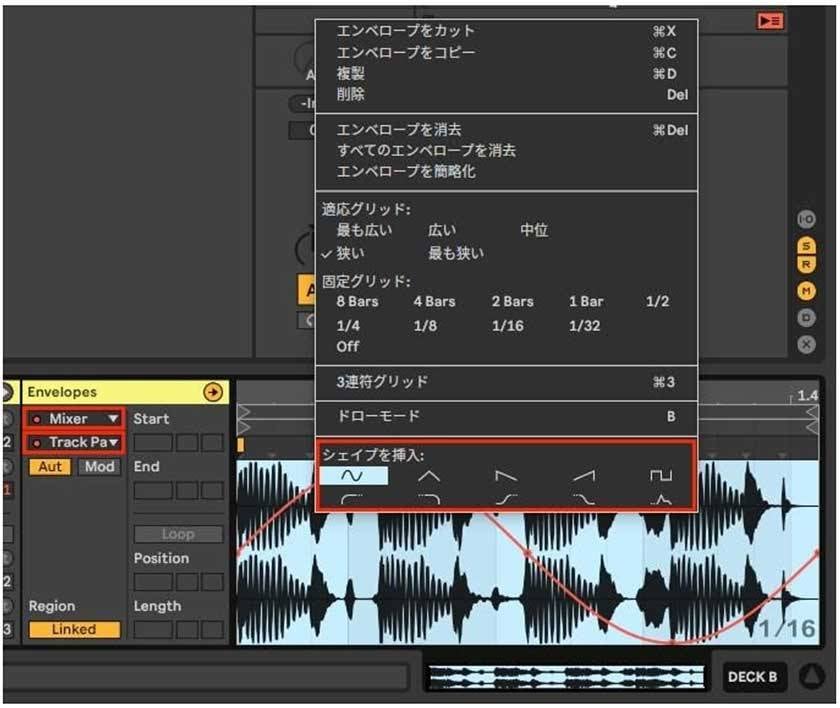
- If you enable [Warp] and select [Aut] from [Mixer] [Track Panning], you can draw in automation. (Please match the BPM to the master)
- You can also select a range in that state and select any curve from the right-click menu "Insert Shape" to adapt it.
- In addition to PAN, you can adjust the feed amount with [Return], and you can also select plug-ins used for tracks other than [Mixer] as adjustment targets.
Click out at the live venue
Set the output separately as you would for a sound effect.
It is most important to have the Click sound source prepared in advance along with the karaoke sound source.
- Track 1 → "Karaoke sound source" → Ext. Out 1-2
- Track 2 → "Click sound source" Ext. Out 3
However, there may be times when it becomes necessary to suddenly return the count to the start of singing to the IEM (in-ear monitor).
In such a case, enter the required count of notes with a MIDI clip and adjust the BPM, or record the count sound of the stick with Live and edit it. Timing adjustment is relatively smooth if you play back at the same time in the scene, enable [Warp] of the karaoke sound source, and then adjust back and forth with the very first warp marker (1.1.1).
* BPM master alignment and unnecessary markers have been deleted.
By performing in session view, you can sort the entire song by scene even when changing the song order, as long as the para-data for each song is summarized in the scene.
Sound source output in the arrangement view
- You can draw fades directly on clips without the use of automation.
- Movie compatible.
- It can be visually recognized on the timeline by both the passage of time and the number of measures.
- Easy to draw automation. Show / hide "Automation Lane" with [A] key.
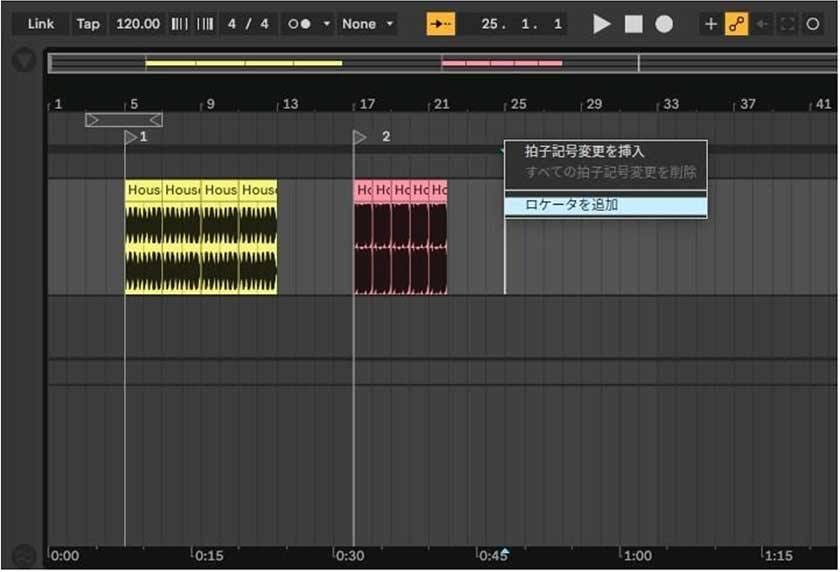
- By "adding a locator" and MIDI-mapping it to the locator like an MTR, you can recall it point at any time with a single button.
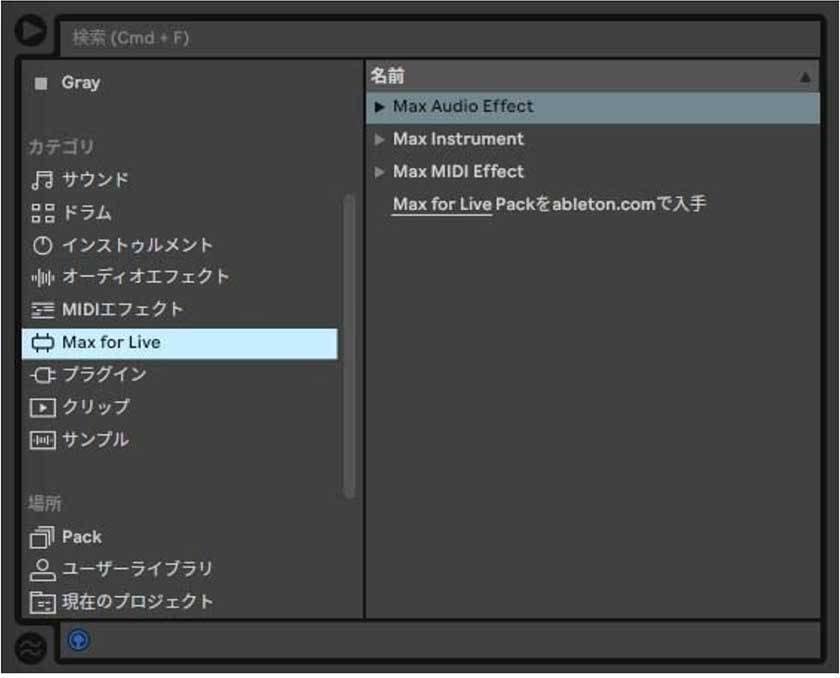
Max for Live (M4L)
One of the features provided by Suite that not only allows you to create your own M4L device, but also allows you to incorporate devices with various features published around the world into Live.
It is also sold separately for Standard users who say, "I don't use the Pack or plug-in that comes with Suite, but I want to use M4L."
(https://www.ableton.com/ja/shop/)
For those who are interested, we recommend the following sites.
[Device with Suite / M4L license]
"Surround Panner" (https://www.ableton.com/ja/packs/surround-panner/)
"Convolution Reverb" (https://www.ableton.com/ja/packs/convolution-reverb/)
[Show sync]
"Clip SMPTE" "Live MTC" (https://help.ableton.com/hc/ja/articles/209071149)
[Aconica]
"FIRE SCENE AT SET TIME" (https://youtu.be/tcG4Hy0RobY)
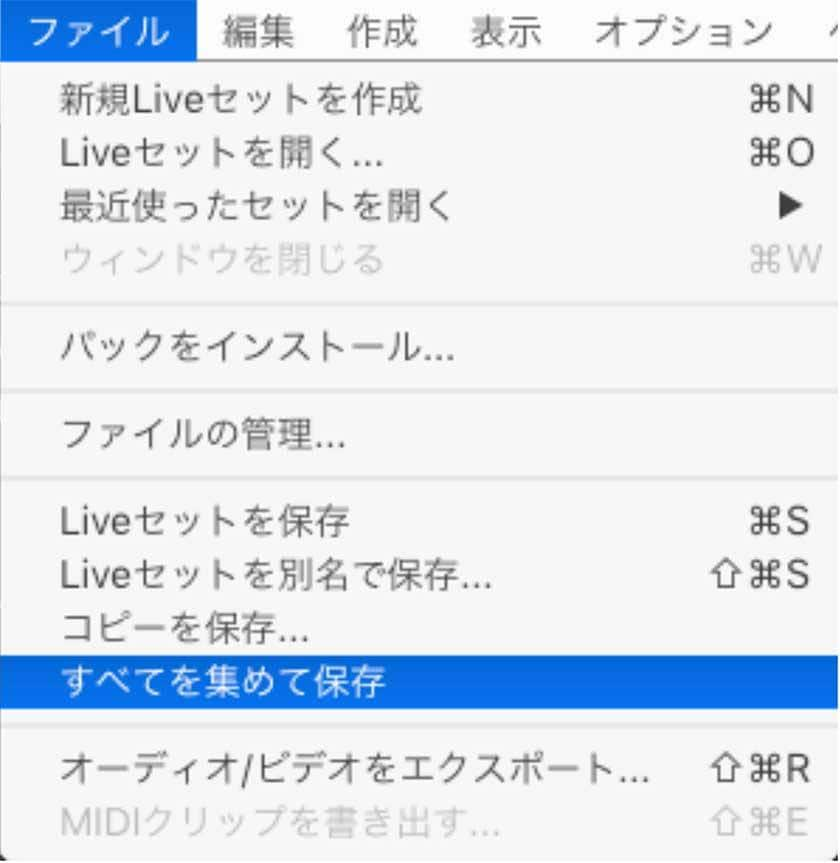
How to save
Precautions when saving -- the most important thing to do -- after assembling with Live.
If you are importing a sound source from an external medium such as a CD or SD card, "Save Live Set" will leave the sound source itself unimported to Live.
This is one of the reasons why the sound source disappears when you open Live with the media removed at a later date or when you save the backup of the set on an external HDD.
Get in the habit of performing "collect and save everything" so that the audio file is packed properly.
Finally…
So, what did you think?
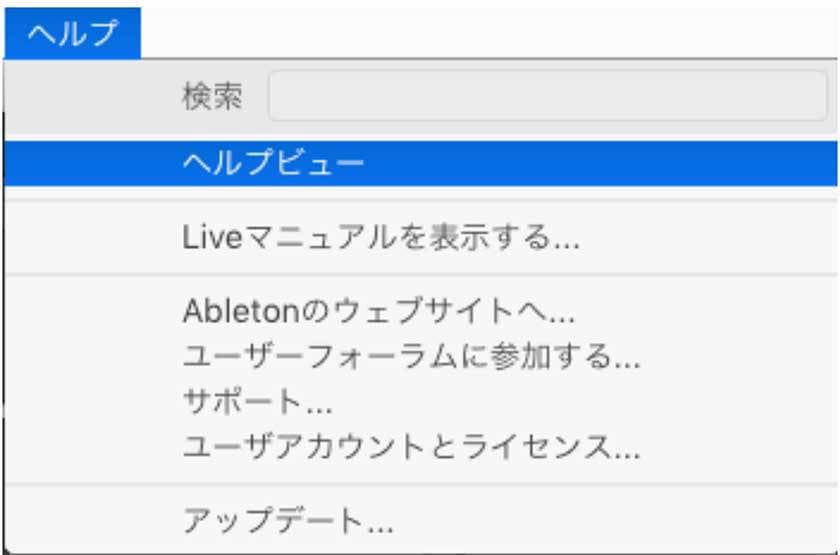
If you have any questions about Live, you can access the lessons from 1 to learn how to use it from the "Help View".
Of course the lessons are in Japanese.
Try using Ableton Live once with a pop-out.
I think you will be able to concentrate on the operation without being at the mercy of the operation of a pile of playback equipment.
In addition, the official tips for pop-out sample playback are also available, so please see here as well.
Burgtheater in Vienna, the city of music (https://www.ableton.com/ja/blog/burgtheater/)
Live on air (https://youtu.be/a3TWKUjiUJA) (English only)
Role of live manipulator (https://www.ableton.com/ja/blog/kei-kusama/)