


![]()
- Lessons for Beginners
- Stringed Instruments Beginner's Guide
- How to Handle a Violin
- How to Tune a Violin
How to Tune a Violin
Before you start to play your violin, you must tune it. It is difficult to tune all the strings at once. Humidity and temperature can affect the condition of the instrument, and the strings fall out of tune easily. Tune your instrument when needed.
When you tune a violin, check the bridge for tilting
When you tune a violin, it is safer to do it sitting on a chair. Professional violinists tune their instruments while in playing posture and it looks fascinating, but you don’t have to try to attempt to tune like them.
The tuning of the violin includes 3 actions.
Turning the pegs, turning the fine tuners, and checking the bridge for tilting.
Remember to check the bridge when tuning a violin.
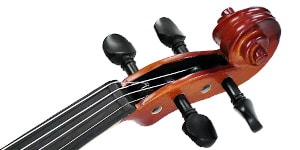
Violin pegs are the tapered round shaped sticks
At the end of the 17th century, the structure of the modern violin was developed in Europe, and it hasn’t changed much for hundreds of years.
The picture shows the pegs on the violin peg box, and its structure is very simple. It’s designed to be fixed with friction, so when the string is loose or not strung, the peg gets loose, too. When the tension of the string loosens the peg, push the peg into the peg hole to tighten the peg. However, it may still get loose due to dryness or getting knocked around, and the instrument may need further checkup and maintenance.
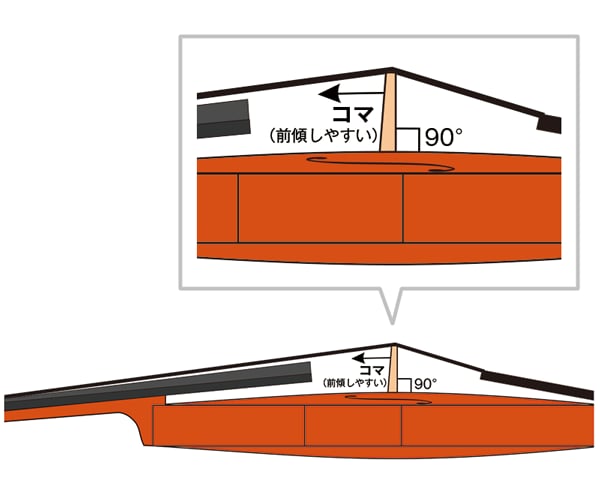
Before you start tuning, check to see that the bridge isn’t tilting first. This is very important as the bridge is responsible for helping your violin to resonate throughout the whole body.
As you can see in the picture, the backside of the bridge must be vertical against the surface of the violin body when looking from the side of the instrument.
You can check the angle with a ruler or the corner of a piece of paper.
The bridge usually tilts frontward when you tune the pitch sharper on a string. If you keep playing the violin without adjusting the bridge, the bridge could fall or warp.
The bridge in the proper straight position looks like a person is standing with his chest out. It may also look like it’s tilting backwards because of the shape of the bridge, but it could be actually tilting, so use a ruler to ensure the proper angle.
Attention! This is how to fix the bridge
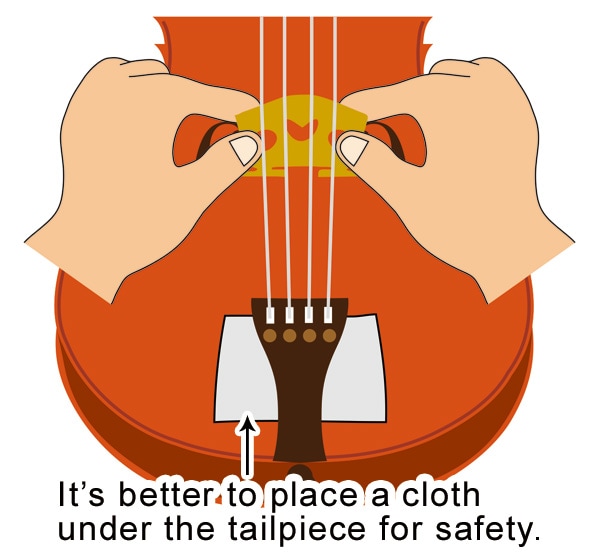
Sit on a chair, place the instrument on your lap as the picture shows. It’s better to place a cloth under the tailpiece for safety. Hold both sides on the upper end of the bridge with both hands, and try to gauge how easy or difficult it is to move the bridge.
It doesn’t require too much force to move it, but it may feel difficult at first. Please do it carefully with moderate force. It’s not that difficult once you get started, but it is tricky to achieve until you get used to it.
Following these 3 steps, “checking from the side, fixing the position, and rechecking the adjustment”, is what must be done as needed even during tuning.
Now it’s time to start tuning with pegs.
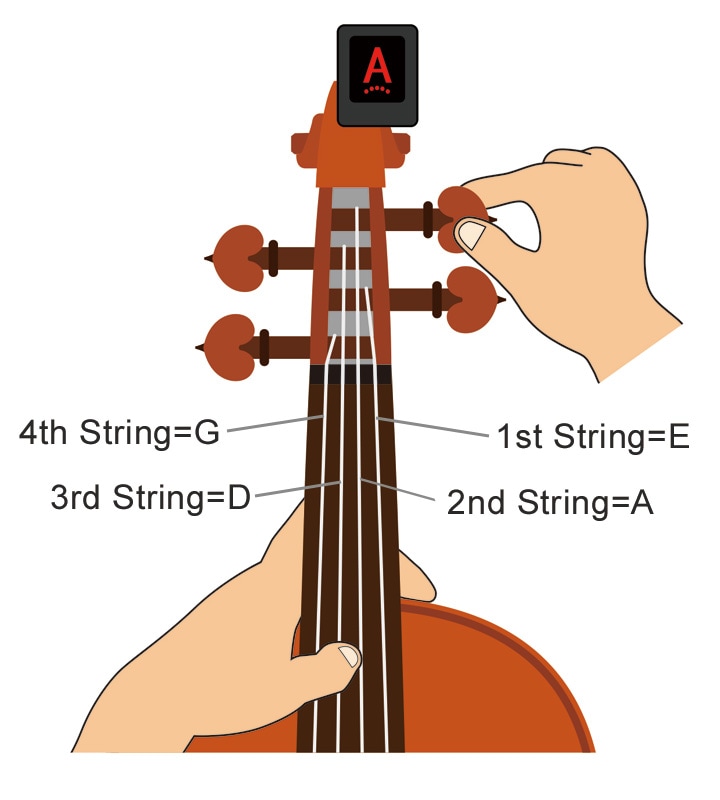
The tuning of the violin starting the highest string on the right is E-A-D-G, but the common order of tuning is starting from A and then moving onto D-G-E.
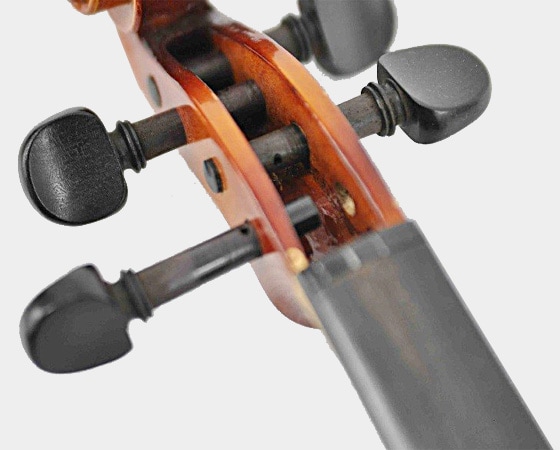
Attach a clip-on tuner to the headstock.
Hold the neck with your left hand, pluck the A string with your left thumb, and the tuner will display the pitch.
With your right hand, tighten the peg into the hole for a higher pitch and loosen the peg for a lower pitch.
Turn the peg on the A string and keep plucking the A string with your left thumb until it finally hits ‘A (la)’.
Then, switch to your right hand to hold the violin, pluck the D string with your right thumb, and turn the peg with your left hand until you get ‘D (re)’
In the same fashion, tune the G string to ‘sol’.
The 3 strings in the A-D-G order should be tuned by now, but the already tuned A string has now fallen slightly flat! Do you know why? This is due to the bridge, which has leaned slightly forward when you tuned the other strings, so it’s not an abnormal occurrence. Just refer to the previous guide and check and fix the bridge position here.
Go onto the E string to tune to ‘mi’, which is the highest note of the 4 strings. Don’t rush. As you increase the pitch, it’s “check and fix the bridge position” again. Go back to tune the A string and repeat tuning on all the strings until the tuning becomes stable to some extent.
Now use the fine tuners for smaller tuning adjustments and “check and fix the bridge position” again. If the bridge is tilting, fix it, and if it causes the pitch to go out, tune it again. In most cases, the procedure so far makes the tuning almost perfect with peg tuning alone, but for finer tuning, adjust the pitch with fine tuners as well. The structure of the fine tuners will be mentioned in another chapter.
Thank you for catching up! I hope you did well on your first violin tuning!
I think you might feel it’s difficult to tune the violin at first, but you have to get used to it as long as you play the violin. You’ll be able to do it easily as you keep on doing it.
I hope you know what “don’t panic, don’t rush, don’t give up” means. The hard work could be part of the fun in playing violin.
-
 Discount Sale
-
 Outlet
-
 New Arrivals
-
 Podcast (streaming)
-
 Headphones / Earphones
-
 Microphones
-
 Wireless Equipment
-
 Speakers
-
 Power Amps
-
 Mixers
-
 Processors
-
 Portable PA Systems
-
 Recorders
-
 Karaoke
-
 Guitars
-
 Basses
-
 Ukuleles
-
 Drums & Percussion
-
 Pianos / Synthesizers
-
 Wind Instruments
-
 Stringed Instruments
-
 Japanese Instruments
-
 Harmonicas, Other
-
 Software
-
 DJ & VJ
-
 Stands
-
 Cables & Connectors
-
 Racks & Cases
-
 Lighting
-
 Stage & Truss
-
 Video Equipment
-
 Computer Accessories
-
 Power Supplies
-
 Studio Furniture
-
 Household Items, Other
-
 Alcoholic Beverages
Search by Brand
Brand List


- Sound House
- 〒286-0825 14-3 Shinizumi , Narita City, Chiba
- Monday-Friday 10:00-17:00
- Narita Call Center
- TEL. 0476-89-1111
- FAX. 0476-89-2222
- Tokushima Call Center
- TEL. 0885-38-1111
- FAX. 0885-38-1100
- Showroom Hours
- Monday-Friday 10:00-17:00
closed on Saturdays, Sundays and Holidays
© Sound House
